
“`html
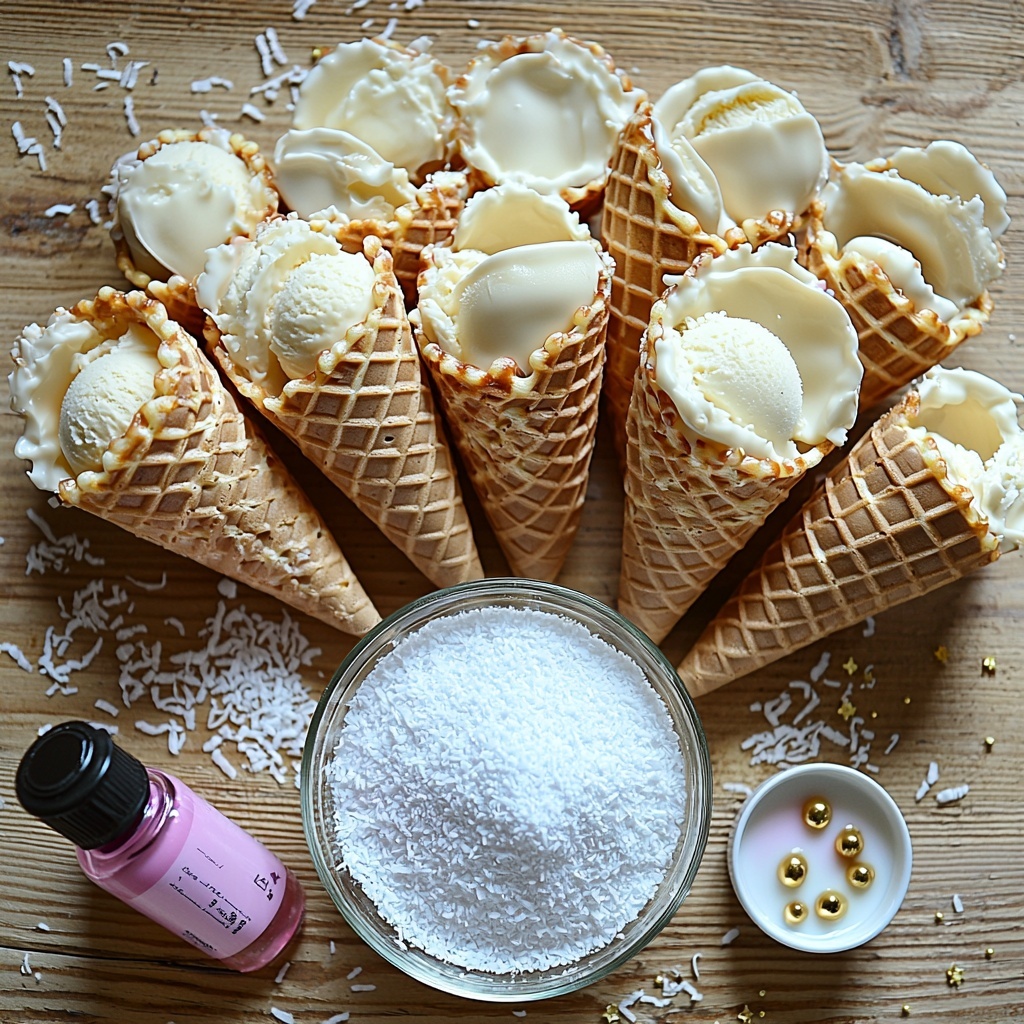
There is something truly magical about turning a classic sweet treat into a festive showstopper, and that’s exactly what the Coconut Ice Christmas Trees: Festive Fun for Family Treats Recipe delivers. These charming little trees bring together creamy coconut, luscious condensed milk, and crisp waffle cones into a colorful and delightful dessert that’s perfect for holiday celebrations. It’s a recipe that feels like a joyful tradition in the making, one that easily invites your kids or friends into the kitchen to create edible works of art that taste just as wonderful as they look.
Ingredients You’ll Need
These ingredients are simple, pantry-friendly essentials that come together to create texture, flavor, and that snowy festive vibe. Each component plays an important role—from the silky sweetness of icing sugar and condensed milk to the coconut’s natural chew and the vanilla’s fragrant warmth. Plus, those cones and chocolate transforms the whole experience into a playful holiday centerpiece.
- 500 grams Pure icing sugar: Provides the perfect sweet base and smooth texture, essential for classic coconut ice.
- 1 teaspoon Cream of tartar: Helps keep the icing sugar fluffy and light; can be omitted if you’re in a pinch.
- 395 grams Sweetened condensed milk: Adds rich, creamy sweetness binding everything together beautifully.
- 200 grams Desiccated coconut: Offers a lovely chew and authentic coconut flavor that is the star of the show.
- 1 teaspoon Vanilla essence: Brings a warm, fragrant note to the mix, making every bite comforting.
- A few drops Pink food coloring: Optional for that playful, candy-colored swirl, or swap this for any festive colors you like.
- 12 pieces Large waffle ice-cream cones: Serve as the base for your festive “trees,” adding both crunch and charm.
- 200 grams White chocolate melts: For decorating with a snowy drizzle; milk chocolate is a sweeter, creamy alternative.
- As needed grams Gold and white cachous, edible gold stars: These add sparkling holiday magic as natural tree ornaments.
How to Make Coconut Ice Christmas Trees: Festive Fun for Family Treats Recipe
Step 1: Prepare the Coconut Ice Mixture
Start by sifting the pure icing sugar together with the cream of tartar in a large bowl. This ensures your coconut ice will have a smooth, lump-free texture—so important for that delicate melt-in-your-mouth feel. Then stir in the sweetened condensed milk, desiccated coconut, and vanilla essence. The mixture will start to come together into a luscious, sticky dough that holds beautifully but feels light and airy.
Step 2: Add a Pop of Festive Color
Divide your coconut mixture into two halves. Tint one half with pink food coloring—or any festive hue you prefer—and gently crumble it over the white half. Swirl the two colors softly, creating a charming marbled effect that looks like candy cane swirls or snowy peppermint spots, adding a playful touch before shaping your trees.
Step 3: Shape Your Trees on Cones
Gently press the coconut mixture into each large waffle ice-cream cone. These cones become the base and trunk of your Christmas trees, giving structure and crunch beneath the sweet coconut ice. Pop the filled cones into the refrigerator and let them chill for about 30 minutes, allowing the coconut ice to set and firm up nicely so it holds its shape.
Step 4: Final Chill Before Decorating
After the initial set, carefully remove the cones from the coconut ice if they stick and then chill them again for another 30 minutes. This extra chill time ensures your coconut ice trees are firm and festive-ready, perfect for the finishing fun.
Step 5: Add Tinsel and Sparkle
Melt the white chocolate melts until silky smooth. Using a piping bag or a small spoon, drizzle the melted chocolate over your coconut ice Christmas trees, mimicking shiny tinsel garlands. Then, decorate with gold and white cachous, edible gold stars, or any sparkly sprinkles you have on hand to give each tree its own dazzling personality.
How to Serve Coconut Ice Christmas Trees: Festive Fun for Family Treats Recipe
Garnishes
Enhance your trees with extra edible glitter, a light dusting of icing sugar “snow,” or even tiny dried cranberry or raspberry bits for a pop of tartness and a fresh red contrast. These small touches really make your Coconut Ice Christmas Trees: Festive Fun for Family Treats Recipe feel like an indulgent holiday treat.
Side Dishes
Pair these sweet treats with a warm cup of hot chocolate or spiced mulled wine for adults — the cold, creamy coconut ice plays beautifully against warm, fragrant drinks. You could also complement the trees with a simple, fresh fruit salad to balance the sweetness.
Creative Ways to Present
Arrange your coconut ice Christmas trees on a platter lined with parchment paper, surrounded by sprigs of holly or evergreen for that true festive feel. You might even set them on a decorated cake stand or nestle them in a box wrapped in cellophane as delightful party favors. The fun of this recipe is how you can personalize the presentation to suit your holiday vibe.
Make Ahead and Storage
Storing Leftovers
Once prepared, wrap your coconut ice Christmas trees tightly in plastic wrap or store them in an airtight container. They will keep wonderfully in the refrigerator for about 3 to 4 days, staying fresh and perfectly firm to enjoy as a quick festive snack.
Freezing
If you want to make these treats well in advance, they freeze very well. Wrap each tree individually in cling film and place them in an airtight freezer bag or container. Frozen coconut ice Christmas trees can be stored for up to 2 months. Just thaw in the refrigerator before serving for the best texture.
Reheating
These treats are meant to be enjoyed cold, so reheating isn’t necessary or recommended. Simply remove from the fridge or freezer and allow them to come to a comfortable eating temperature, ensuring the white chocolate decorations remain intact and beautiful.
FAQs
Can I substitute powdered sugar for the pure icing sugar?
Absolutely! Powdered sugar works fine as a substitute, just ensure it’s finely sifted to maintain that smooth coconut ice texture.
What if I don’t have cream of tartar?
You can safely leave out the cream of tartar. It helps with texture but isn’t essential, so your coconut ice will still turn out delicious.
Can I use shredded coconut instead of desiccated?
Yes, shredded coconut will give you a slightly different, chunkier texture, which some people prefer. Both versions taste fantastic, so feel free to experiment.
What if I don’t have waffle cones?
Regular ice-cream cones can be used as an alternative, though waffle cones add a bit more sturdiness and charm to your Christmas trees.
How do I prevent the coconut ice from sticking to the cones?
Press the mixture firmly into the cones and refrigerate well. Chilling twice, as in the recipe, helps the coconut ice set firmly, making removal much easier and neater.
Final Thoughts
Making Coconut Ice Christmas Trees: Festive Fun for Family Treats Recipe is truly a joyful experience that brings everyone together and creates delightful memories along with delicious sweets. It’s approachable, visually stunning, and downright addictive. I encourage you to gather your favorite colors, cones, and sprinkles and give this recipe a go—it’s a festive project and treat you’ll find yourself coming back to every holiday season.
“`
Print
Coconut Ice Christmas Trees: Festive Fun for Family Treats Recipe
- Prep Time: 30 minutes
- Cook Time: 0 minutes
- Total Time: 1 hour 15 minutes
- Yield: 12 servings
- Category: Dessert
- Method: No-Cook
- Cuisine: Western
- Diet: Vegetarian
Description
Celebrate the festive season with these delightful Coconut Ice Christmas Trees, a fun and easy no-bake treat perfect for family gatherings. Made with creamy sweetened condensed milk and shredded coconut, these colorful, cone-shaped treats combine sweet, creamy, and crunchy textures, topped with decorative white chocolate tinsel and edible glitter for a magical holiday presentation.
Ingredients
Base Mixture
- 500 grams Pure icing sugar (Can substitute with powdered sugar if needed.)
- 1 teaspoon Cream of tartar (Can be omitted if unavailable.)
- 395 grams Sweetened condensed milk (Use regular or low-fat based on preference.)
- 200 grams Desiccated coconut (Shredded coconut can be used for a different texture.)
- 1 teaspoon Vanilla essence (Substitute with almond extract for a slightly different taste.)
- a few drops Pink food coloring (Optional and can be swapped for other colors.)
Assembly and Decoration
- 12 pieces Large waffle ice-cream cones (Regular cones can work in a pinch.)
- 200 grams White chocolate melts (Milk chocolate can be a sweeter alternative.)
- As needed Gold and white cachous, edible gold stars (Other edible glitter or sprinkles can also be used.)
Instructions
- Prepare Base Mixture: In a large bowl, sift together the pure icing sugar and cream of tartar to ensure a smooth, lump-free blend that will form the base of the coconut ice.
- Combine Ingredients: Stir in the sweetened condensed milk, desiccated coconut, and vanilla essence until the mixture is well combined, thick, and sticky.
- Tint the Mixture: Divide the mixture in half. Add a few drops of pink food coloring to one half and crumble the pink mixture over the white half, gently folding them together to create a marbled effect.
- Fill Cones: Carefully spoon and pack the coconut ice mixture into each waffle ice-cream cone, ensuring they are filled securely to hold their shape.
- Chill to Set: Place the filled cones upright in the refrigerator and chill for about 30 minutes until the mixture is set firmly.
- Additional Chilling: Once the cones can be removed from the set coconut ice, chill them for another 30 minutes to enhance firmness for easier decorating.
- Decorate: Melt the white chocolate melts gently until smooth. Pipe the chocolate onto the cones in a wavy pattern resembling tinsel, then decorate with gold and white cachous and edible gold stars to create a festive finish.
Notes
- The cream of tartar is optional but helps to stabilize the icing sugar mixture.
- If you prefer a less sweet treat, use low-fat condensed milk or adjust the amount of icing sugar slightly.
- Marbling the pink and white coconut ice adds a visually pleasing festive look.
- Regular ice cream cones can be substituted if waffle cones are unavailable, but texture and rigidity may vary.
- Melt chocolate gently over a double boiler or microwave at low power to prevent burning.
- Store the finished cones in an airtight container in the refrigerator and consume within 3-4 days for best freshness.


