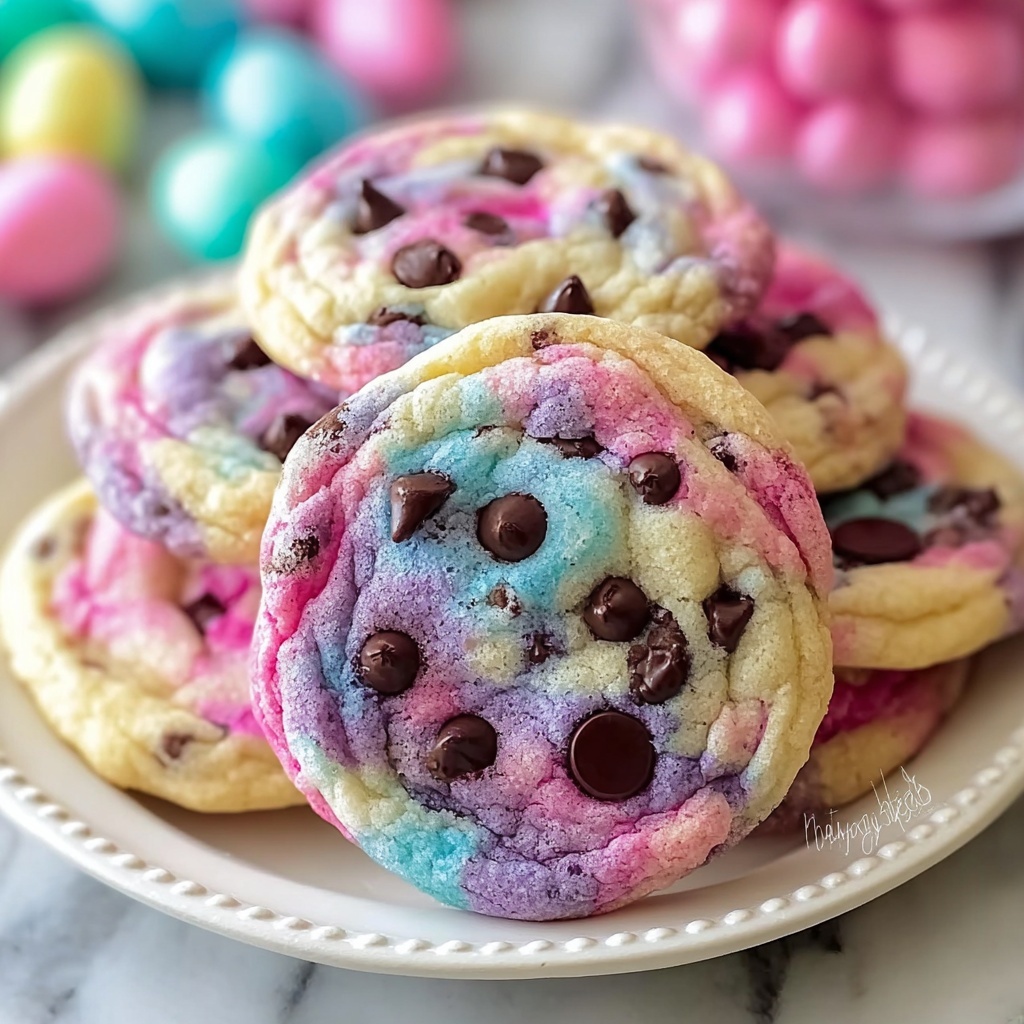
If you are searching for a cookie recipe that is as delightful to look at as it is to eat, then you are in for a treat with the Pastel Marbled Chocolate Chip Cookies with Easter M&M’s Recipe. This charming cookie features a playful swirl of pastel-colored dough combined with melty semi-sweet chocolate chips and vibrant Easter-themed M&Ms, creating a festive and irresistible twist on the classic chocolate chip cookie. Perfect for celebrating springtime gatherings or adding a splash of color to your cookie jar, these cookies bring together nostalgia, sweetness, and creativity in each soft, chewy bite.
Ingredients You’ll Need
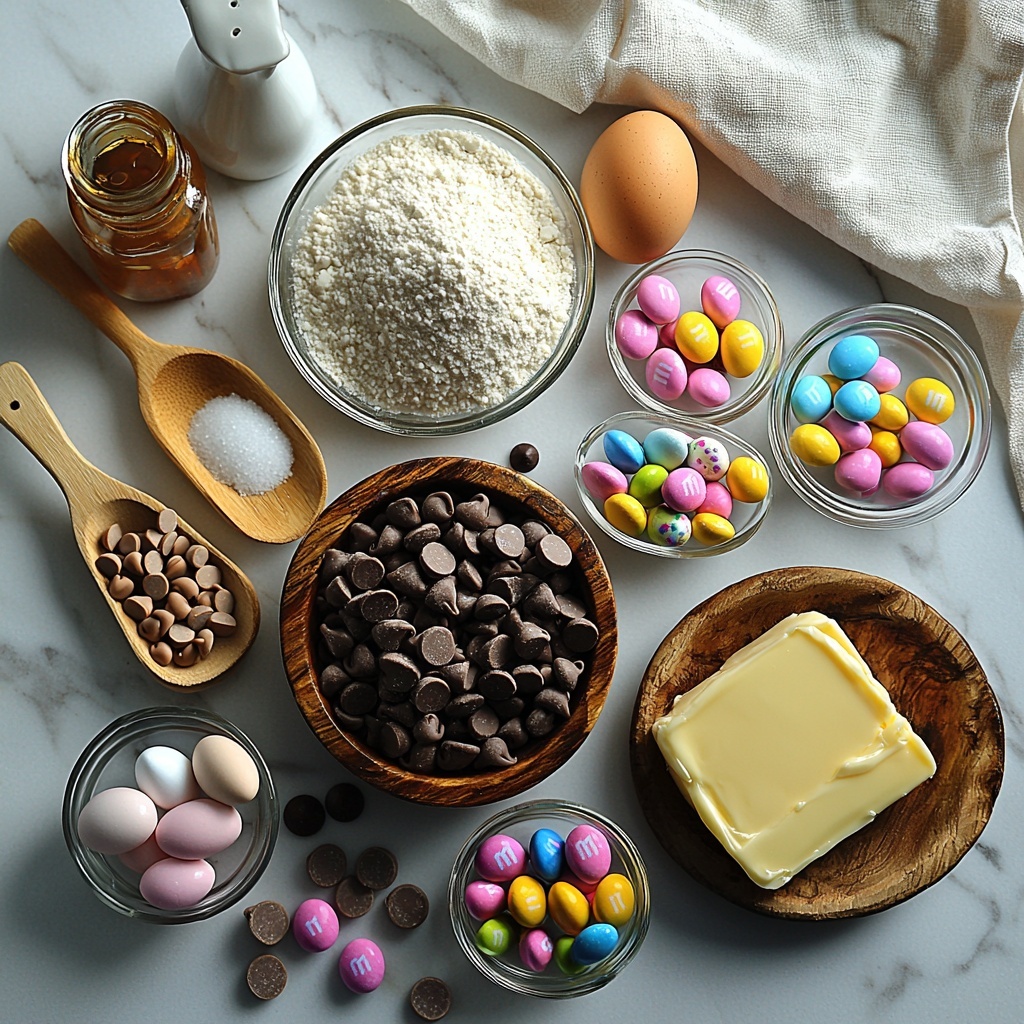
To make these enchanting cookies, you only need a handful of familiar ingredients that each play an essential role in building the perfect texture, flavor, and color. From the basic baking staples to the special pastel food coloring and festive M&Ms, everything comes together beautifully for a cookie that’s as fun to make as it is to share.
- 2 ½ cups all-purpose flour: Provides the structure and chewiness that make the cookies just right.
- 1 teaspoon baking soda: Acts as a leavening agent to help the cookies rise perfectly.
- ½ teaspoon salt: Balances the sweetness and enhances all the flavors.
- 1 cup unsalted butter, softened: Adds rich, creamy moisture essential for soft cookies.
- ¾ cup granulated sugar: Gives sweetness and helps cookies develop a slight crispness on the edges.
- ¾ cup packed brown sugar: Contributes deep caramel notes and helps maintain a chewy center.
- 2 large eggs: Bind the ingredients and add tenderness.
- 2 teaspoons vanilla extract: Infuses warm, aromatic flavor throughout the dough.
- 1 ½ cups semi-sweet chocolate chips: The classic melty pockets of chocolate everyone loves in a cookie.
- 1 cup Easter-themed M&Ms, plus extra for topping: Festive, colorful candies that add fun and crunch.
- Gel food coloring (pastel pink, purple, yellow, and blue): These concentrated colors ensure vibrant pastels without changing dough texture.
How to Make Pastel Marbled Chocolate Chip Cookies with Easter M&M’s Recipe
Step 1: Prepare Your Dry Ingredients
Begin by whisking together the all-purpose flour, baking soda, and salt in a medium bowl. This pre-mixing ensures the leavening agent and salt are evenly distributed throughout your flour, which is key to consistent texture and flavor in every bite.
Step 2: Cream the Butter and Sugars
In a large mixing bowl, cream together the softened butter with granulated sugar and brown sugar using an electric mixer. Beat until the mixture is light and fluffy—this aerates the dough to make your cookies delightfully tender with just enough puff.
Step 3: Add the Eggs and Vanilla
Add the eggs one at a time to the butter-sugar mixture, mixing well after each addition to ensure everything is fully incorporated. Then, mix in the vanilla extract to infuse that classic cookie aroma and sweetness that makes homemade cookies irresistible.
Step 4: Combine Wet and Dry Ingredients
Gradually add the dry flour mixture to your wet ingredients, mixing on low speed to bring the dough together without overworking. Overmixing can make cookies tough, so stop as soon as the flour streaks disappear.
Step 5: Add Chocolate Chips and M&Ms
Fold in the semi-sweet chocolate chips and the Easter-themed M&Ms gently to distribute the colorful candy and luscious chocolate throughout the dough evenly.
Step 6: Divide and Color the Dough
Now comes the fun part: divide your cookie dough into four equal portions. Using gel food coloring, tint each portion a different pastel shade—pink, purple, yellow, and blue. Use gel colors for vibrant hues without watering down your dough. Mix each portion gently until you achieve an even shade.
Step 7: Create the Marbled Effect and Shape
Take small amounts from each colored dough then press them together lightly without mixing fully—this process creates the beautiful pastel marbled look. Roll these marbled portions into roughly 2-tablespoon balls, making sure not to overblend so the colors stay distinct.
Step 8: Prepare for Baking
Place your dough balls on a parchment-lined baking sheet spaced about 2 inches apart. Press a few extra Easter M&Ms gently on top of each ball to give a festive pop of color and sweetness right on the surface. Then, cover and refrigerate the baking sheet for at least 30 minutes. Chilling firms up the dough, preventing excessive spreading and helping the marbling stay intact during baking.
Step 9: Bake to Perfection
Preheat your oven to 350°F (175°C). Bake the chilled dough balls for 10-12 minutes or until the edges are set and have a slight golden color, while the centers may look a bit underbaked. That’s exactly right as they will firm up while cooling, resulting in a soft, tender center with crispy edges.
Step 10: Cool and Enjoy
Allow the cookies to cool on the baking sheet for about 5 minutes, giving them time to firm up more before transferring to a wire rack to cool completely. This resting period is crucial for achieving the perfect texture in every bite.
How to Serve Pastel Marbled Chocolate Chip Cookies with Easter M&M’s Recipe
Garnishes
For an extra festive touch, sprinkle a few pastel sugar crystals or mini pastel sprinkles on top immediately after baking. These tiny bursts of color add sparkle and an inviting crunch that will wow anyone reaching for a cookie. A light dusting of powdered sugar can also enhance their soft appearance.
Side Dishes
These cookies pair wonderfully with a classic cold glass of milk or a warm mug of vanilla or cinnamon-spiced tea. For an indulgent snack, try serving them alongside creamy vanilla ice cream or a dollop of whipped cream for the ultimate sweet treat experience.
Creative Ways to Present
To really impress guests, arrange these pastel marbled cookies on a tiered dessert stand or in a pastel-themed basket lined with tissue paper matching the cookie colors. You can also wrap individual cookies in cellophane tied with pastel ribbons for easy gifting or party favors.
Make Ahead and Storage
Storing Leftovers
Once baked and completely cooled, store your cookies in an airtight container at room temperature. They will stay fresh and chewy for 3-4 days, making them perfect for enjoying over several days or sharing with friends and family.
Freezing
You can freeze unbaked dough balls by placing them on a baking sheet and freezing until solid, then transferring them to a freezer bag or container for up to 3 months. When ready, bake directly from frozen, adding a couple of extra minutes to the baking time. Baked cookies can also be frozen in airtight containers and thawed at room temperature before serving.
Reheating
If you want to enjoy your cookies warm, simply reheat them in a preheated oven at 300°F (150°C) for 5-7 minutes or microwave individually for about 10-15 seconds. This brings back that freshly-baked softness and melts the chocolate chips just right.
FAQs
Can I use different colors for the marbled dough?
Absolutely! The pastel pink, purple, yellow, and blue are festive and perfect for Easter, but you can customize the colors to fit any occasion or your personal preference. Just be sure to use gel food coloring to avoid altering the dough’s texture.
What if I don’t have Easter M&Ms?
No problem at all! You can substitute with regular M&Ms, mini chocolate chips, or even chopped colorful candy pieces. The key is to ensure the colors shine through to create that playful, festive look.
Is it necessary to chill the dough balls before baking?
Yes, chilling helps the cookies retain their marbled shape and prevents them from spreading too much in the oven. It also enhances the flavor and texture by allowing the butter to solidify slightly.
Can I make these cookies gluten-free?
To make a gluten-free version, use a trusted gluten-free all-purpose flour blend that includes xanthan gum. Keep in mind that the texture might vary slightly, but the cookies will still be delicious and festive!
How should I store the cookies if I want to keep them soft?
Store the cookies in an airtight container at room temperature with a slice of bread or a damp paper towel in and sealed separately from the cookies. This will help maintain moisture and keep them soft for 3-4 days.
Final Thoughts
There’s something truly magical about the Pastel Marbled Chocolate Chip Cookies with Easter M&M’s Recipe. It’s more than just a cookie—it’s a celebration of color, flavor, and joyful creativity baked right into a classic treat. Whether you’re baking for a special occasion or simply brightening up your day, these cookies are guaranteed to bring smiles and sweet moments to everyone lucky enough to try them. So roll up your sleeves, grab those pastel gels, and get ready to create a batch of cookies that are as fun to make as they are to eat!
Print
Pastel Marbled Chocolate Chip Cookies with Easter M&M’s Recipe
- Prep Time: 15 minutes
- Cook Time: 12 minutes
- Total Time: 27 minutes plus 30 minutes chilling
- Yield: 24 servings
- Category: Dessert
- Method: Baking
- Cuisine: American
Description
Delight in these festive Chocolate Chip Cookies featuring a unique marbled pastel effect created by coloring separate portions of the dough. Loaded with semi-sweet chocolate chips and Easter-themed M&Ms, these cookies are perfect for spring celebrations and bring vibrant color and classic sweetness together in every bite.
Ingredients
Dry Ingredients
- 2 ½ cups all-purpose flour
- 1 teaspoon baking soda
- ½ teaspoon salt
Wet Ingredients
- 1 cup unsalted butter, softened
- ¾ cup granulated sugar
- ¾ cup packed brown sugar
- 2 large eggs
- 2 teaspoons vanilla extract
Add-ins & Coloring
- 1 ½ cups semi-sweet chocolate chips
- 1 cup Easter-themed M&Ms, plus extra for topping
- Gel food coloring (pastel pink, purple, yellow, and blue)
Instructions
- Prepare the Dough: In a medium bowl, whisk together the all-purpose flour, baking soda, and salt. Set this mixture aside to be incorporated later.
- Cream Butter and Sugars: In a large mixing bowl, use an electric mixer to cream the softened unsalted butter with granulated sugar and packed brown sugar until the mixture is light and fluffy, ensuring a smooth base for the cookies.
- Add Eggs: Add eggs to the butter and sugar mixture one at a time, mixing well after each addition to fully incorporate and maintain a creamy texture.
- Mix in Vanilla: Stir in the vanilla extract thoroughly until well combined for added flavor.
- Combine Wet and Dry Ingredients: Gradually add the flour mixture to the wet ingredients, mixing on low speed just until combined, careful to avoid overmixing which can toughen the cookies.
- Fold in Chocolate and M&Ms: Gently fold in the semi-sweet chocolate chips and 1 cup of Easter-themed M&Ms, distributing them evenly throughout the dough.
- Color the Dough: Divide the cookie dough into four equal portions. Tint each portion with a different pastel gel food coloring (pink, purple, yellow, and blue) by mixing gently until the dye is evenly incorporated.
- Create Marbled Dough Balls: Take small amounts from each colored portion and press them lightly together without overmixing to maintain the separate colors, creating a marbled effect.
- Shape Cookies: Roll these multicolored portions into balls about 2 tablespoons each and place them spaced about 2 inches apart on a parchment-lined baking sheet.
- Top with Extra M&Ms: Press a few extra Easter-themed M&Ms onto the tops of each cookie ball for visual appeal and bursts of sweetness.
- Chill Dough: Cover the baking sheet with plastic wrap and refrigerate the dough balls for at least 30 minutes to firm up, which helps maintain their shape during baking.
- Preheat Oven: Preheat your oven to 350°F (175°C) to the correct temperature for baking.
- Bake Cookies: Place the chilled dough balls on the baking sheet spaced evenly. Bake for 10-12 minutes or until the edges are set and slightly golden, while the centers may look underbaked but will firm upon cooling.
- Cool Cookies: Allow cookies to cool on the baking sheet for about 5 minutes before transferring them to a wire rack to cool completely, ensuring they set properly.
Notes
- For best results, use gel food coloring rather than liquid to avoid affecting dough consistency.
- Refrigerating the dough balls is essential to prevent spreading during baking and to maintain the marbled effect.
- Use parchment paper or a silicone baking mat to prevent sticking and promote even baking.
- These cookies keep well in an airtight container for up to 5 days and can also be frozen before or after baking.
- If you prefer a more intense flavor, consider adding a pinch of cinnamon or espresso powder to the dry ingredients.


