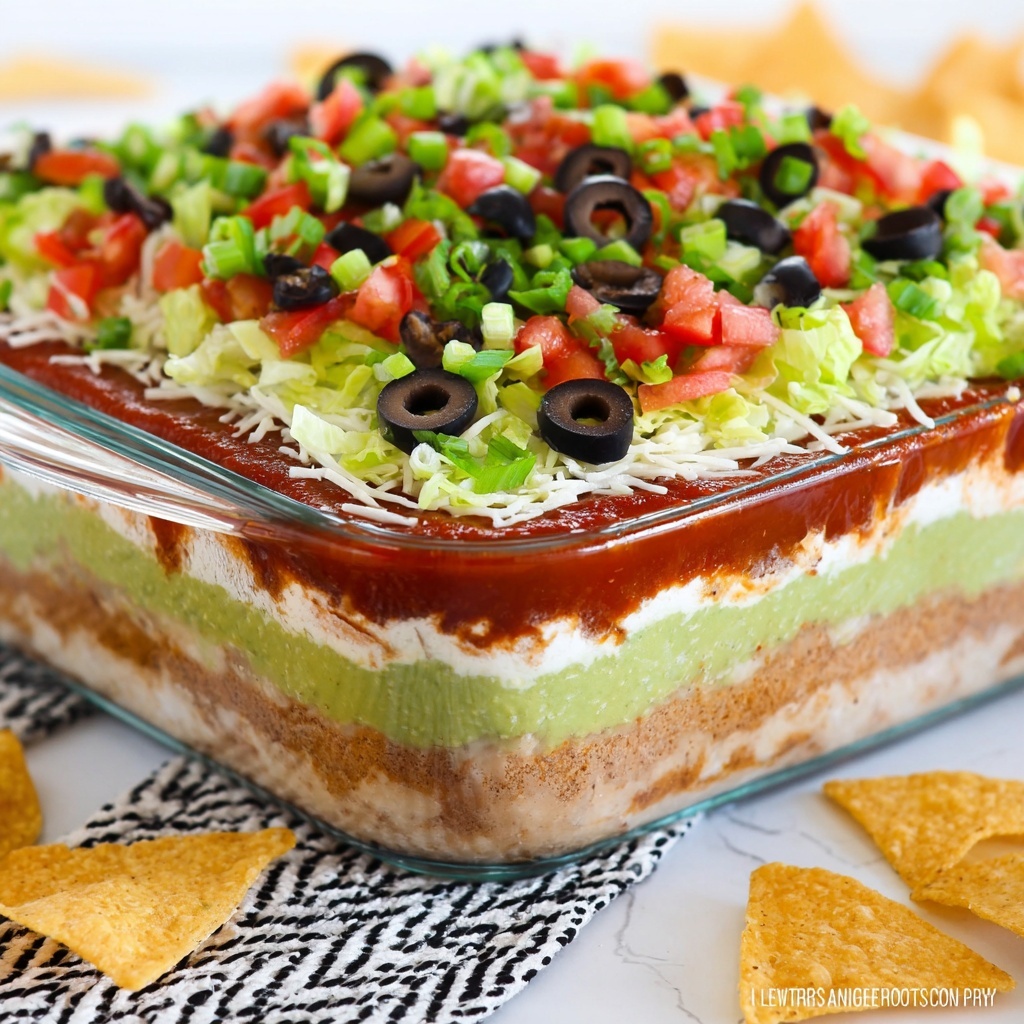
If you’re craving a vibrant, flavorful, and crowd-pleasing appetizer, this 7 Layer Dip Recipe is exactly what you need to bring to your next gathering or enjoy as a fun snack at home. Each carefully layered ingredient adds its own unique taste and texture, creating a harmonious blend that’s creamy, tangy, fresh, and just downright irresistible. Whether you’re a seasoned dip lover or just discovering this classic, get ready for a dip experience that’s as visually stunning as it is delicious.
Ingredients You’ll Need
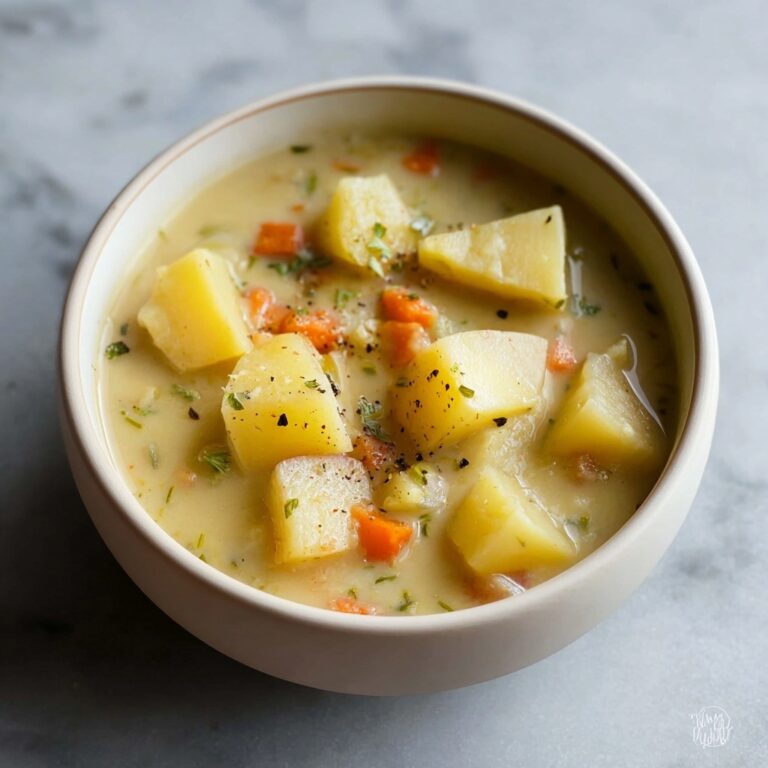
Creating this 7 Layer Dip Recipe is wonderfully straightforward because the ingredients are simple yet essential. Each one brings its own vibrant flavor and texture, from the smooth refried beans to the crisp lettuce and creamy guacamole, making this dip a delightful combination of tastes and colors.
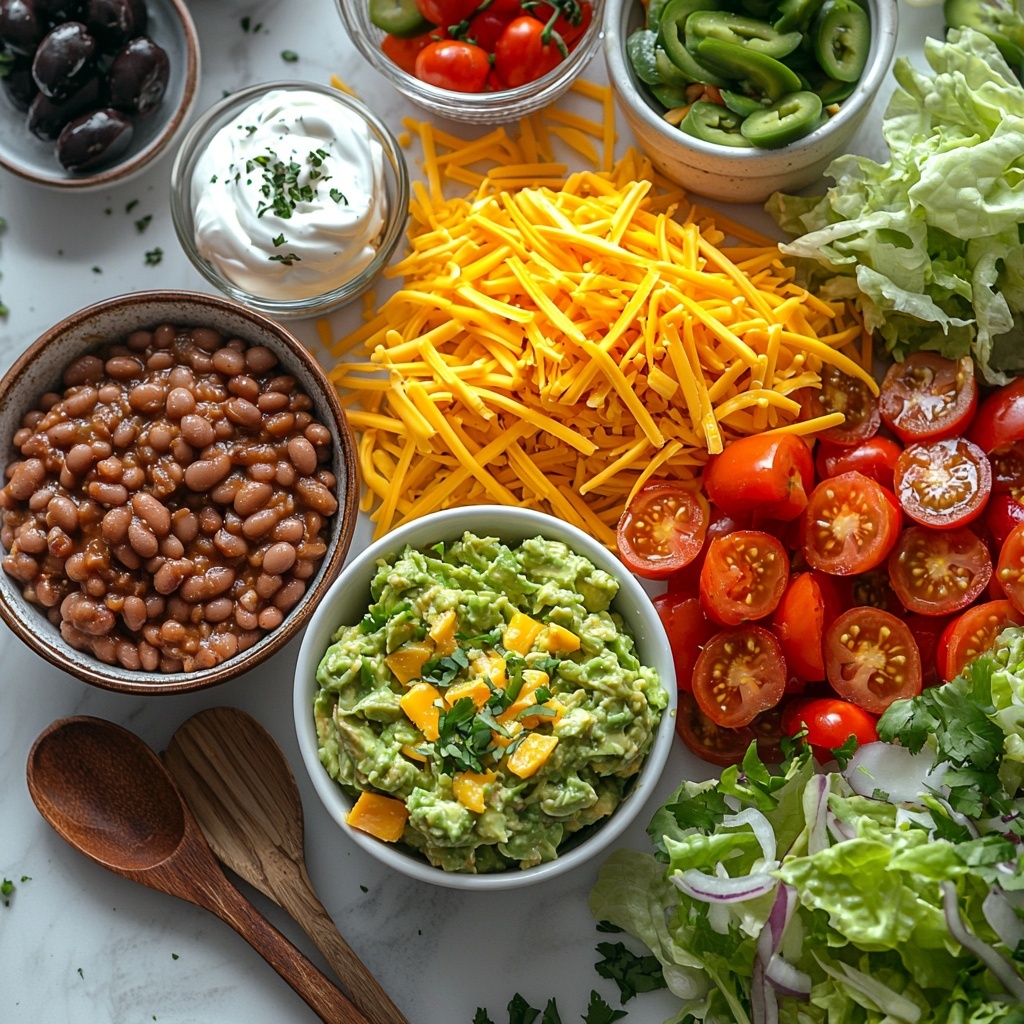
- 32 ounces canned refried beans: The hearty base that gives the dip its creamy, savory foundation.
- 3 tablespoons water: Added to the beans to create the perfect smooth consistency for spreading.
- 1½ cups premade mild guacamole: Adds a rich, buttery layer with fresh avocado flavor.
- 2 cups sour cream: Provides creamy tang that balances warm spices perfectly.
- 1 ounce packet mild taco seasoning: Mixed into the sour cream for a subtle, zesty kick.
- 16 ounces chunky mild salsa: Drained to avoid sogginess, contributes bold tomato and pepper flavors.
- 2 cups shredded lettuce: Adds a crisp, refreshing crunch and brightens up the dip visually.
- 2 cups pre-shredded fiesta blend cheese: Melts slightly and brings a savory, cheesy richness.
- 2.25 ounces sliced black olives: Adds tangy, briny bites for complexity.
- 1 cup chopped roma tomatoes: Fresh, juicy bursts that complement the other layers.
- ½ cup thinly sliced green onions: A mild oniony finish that tops the dip with fresh aroma and color.
How to Make 7 Layer Dip Recipe
Step 1: Prepare the Refried Beans
Start by placing the canned refried beans in a small mixing bowl, then stir in 3 tablespoons of water until the mixture is smooth and easily spreadable. This step ensures the beans layer isn’t too thick or dry, making it perfect as the foundational layer of your dip.
Step 2: Layer the Beans
Using a silicone spatula or an offset spatula, spread the refried beans evenly across the bottom of a 9×13 baking dish. A clear glass dish works wonderfully here, as it beautifully displays all the colorful layers from the side as well as the top.
Step 3: Add the Guacamole Layer
Next, smoothly spread the premade mild guacamole over the refried beans. This creamy, velvety layer adds an unmistakable freshness and richness that pairs beautifully with the beans underneath.
Step 4: Mix and Spread the Sour Cream
In a separate bowl, combine the sour cream with the mild taco seasoning packet. Whisk until the seasoning is fully blended in, creating a tangy and mildly spiced cream layer. Spread this mixture evenly over the guacamole, adding a zesty creaminess that balances the dip.
Step 5: Layer on the Salsa
Drain the chunky mild salsa through a fine mesh strainer to remove excess liquid, which keeps the dip from becoming watery. Spread the salsa gently over the sour cream layer, bringing a fresh, tomatoey, and slightly spicy element to the middle of the dip.
Step 6: Sprinkle the Cheese and Lettuce
Evenly sprinkle the shredded fiesta blend cheese across the salsa, then layer the shredded lettuce over the cheese. These two layers add a mix of savory gooeyness and crisp crunch, making the dip fun to bite into.
Step 7: Add the Olives, Tomatoes, and Onions
Top your masterpiece by spreading the well-drained sliced black olives, followed by the chopped roma tomatoes (take a moment to pat away any extra juice), and finally, sprinkle the thinly sliced green onions on top. These final touches add brightness, a hint of saltiness, and a fresh finish to every bite.
Step 8: Chill Before Serving
Cover the dip tightly with plastic wrap and refrigerate for at least 1 hour. This rest time allows the flavors to meld beautifully, resulting in a dip that’s even more delicious once chilled and ready to serve.
How to Serve 7 Layer Dip Recipe
Garnishes
You can enhance the presentation and taste by adding a sprinkle of fresh chopped cilantro, a dash of smoked paprika, or a few jalapeno slices on top. These garnishes add color contrast plus an exciting burst of flavor that invites your guests to dig right in.
Side Dishes
Tortilla chips are the classic pairing for this 7 Layer Dip Recipe, but don’t stop there. Serve it alongside crunchy vegetable sticks like bell peppers, cucumbers, or carrot sticks for a lighter but equally satisfying way to enjoy the layers.
Creative Ways to Present
For a fun twist, spoon the dip into individual small cups or glasses for party guests, or use it as a layered filling in a taco salad bowl. You can also portion it layered in mason jars for portable snacks—all while keeping that iconic seven-layer look intact.
Make Ahead and Storage
Storing Leftovers
Once assembled and chilled, this 7 Layer Dip Recipe can be stored in the refrigerator for 3-4 days. Keep it covered tightly with plastic wrap or in an airtight container to maintain freshness and prevent odors from other foods from seeping in.
Freezing
Due to its fresh vegetable and dairy layers, freezing is not recommended for this dip as it can alter the texture and flavor, particularly of the lettuce, tomatoes, and sour cream mixture.
Reheating
This dip is best enjoyed cold or at room temperature. If you prefer a warm version, consider warming individual layers like the refried beans separately, then reassemble with the fresh ingredients before serving.
FAQs
Can I make this 7 Layer Dip Recipe vegan?
Absolutely! Simply swap out the sour cream for a dairy-free alternative and choose vegan cheese, while ensuring all other ingredient choices are vegan-friendly. The flavor will still be fantastic.
What can I substitute if I don’t have pre-shredded cheese?
You can shred your own cheese using cheddar, Monterey Jack, or a similar blend. Freshly shredded cheese tends to melt better and enhances the texture of the dip.
How far in advance can I prepare this dip?
This dip is best made the same day but can be assembled up to a few hours ahead and refrigerated. Just be sure to keep it covered to maintain freshness and prevent drying out.
Is this dip spicy?
This particular 7 Layer Dip Recipe is mild, thanks to the use of mild taco seasoning and salsa. You can easily increase the spice level by choosing spicy salsa or adding jalapenos.
Can I add other layers to customize this dip?
Definitely! While the classic 7 layers are perfect as is, feel free to add layers like cooked ground beef or black beans, corn, or fresh cilantro to make it uniquely yours.
Final Thoughts
This 7 Layer Dip Recipe is a guaranteed crowd-pleaser that combines simple ingredients into a spectacular, layered experience that’s as fun to make as it is to eat. Whether for game day, parties, or a casual snack, I encourage you to give it a try and watch everyone come back for seconds. Trust me—it’s one of those timeless dishes that never disappoints!
Print
7 Layer Dip Recipe
- Prep Time: 15 minutes
- Cook Time: 0 minutes
- Total Time: 1 hour 15 minutes
- Yield: 12 servings
- Category: Appetizer
- Method: No-Cook
- Cuisine: Mexican
Description
A delicious and colorful 7 Layer Dip featuring layers of seasoned refried beans, creamy guacamole, zesty sour cream, chunky salsa, shredded cheese, crisp lettuce, black olives, fresh tomatoes, and green onions. Perfect as a party appetizer or snack served chilled with tortilla chips.
Ingredients
Bean Layer
- 32 ounces (2 16-ounce cans) refried beans (I used Old El Paso brand)
- 3 tablespoons water
Guacamole Layer
- 1½ cups premade mild guacamole (I used Walmart brand – Freshness Guaranteed)
Sour Cream Layer
- 2 cups sour cream
- 1 ounce packet mild taco seasoning (I used Great Value brand)
Salsa Layer
- 16 ounces chunky mild salsa (I used Pace brand), drained through a mesh strainer
Toppings
- 2 cups shredded lettuce
- 2 cups pre-shredded fiesta blend cheese (I used Great Value brand)
- 2.25 ounces sliced black olives (I used Mario brand), well drained
- 1 cup chopped roma tomatoes
- ½ cup thinly sliced green onions
Instructions
- Prepare Refried Beans: Add the canned refried beans to a small mixing bowl. Add 3 tablespoons of water and stir until completely combined and smooth to make spreading easier.
- Spread Beans: Use a silicone or offset spatula to evenly spread the refried beans into the bottom of a 9×13 inch baking dish, creating the first layer.
- Add Guacamole Layer: Evenly spread the premade guacamole over the refried beans layer to create the second layer.
- Season Sour Cream: In a small mixing bowl, add the sour cream and sprinkle in the packet of mild taco seasoning. Whisk well until fully incorporated to enhance flavor.
- Spread Sour Cream Layer: Spread the seasoned sour cream mixture evenly over the guacamole layer.
- Drain and Add Salsa: Drain the chunky mild salsa through a mesh strainer to remove excess liquid, then spread it evenly over the sour cream layer.
- Add Cheese Layer: Sprinkle the shredded fiesta blend cheese evenly over the salsa layer.
- Add Lettuce Layer: Sprinkle shredded lettuce evenly over the cheese layer for a fresh crunch.
- Add Black Olives: Drain sliced black olives well and sprinkle them evenly over the lettuce.
- Add Tomatoes: Sprinkle chopped roma tomatoes over the black olives. Pat excess juice off to prevent sogginess.
- Top with Green Onions: Finally, sprinkle the thinly sliced green onions evenly over the tomatoes.
- Chill Before Serving: Cover the dish tightly with plastic wrap and chill in the refrigerator for 1 hour to allow flavors to meld. Serve chilled with tortilla chips.
Notes
- Be sure to thoroughly drain the salsa and olives to avoid a watery dip.
- You can adjust the level of heat by choosing mild, medium, or hot taco seasoning and salsa.
- Use a clear glass dish to show off the colorful layers if desired.
- Prepare the dip a few hours ahead for best flavor, keeping it refrigerated until serving.
- Serve with sturdy tortilla chips to hold the thick layers.


