“`html
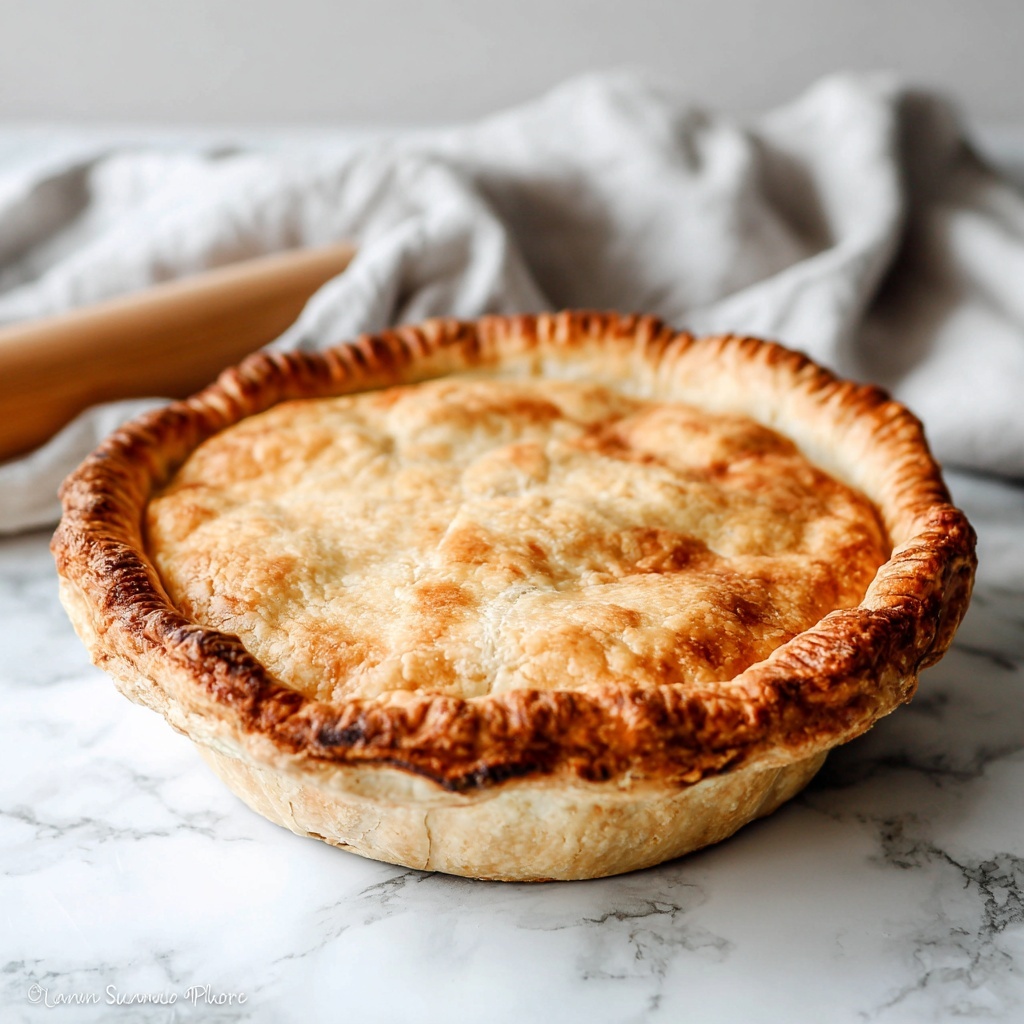
If you’ve ever longed for that perfect, flaky, melt-in-your-mouth pie crust that brings everyone back to fond memories, then you’re in the right place. Grandma’s Perfect Pie Crust Recipe is exactly that—a timeless classic that balances simplicity and technique to create a tender, buttery crust every single time. Whether you crave a fruit-filled dessert or a savory quiche, this crust lays the perfect foundation for any pie, making each bite a nostalgic delight.

Ingredients You’ll Need
This recipe calls for simple, pantry-friendly ingredients that come together harmoniously to give your pie crust its signature texture and flavor. Each one plays a vital role—from the flaky tenderness that cold butter imparts to the slight sweetness from granulated sugar that rounds out the taste.
- 2 1/2 cups all-purpose flour: The backbone of your crust, providing structure and a tender crumb.
- 1 teaspoon salt: Enhances flavor, balancing sweetness and richness.
- 1 tablespoon granulated sugar: Adds a subtle sweetness that complements both sweet and savory pies.
- 1 cup cold unsalted butter, cut into small cubes: Key to flakiness—cold butter creates those gorgeous layers when baked.
- 1/2 cup ice water (plus 1–2 tablespoons more if needed): Just enough moisture to bring the dough together without making it wet.
- 1 large egg: For a beautiful egg wash that gives your crust a golden, glossy finish.
- 1 tablespoon milk: Mixed with the egg to create the perfect brush-on glaze.
- Additional all-purpose flour (optional): To dust your work surface, preventing sticking while rolling out the dough.
How to Make Grandma’s Perfect Pie Crust Recipe
Step 1: Combine the Dry Ingredients
Start by whisking together the all-purpose flour, salt, and granulated sugar in a large mixing bowl. This ensures even distribution of flavors and is the foundation for a great crust texture.
Step 2: Cut in the Butter
Add in your cold, cubed unsalted butter and use a pastry cutter, two knives, or even your fingertips to work it into the flour mixture. Aim for a combination of coarse crumbs and pea-sized butter pieces—this creates those delightful flaky layers once baked.
Step 3: Add Ice Water
Sprinkle in about half of the ice water and toss the dough gently with a fork. Add more water one tablespoon at a time until the dough just holds together when you press it—it should look shaggy, not wet or sticky. This is the dough telling you it’s perfectly hydrated.
Step 4: Chill the Dough
Turn the dough onto a clean surface, gently press it together, and divide it into two equal discs. Wrap each one tightly in plastic wrap and pop them in the fridge to chill for at least an hour. This chilling step relaxes the gluten and keeps the butter cold, both crucial for the best pie crust texture.
Step 5: Roll Out and Fit the Dough
Dust your work surface lightly with flour, then roll one disc into a 12-inch circle. Gently fit it into a 9-inch pie plate, easing it into the corners without stretching to keep it tender. Trim the overhang to about an inch—neat edges make for a clean bake and crisp crust.
Step 6: Assemble Your Pie
If you’re making a double-crust pie, add your prepared filling inside the bottom crust. Roll the second disc to match and place it over the filling. Trim any excess, tuck the edges together, and crimp for that classic pie look. For a blind-baked single crust, prick the bottom with a fork, line it with parchment paper, and fill with pie weights or dried beans to prevent shrinkage.
Step 7: Egg Wash and Baking
Create your egg wash by whisking the egg and milk together. Brush it over the top crust or any exposed edges for that irresistible golden shine. Bake blind crusts at 400°F (200°C) for about 15 minutes until lightly golden, removing weights and parchment halfway if extra baking is required. Filled pies should be baked according to their specific recipe directions until the crust is deeply golden and crisp.
How to Serve Grandma’s Perfect Pie Crust Recipe
Garnishes
Once your pie is out of the oven, you can elevate it with a light dusting of powdered sugar for sweet pies or fresh herbs for savory tarts. A small pat of butter melted on a warm slice creates an inviting aroma and extra richness.
Side Dishes
This pie crust pairs beautifully with simple accompaniments — think a scoop of homemade vanilla ice cream for desserts or a fresh green salad to complement savory fillings. The buttery, flaky crust balances heartiness and freshness perfectly.
Creative Ways to Present
Use cookie cutters to cut decorative shapes from excess dough for pie toppers or create a lattice crust to show off your colorful fillings. You can also brush flavored butters or sprinkle coarse sugar for added texture and flair. Sharing Grandma’s Perfect Pie Crust Recipe becomes a family tradition when you get creative and make it your own!
Make Ahead and Storage
Storing Leftovers
If you have any leftover pie, wrap the slices tightly in plastic wrap or store in an airtight container in the refrigerator. The crust will stay fresh and flaky for 3-4 days, retaining that homemade charm every time you reheat.
Freezing
You can freeze unbaked pie crust discs by wrapping them in plastic wrap and placing them in a freezer bag. They keep well for up to 3 months. Thaw in the refrigerator overnight before rolling out as usual, bringing back that classic taste whenever the pie craving hits.
Reheating
Warm leftover pie slices in a 350°F (175°C) oven for 10–15 minutes to revive the crispiness of Grandma’s Perfect Pie Crust Recipe. Avoid microwaving if possible to keep the crust flaky and delicious.
FAQs
Can I use a food processor to make the dough?
Absolutely! A food processor can speed up the process of cutting butter into flour. Just pulse in short bursts until you get the crumbly mixture with pea-sized butter pieces before adding the water.
What happens if I overwork the dough?
Overworking activates gluten, which can make the crust tough instead of tender and flaky. Be gentle and mix just until the dough holds together.
Why is chilling the dough so important?
Chilling keeps the butter cold and allows the gluten to relax, resulting in a crust that is flaky, not chewy or shrinking during baking.
Can I make this crust gluten-free?
This particular recipe relies on all-purpose flour, but with some flour substitutions and tweaks, a gluten-free version is possible, though it may not have quite the same texture as Grandma’s Perfect Pie Crust Recipe.
How do I prevent a soggy bottom crust?
Blind baking your crust or brushing it with egg wash before adding filling helps create a moisture barrier, keeping that bottom crust crisp and delightful.
Final Thoughts
There is something truly heartwarming about making pie from scratch, and Grandma’s Perfect Pie Crust Recipe is your ticket to creating those memorable homemade moments. It turns humble ingredients into golden, flaky magic that will have everyone asking for seconds. So roll up your sleeves, trust the process, and get ready to impress with a crust that feels like a warm hug from Grandma herself.
“`
Print
Grandma’s Perfect Pie Crust Recipe
- Prep Time: 15 minutes
- Cook Time: 15 minutes (blind-bake) to 50 minutes (filled pie, varies)
- Total Time: 1 hour 35 minutes
- Yield: 1 double crust for a 9-inch pie
- Category: Baking
- Method: Baking
- Cuisine: American
- Diet: Vegetarian
Description
Grandma’s Pie Crust is a classic, flaky, and buttery pastry dough perfect for both single and double-crust pies. This recipe guides you through making a tender, golden crust using simple ingredients like flour, butter, and ice water, with tips for blind-baking or assembling filled pies.
Ingredients
Dry Ingredients
- 2 1/2 cups all-purpose flour
- 1 teaspoon salt
- 1 tablespoon granulated sugar
Wet Ingredients
- 1 cup cold unsalted butter, cut into small cubes
- 1/2 cup ice water, plus 1–2 tablespoons more as needed
- 1 large egg
- 1 tablespoon milk
Optional
- Additional all-purpose flour, for rolling and dusting
Instructions
- Mix Dry Ingredients: Whisk together the all-purpose flour, salt, and granulated sugar in a large mixing bowl until they are evenly combined.
- Incorporate Butter: Add the cold, cubed unsalted butter into the flour mixture and cut it in using a pastry cutter, two knives, or your fingertips until the mixture resembles coarse crumbs with some pea-sized pieces of butter remaining.
- Add Ice Water: Sprinkle in about half of the ice water and toss the mixture with a fork. Gradually add more water, one tablespoon at a time, just until the dough starts to hold together when pressed. The dough should appear shaggy and not wet.
- Form Dough Discs: Turn the dough onto a clean work surface and gently press it together. Divide it into two equal portions, shaping each into a flat disc. Wrap both discs tightly in plastic wrap and refrigerate for at least one hour to chill.
- Roll Out Dough: On a lightly floured surface, roll out one chilled disc into a 12-inch circle. Fit it gently into a 9-inch pie plate, easing the dough into the corners without stretching. Trim the overhang to about 1 inch.
- Assemble Crust: For a double-crust pie, add your chosen pie filling, roll out the second disc to the same size, and lay it over the filling. Trim, tuck, and crimp the edges decoratively. For a single crust that requires blind-baking, prick the bottom crust with a fork, line it with parchment paper, and fill with pie weights or dried beans.
- Apply Egg Wash and Bake: Whisk the egg and milk to create an egg wash, then brush it over the top crust or exposed edges. For blind-baking, bake the crust at 400°F (200°C) for about 15 minutes or until lightly golden, removing the weights and parchment paper if finishing the bake. For filled pies, bake according to your filling recipe’s instructions until the crust is deeply golden and crisp.
Notes
- Keeping the butter cold is essential for a flaky crust.
- Do not overwork the dough to avoid toughness.
- Chilling the dough allows the gluten to relax and the butter to firm up, which helps with flakiness.
- Use pie weights or dried beans during blind-baking to prevent bubbling.
- If you want a browner crust, you can add a little sugar to the egg wash.
- Additional flour can be used sparingly while rolling to prevent sticking but avoid too much to keep the crust tender.


