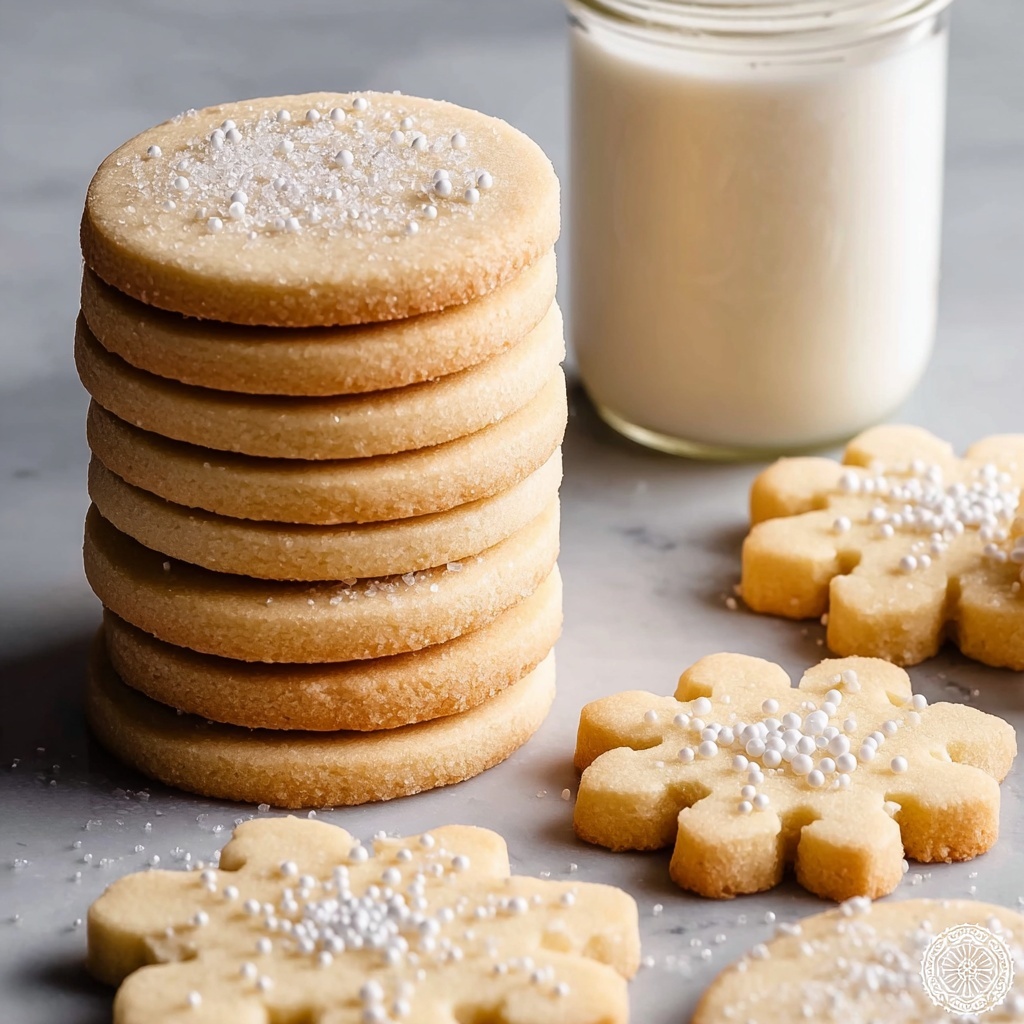
Nothing says celebration quite like a batch of perfectly soft, sweet, and buttery cookies, and this Best Sugar Cookies Recipe for Holidays & Any Day Recipe is exactly that magic you’ve been searching for. It’s the ultimate recipe that transforms simple ingredients into delightful, melt-in-your-mouth cookies, perfect for decorating with royal icing to add your personal holiday flair or just to enjoy any day. Trust me, once you try this recipe, these sugar cookies will become your go-to treat year-round, whether you’re filling holiday cookie tins or simply craving a timeless sweet snack.
Ingredients You’ll Need
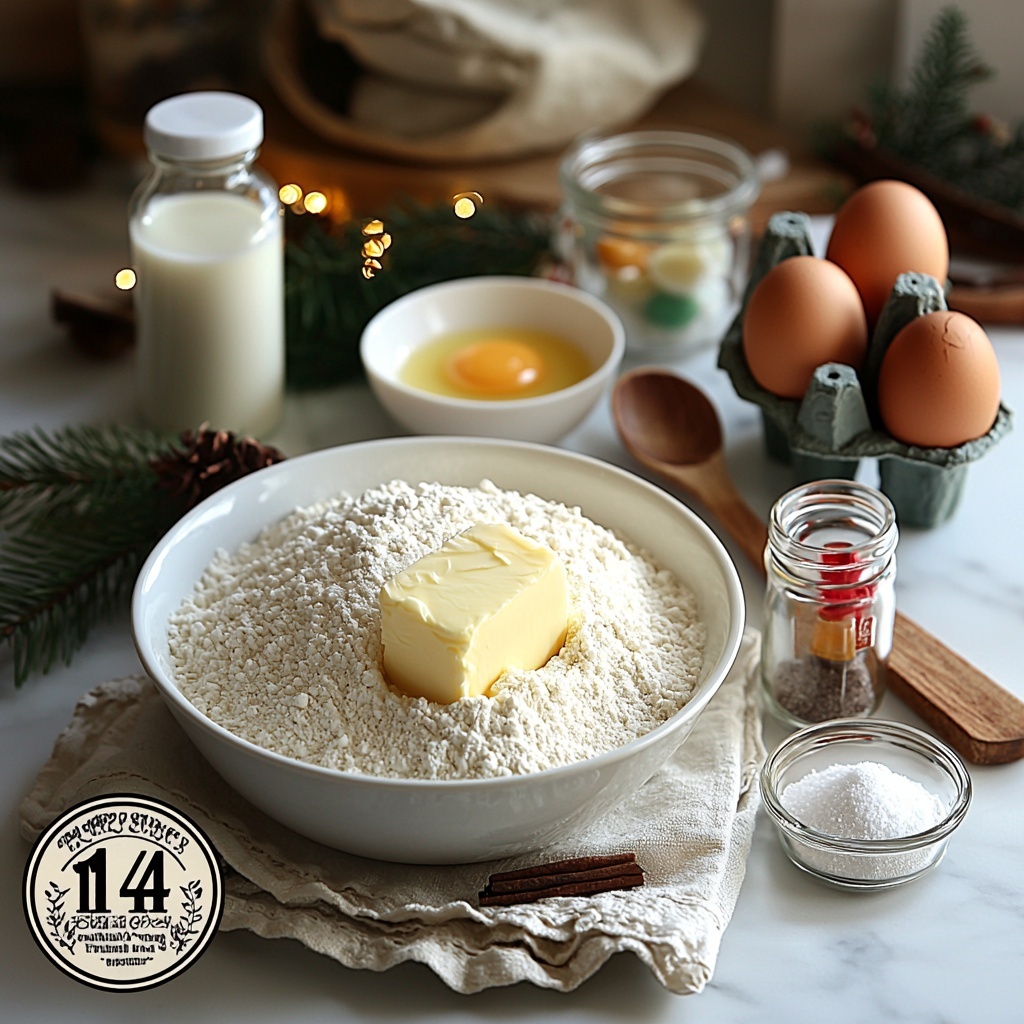
This recipe relies on a handful of everyday ingredients that work beautifully together, creating the perfect balance of flavor, texture, and that classic sugar cookie softness you love. Each ingredient matters for its role—from the richness of butter to the light fluffiness brought by baking powder.
- 2 ¾ cups (340g) all-purpose flour: The sturdy base that gives your cookies structure without being tough.
- 1 tsp baking powder: Adds just enough lift to keep your cookies tender and soft.
- ½ tsp salt: Balances sweetness and enhances all the other flavors.
- 1 cup (226g) unsalted butter, softened: Key for that rich, buttery taste and tender crumb.
- 1 ½ cups (300g) granulated sugar: Sweetens perfectly and helps cookies brown evenly.
- 2 large eggs: Bind it all together while adding moisture.
- 2 tsp pure vanilla extract: Infuses warm, comforting aroma and depth.
- 1 tsp almond extract (optional): A subtle, nutty hint that elevates the flavor if you choose to add it.
- For Royal Icing: 4 cups (480g) powdered sugar, sifted; 3 tbsp meringue powder; ½ tsp pure vanilla extract; ½ tsp almond extract (optional); 6-8 tbsp warm water; gel food coloring (optional) for decorating.
How to Make Best Sugar Cookies Recipe for Holidays & Any Day Recipe
Step 1: Prepare Dough
Begin by whisking together your flour, baking powder, and salt in a bowl—this ensures even distribution and a consistent texture. In a separate large bowl, cream your softened butter and sugar together for about 3 to 5 minutes until the mixture is wonderfully fluffy. This step is crucial because the fluffiness traps air for soft, tender cookies. Next, beat in your eggs one at a time, letting each incorporate fully before adding the next, followed by the vanilla and optional almond extract for that sweet aroma. Gradually add your dry ingredients on low speed just until they come together—overmixing can make the cookies tough, so patience here pays off.
Step 2: Chill Dough
Divide your dough into two discs and wrap each in plastic wrap. Pop them into the refrigerator to chill for at least 1 to 2 hours, or even better, overnight. Chilling is an essential step because it allows the butter to firm up, making the dough easier to roll out and helping the cookies hold their shape once baked.
Step 3: Roll & Cut Cookies
Preheat your oven to 375°F (190°C) and flour your work surface and rolling pin generously to prevent sticking. Take one of your chilled dough discs and roll it out evenly to about a ¼ inch thickness—this thickness ensures even baking and that perfect tender bite. Use floured cookie cutters to shape your cookies, then transfer them carefully to a baking sheet lined with parchment paper. Don’t toss your scraps! Just re-roll them once or twice for more cookie fun.
Step 4: Bake Cookies
Bake your cookies for 8 to 12 minutes until the edges start turning a light golden color. That subtle color change is your cue they’re done. Let them cool on the baking sheet for about 5 minutes to firm up, then transfer to a wire rack to cool completely. This cooling step lets the cookies set properly so your decorations won’t melt or run.
Step 5: Make Royal Icing
Sift powdered sugar and meringue powder into a bowl to remove lumps—smooth icing is pure joy to work with. Beat these dry ingredients together with 6 tablespoons of warm water, vanilla, and almond extract on medium-high for 5 to 7 minutes. The result? A stiff, glossy icing perfect for piping detailed designs and outlining your cookies beautifully. If the icing feels too thick, add extra water by half-teaspoon increments until it reaches the right consistency.
Step 6: Color & Thin Icing
Divide the royal icing into portions if you want multiple colors, then tint each segment with gel food coloring for vibrant, vivid hues. For flooding the cookies, thin a little of each colored icing with water carefully—just a few drops at a time—until drizzles disappear within 10 to 15 seconds. This takes your decorating from ordinary to extraordinary, giving you that smooth, glossy finish.
Step 7: Decorate Cookies
Start by piping an outline around the edges of your cooled cookies using the stiffest icing and let it dry for about 10 to 15 minutes to create a dam for flooding. Then fill the outlined spaces with the thinned flood icing, spreading evenly with a toothpick or scribe tool to pop any pesky air bubbles. Let the flooded cookies dry completely for 6 to 24 hours at room temperature. Once dry, add delicate details with stiff icing or use the wet-on-wet technique for fun patterns and textures. Let all decorations harden fully before handling or packaging.
Step 8: Store
Once your cookies and icing are completely dry, store them in an airtight container layered with parchment paper to keep every cookie just as perfect as the day you made them. They stay fresh for up to 2 weeks, making these sweet treats just as wonderful a gift as they are a snack.
How to Serve Best Sugar Cookies Recipe for Holidays & Any Day Recipe
Garnishes
While the royal icing gives so much room for creativity, a sprinkle of edible glitter or pearl dust can add an elegant sparkle perfect for holiday occasions. Fresh mint leaves or even a light dusting of powdered sugar can elevate the presentation beautifully, making the cookies look as festive as they taste.
Side Dishes
These sugar cookies pair insanely well with a cozy cup of hot cocoa or a freshly brewed pot of tea, especially spiced varieties like chai or cinnamon. For a brunch or afternoon treat, serve alongside a bowl of fresh berries or lightly whipped cream to add a refreshing contrast to their sweetness.
Creative Ways to Present
Think beyond the plate! Arrange your cookies in a festive tin lined with parchment, stack them up tied with a colorful ribbon as a heartfelt homemade gift, or display on a tiered dessert stand surrounded by holiday greenery and ornaments for a show-stopping centerpiece. Let your imagination run wild and match your cookie decorating style with your décor or party theme.
Make Ahead and Storage
Storing Leftovers
After a crowd-pleasing cookie party, you might have leftovers—and that’s a great thing! Store your sugar cookies in an airtight container at room temperature layered with parchment paper to prevent sticking and maintain freshness for up to two weeks. This way, the cookies stay soft, and the icing keeps its beautiful finish.
Freezing
If you want to prep in advance, frozen sugar cookie dough is your best friend. Wrap dough discs tightly in plastic wrap and place in a freezer-safe bag for up to 3 months. When ready to bake, thaw in the refrigerator overnight, roll and cut as usual. You can also freeze fully decorated cookies on a baking sheet until hard, then transfer to airtight containers—just thaw to room temperature before serving for a fresh-from-the-oven feel.
Reheating
Warm your sugar cookies for a few seconds in the microwave (about 10-15 seconds) if you want that just-baked softness back before serving. Avoid overheating as it can make them crumbly. A quick warm-up revives the buttery flavor and makes any leftover cookie feel like new.
FAQs
Can I use salted butter for this recipe?
Yes, but since the recipe already includes salt, you might want to reduce or omit the additional salt to avoid an overly salty taste. Unsalted butter gives you better control over the flavor balance, but salted butter works in a pinch.
Why is chilling the dough important?
Chilling firms up the butter, making the dough easier to roll and cut into shapes. It also prevents the cookies from spreading too much during baking, ensuring crisp edges and soft centers, which are hallmarks of the best sugar cookies.
How long should royal icing dry before packaging?
For the best results, let your decorated cookies dry completely for at least 6 to 24 hours uncovered. This ensures the icing hardens properly so decorations don’t smudge or stick when stored or stacked.
Can I skip the almond extract?
Absolutely! Almond extract is optional and adds a lovely subtle nuttiness, but the vanilla extract carries most of the flavor. Your cookies will still taste incredible without it.
Why use meringue powder in royal icing?
Meringue powder replaces raw egg whites, making royal icing safer and easier to handle. It gives the icing its characteristic stiffness and glossy finish, perfect for detailed decorating and durability.
Final Thoughts
When you want a cookie that feels like a warm hug and spreads holiday cheer any day of the year, this Best Sugar Cookies Recipe for Holidays & Any Day Recipe will be your new best friend in the kitchen. The simple ingredients and straightforward steps combine with endless decorating possibilities to make this recipe both comforting and creative. So roll up your sleeves, gather your loved ones, and bake up some sweetness that will brighten every season and every day. Happy baking!
Print
Best Sugar Cookies Recipe for Holidays & Any Day Recipe
- Prep Time: 20 minutes
- Cook Time: 10 minutes
- Total Time: 8 hours 40 minutes
- Yield: 30 cookies
- Category: Baking
- Method: Baking
- Cuisine: American
Description
This classic sugar cookie recipe yields soft, buttery cookies perfect for holidays and any day celebrations. Paired with smooth royal icing, these cookies offer endless decorating possibilities, making them ideal for festive occasions or personalized treats. With a chilled dough base and precise baking, you’ll achieve tender cookies with a delicate crumb and perfect edges.
Ingredients
For the Cookies
- 2 ¾ cups (340g) all-purpose flour
- 1 tsp baking powder
- ½ tsp salt
- 1 cup (226g) unsalted butter, softened
- 1 ½ cups (300g) granulated sugar
- 2 large eggs
- 2 tsp pure vanilla extract
- 1 tsp almond extract (optional)
For the Royal Icing
- 4 cups (480g) powdered sugar, sifted
- 3 tbsp meringue powder
- ½ tsp pure vanilla extract
- ½ tsp almond extract (optional)
- 6–8 tbsp warm water
- Gel food coloring (optional)
Instructions
- Prepare Dough: Whisk together the flour, baking powder, and salt in a bowl. In a large separate bowl, cream the softened butter and granulated sugar together for 3-5 minutes until fluffy and light in color. Beat in the eggs one at a time, making sure each is fully incorporated. Stir in the vanilla extract and almond extract if using. Gradually add the dry ingredients on low speed until the dough just comes together.
- Chill Dough: Divide the dough into two equal discs, wrap tightly in plastic wrap, and refrigerate for at least 1 to 2 hours or preferably overnight. This step firms the dough, making it easier to roll and enhances flavor development.
- Roll & Cut Cookies: Preheat your oven to 375°F (190°C). Lightly flour your work surface and rolling pin to prevent sticking. Roll out one disc of dough to approximately ¼ inch thickness. Use floured cookie cutters to cut desired shapes, transferring each to parchment-lined baking sheets. Gather and reroll scraps once or twice after chilling again to maximize dough usage.
- Bake Cookies: Place the baking sheets in the oven and bake the cookies for 8-12 minutes, or until the edges just begin to turn a light golden color. Remove from oven and allow cookies to cool on the baking sheets for about 5 minutes before transferring them to a wire rack to cool completely.
- Make Royal Icing: Sift together the powdered sugar and meringue powder into a mixing bowl. Add 6 tablespoons of warm water, vanilla extract, and optional almond extract. Beat on medium-high speed for 5-7 minutes until the icing is stiff, glossy, and holds peaks, suitable for piping. Add additional water, one tablespoon at a time, if icing is too thick.
- Color & Thin Icing: Divide the royal icing into separate bowls and color each portion using gel food coloring as desired. To prepare flood consistency icing, thin a portion of colored icing with warm water in ½ teaspoon increments until a line drizzled on parchment disappears within 10-15 seconds, indicating proper spreading ability.
- Decorate Cookies: Using stiff icing, pipe outlines around the edges of cooled cookies to create ‘walls.’ Allow these outlines to dry for 10-15 minutes. Then flood the interior spaces with the thinned flood icing, spreading evenly and popping any air bubbles with a toothpick or needle tool. Let the flooded cookies dry uncovered for 6 to 24 hours until completely set. Once dry, add additional elements or details using stiff icing or wet-on-wet techniques, then allow details to dry fully.
- Store: After the icing is fully dried, carefully layer the decorated cookies with parchment paper between them and store in an airtight container at room temperature. Properly stored, cookies will remain fresh and delicious for up to two weeks.
Notes
- For best results, chill the dough overnight to improve flavor and texture.
- Use gel food coloring to avoid watering down the royal icing.
- If you don’t have meringue powder, you can substitute with egg whites but be mindful of food safety.
- Royal icing dries hard, making these cookies ideal for stacking and gifting.
- Re-roll scraps a limited number of times to avoid tough cookies.
- Store decorated cookies at room temperature, not in the refrigerator, to prevent condensation ruining the icing.
