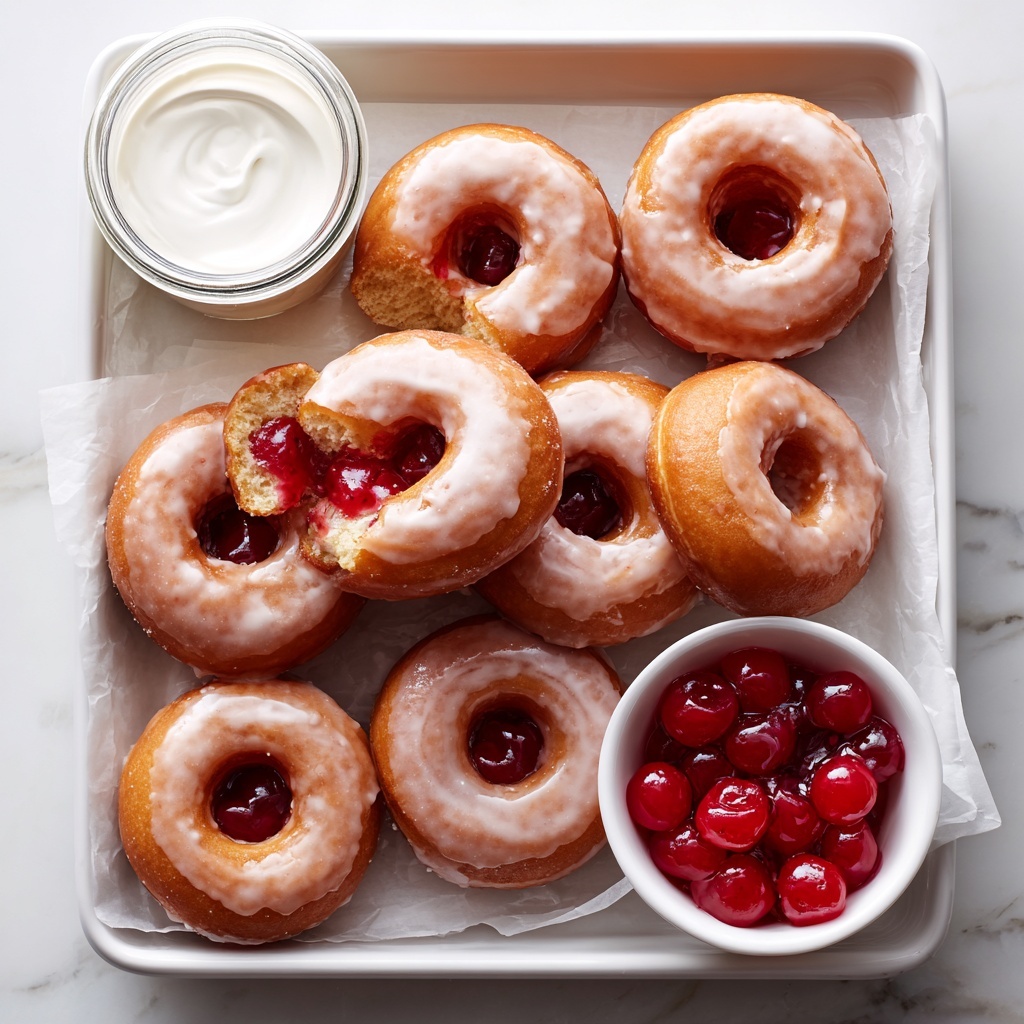
If you are looking for a fun, finger-friendly dessert that bursts with sweet cherry goodness, the Cherry Pie Bombs Recipe is a total game-changer. These little pockets of flaky dough filled with luscious cherry pie filling are perfect for sharing, snacking, or impressing guests. Each bite delivers a delightful balance of buttery, tender crust and warm, fruity filling, finished off with a glossy, sweet glaze that makes them utterly irresistible. Whether you’re new to baking or just want a quick treat that tastes homemade, these Cherry Pie Bombs will quickly become a beloved favorite in your kitchen.
Ingredients You’ll Need
This recipe uses a handful of simple, essential ingredients that come together beautifully to create a delicious dessert with layers of flavor and texture. Each item plays a crucial role, from the flaky biscuits that form a soft yet crisp shell to the sweet cherry filling that adds a burst of color and taste.
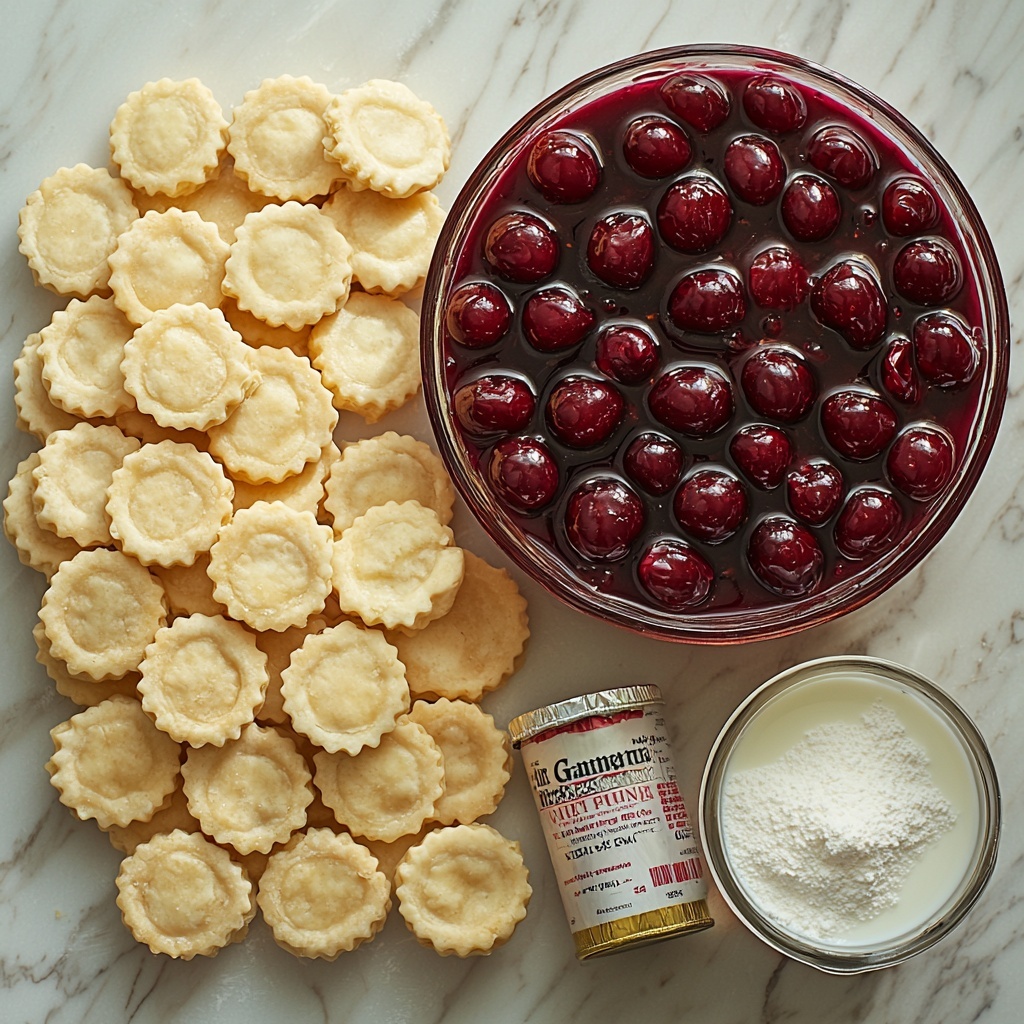
- Pillsbury Grand biscuits (8-count, not flaky layers): These are the perfect dough base for a tender, buttery crust that is easy to work with.
- Cherry pie filling (1 cup or 255 g): Provides juicy, sweet cherry centers with a lovely texture and vibrant color.
- Unsalted butter (½ cup / 1 stick / 113 g, melted): Used both inside and on top for richness and a golden finish.
- Confectioners’ sugar (2 cups / 250 g): Essential for the smooth, sweet glaze that coats the pie bombs.
- Whole milk (3-4 tablespoons, room temperature): Helps thin the glaze to just the right consistency for dipping and dripping.
How to Make Cherry Pie Bombs Recipe
Step 1: Prepare the Biscuit Circles
Begin by removing the biscuits from the can and carefully peeling each one into two layers, doubling your dough pieces. Press each layer into a 4-inch circle, giving you 16 perfect pieces to hold the cherry filling. This step is key for ensuring a consistent thickness that will cook evenly and hold the filling without bursting.
Step 2: Add the Cherry Filling
Spoon about one tablespoon of cherry pie filling right into the center of each biscuit circle. Don’t overfill to avoid any leaks, but make sure there’s enough juicy filling to get that delightful fruit burst with every bite.
Step 3: Shape the Bombs
Bring the edges of each biscuit circle together and pinch them to seal securely around the cherry filling, forming a smooth round ball. Try to keep the dough thickness even all around to ensure they cook uniformly and look beautiful once done.
Step 4: Butter the Bombs
Brush both the tops and bottoms of each pie bomb with melted butter. This step delivers a rich flavor and helps achieve that gorgeous golden brown color when air fried.
Step 5: Prepare Your Air Fryer
Lightly spray the basket of your air fryer with nonstick cooking spray to prevent sticking and keep clean-up a breeze.
Step 6: Air Fry the Pie Bombs
Place the bombs in the air fryer basket spaced about 2 inches apart to allow even air circulation. Cook at 330°F for 7-8 minutes or until they turn golden and puffed. Remove them carefully and set aside to cool slightly as you prepare the glaze.
Step 7: Make the Sweet Glaze
In a medium bowl, whisk together the confectioners’ sugar and whole milk until smooth. Adjust the milk amount to get a glaze that’s thick enough to coat but still fluid enough to dip the bombs in or drizzle over them.
Step 8: Glaze and Finish
Dip or roll each warm cherry pie bomb in the glaze, then place them on a wire rack set over a baking sheet to catch any drips. Let the glaze set until it forms a delicate, sweet shell. Now they’re ready for serving!
How to Serve Cherry Pie Bombs Recipe
Garnishes
A sprinkle of powdered sugar or a few fresh cherries on top adds a charming touch that makes these bombs look irresistible. You could also brush the glaze with a pinch of cinnamon or add a little chopped mint for freshness and color contrast.
Side Dishes
Cherry Pie Bombs pair beautifully with a scoop of vanilla ice cream or a dollop of whipped cream, turning these bite-sized treats into a full dessert experience. A cup of hot coffee or tea also complements their sweetness perfectly.
Creative Ways to Present
Serve these delights on a rustic wooden board or a tiered dessert stand for a fun party presentation. For a festive twist, place each bomb in a mini cupcake liner and drizzle extra glaze on top just before serving.
Make Ahead and Storage
Storing Leftovers
Once cooled, place any remaining cherry pie bombs in an airtight container. They keep well at room temperature for up to two days, although they’re best enjoyed fresh for that perfect contrast of warm filling and crisp crust.
Freezing
If you want to make these ahead of time, freeze the formed but unbaked bomb balls on a parchment-lined tray. Once firm, transfer them to a freezer bag. When ready, air fry them straight from frozen, adding a couple of extra minutes to the cooking time.
Reheating
To enjoy leftovers warm, reheat the chilled pie bombs in your air fryer at 330°F for about 3-4 minutes. This brings back that golden crisp without drying out the cherry filling. Reapply glaze if desired for a fresh finish.
FAQs
Can I use homemade pie dough instead of biscuits?
Absolutely! While the recipe is designed for Pillsbury Grand biscuits for convenience and texture, homemade pie dough can add a personal touch and a flakier crust if you prefer a more traditional pie taste.
Is it possible to bake these in a regular oven?
Yes, you can bake the cherry pie bombs in a preheated oven at 350°F for about 12-15 minutes or until golden. Just place them on a parchment-lined baking sheet and keep an eye on them to prevent overbrowning.
Can I substitute the cherry pie filling with other flavors?
Definitely! Blueberry, apple, or peach pie filling can be delicious alternatives. Just make sure the filling isn’t too runny to avoid leaks during cooking.
Do I have to use the glaze, or can I skip it?
The glaze adds a wonderful sweet finish and visual appeal, but if you prefer something less sweet, you can skip it or dust the bombs lightly with powdered sugar for a simpler presentation.
How do I avoid the pie bombs bursting while cooking?
Sealing the dough tightly and not overfilling each bomb are key. Make sure to pinch the edges firmly and shape them evenly to prevent leaks during air frying or baking.
Final Thoughts
Making Cherry Pie Bombs Recipe is a joyful experience that brings together simple ingredients to create something truly special and shareable. Whether for a quick snack or a festive treat, these bombs deliver flavor, fun, and a touch of nostalgia all in one bite. Give this recipe a try—you’ll be amazed at how quickly these disappear from the plate and how often you’ll find yourself making them again!
Print
Cherry Pie Bombs Recipe
- Prep Time: 15 minutes
- Cook Time: 8 minutes
- Total Time: 23 minutes
- Yield: 16 pie bombs
- Category: Dessert
- Method: Air Frying
- Cuisine: American
Description
Cherry Pie Bombs are delightful bite-sized treats made by wrapping cherry pie filling in biscuit dough and air frying until golden and crisp. Finished with a sweet glaze, these dessert bombs are perfect for a fun and easy treat.
Ingredients
Pie Bombs
- 1 can (8-count) Pillsbury Grand biscuits (not flaky layers)
- 1 cup (255 g) cherry pie filling
- ½ cup (1 stick / 113 g) unsalted butter, melted
Glaze
- 2 cups (250 g) confectioners’ sugar
- 3–4 tablespoons whole milk, room temperature
Instructions
- Prepare the biscuit circles: Remove the biscuits from the can and peel to separate each into two layers. Press each layer of biscuit into a 4-inch circle to yield 16 circles in total.
- Add cherry filling: Spoon about 1 tablespoon of cherry pie filling into the center of each biscuit circle.
- Seal and shape: Fold the sides of each circle together using your fingers, pinching to seal the edges. Shape the sealed dough into balls, ensuring the dough thickness is even for uniform cooking.
- Brush with butter: Brush the tops and bottoms of each pie bomb with the melted unsalted butter to promote browning and flavor.
- Prepare the air fryer basket: Spray the air fryer basket with nonstick cooking spray to prevent sticking.
- Air fry the bombs: Place 2 inches apart in the air fryer basket working in batches. Air fry at 330°F (165°C) for 7-8 minutes or until the bombs turn golden brown.
- Cool slightly: Remove the cooked pie bombs and let them cool slightly before glazing.
- Make the glaze: In a medium bowl, whisk together confectioners’ sugar and 3-4 tablespoons whole milk until smooth. Adjust the milk amount to get the desired glaze consistency.
- Glaze the bombs: Dip or roll each cherry pie bomb in the prepared glaze and place them on a wire rack set over a baking sheet.
- Set glaze and serve: Allow the glaze to firm up before serving the bombs warm or at room temperature.
Notes
- Ensure biscuits are pressed evenly for uniform thickness and cooking.
- Do not overfill with cherry pie filling to avoid leaking during air frying.
- If you don’t have an air fryer, these can be baked at 375°F for about 12-15 minutes until golden brown.
- Glaze consistency can be adjusted by adding more or less milk depending on preference.
- Serve these as a quick dessert or party snack for a crowd-pleaser.


