
“`html
If you’ve ever wished for a dessert that’s downright effortless yet irresistibly delicious, you’re going to fall head over heels for this Chocolate Cherry Dump Cake Recipe. Imagine the perfect balance of luscious cherry pie filling bubbling beneath a rich, chocolate cake crust that’s buttery and tender—it’s like a cozy hug in dessert form. What’s best is you need just a handful of ingredients and no fancy skills to pull this showstopper together. Trust me, this recipe will become your go-to when you want something sweet, satisfying, and seriously impressive without the fuss.

Ingredients You’ll Need
This chocolate cherry dump cake relies on simple but essential ingredients that each bring their magic to the table, from juicy cherries to the deep chocolate flavor of devil’s food cake mix. Every ingredient plays a part in creating the wonderful textures and flavors you’ll love.
- 2 cans (21 ounces each) cherry pie filling: Offers a sweet and tart fruit base bursting with juicy cherries that keeps every bite moist and flavorful.
- 1 box devil’s food cake mix: Adds a rich chocolatey crumb that contrasts perfectly against the cherry filling’s brightness.
- 3/4 cup butter, melted: Gives the cake topping a golden, crispy finish and a buttery richness that elevates the entire dessert.
- Whipped topping: A light, creamy accent that complements the warm cake, adding softness and a little extra indulgence.
- Vanilla ice cream: Optional but highly recommended, it melts beautifully over the warm cake, lending a cool, creamy counterpoint.
How to Make Chocolate Cherry Dump Cake Recipe
Step 1: Preheat Oven and Prepare Pan
Start by heating your oven to 350°F (175°C). Grab a 13×9-inch baking dish and give it a quick spray with cooking spray to prevent sticking. This simple prep ensures your dessert comes out clean and beautiful, ready for the layers you’ll build next.
Step 2: Layer Cherry Filling
Pour both cans of cherry pie filling evenly across the bottom of the prepared pan. This juicy layer is the heart of the cake, creating pockets of sweetness and that luscious cherry texture you just crave in every bite.
Step 3: Add Cake Mix
Next, sprinkle the dry devil’s food cake mix evenly over the cherry filling until it’s completely covered. The dry mix will bake into a rich, chocolatey top that contrasts perfectly with the tart cherries below—it’s like magic happening right before your eyes!
Step 4: Add Butter
Pour the melted butter evenly over the top of the cake mix. If needed, tilt the pan gently so the butter reaches as many spots as possible. Don’t worry if it looks patchy—those dry spots will bake through to a scrumptious, buttery crust.
Step 5: Bake
Bake your dump cake for 40 to 45 minutes until the edges are bubbling and the cake topping is fully set. The smell wafting through your kitchen will be absolutely intoxicating, signaling the wonderful treat waiting inside.
Step 6: Cool and Serve
Allow the cake to cool for about 10 minutes before serving. This step helps it set just enough while still warm and inviting—perfect for topping with cool whipped cream or a scoop of vanilla ice cream. Trust me, you’ll want to dive right in!
How to Serve Chocolate Cherry Dump Cake Recipe
Garnishes
For an extra-special finish, top your warm dump cake with a generous dollop of fluffy whipped topping or a scoop of creamy vanilla ice cream. The cool, sweet creaminess balances the warm, fruity chocolate layers perfectly and adds a refreshingly smooth texture that melts in your mouth.
Side Dishes
While this Chocolate Cherry Dump Cake Recipe shines as a dessert all on its own, pairing it with a light fresh salad or simple coffee can really round out your meal. A cup of hot coffee or a mild black tea works beautifully to balance the sweetness, making every bite more enjoyable.
Creative Ways to Present
Want to impress your guests further? Serve the dump cake in individual ramekins or mason jars topped with a cherry or chocolate shavings for a pretty, personal touch. You can also layer it with extra cherries or sprinkle toasted almonds on top for a delightful crunch that adds a whole new level of texture.
Make Ahead and Storage
Storing Leftovers
If you find yourself lucky enough to have leftovers, simply cover the dump cake with foil or plastic wrap and store it in the refrigerator. It will stay fresh and delicious for 3-4 days. The flavors actually deepen overnight, making it even tastier the next day!
Freezing
You can freeze this cake too, making it a fantastic make-ahead dessert. After cooling completely, wrap the pan tightly with plastic wrap and aluminum foil or transfer individual portions into airtight containers. Frozen dump cake will maintain its quality for up to 2 months—perfect for a rainy day craving.
Reheating
To reheat, simply warm portions in the microwave for about 30 seconds to a minute, or heat in a 350°F oven covered with foil for about 15 minutes until warmed through. Add a fresh scoop of vanilla ice cream or whipped topping after reheating for that freshly served feeling.
FAQs
What is a dump cake?
A dump cake gets its charming name from how easy it is to prepare: you literally “dump” layers of ingredients into a pan—no mixing bowl needed! It’s a streamlined way to create a moist, flavorful cake with minimal effort.
Can I use other fruit fillings?
Absolutely! While this Chocolate Cherry Dump Cake Recipe features cherry pie filling, feel free to swap in blueberry, peach, or even mixed berry fillings to suit your mood or seasons.
Do I need to refrigerate this cake?
After baking, it’s best to refrigerate any leftovers to maintain freshness, especially because of the fruit filling. Stored properly, it lasts 3-4 days in the fridge.
Can I make this cake gluten-free?
You sure can! Simply substitute the devil’s food cake mix with a gluten-free chocolate cake mix of your choice. Make sure your pie filling is also gluten-free for a safe swap.
Is this recipe kid-friendly?
Definitely! Kids usually love the sweet cherries and chocolate combo. Just remember to keep servings appropriate and enjoy the smiles this cozy dessert brings to the table.
Final Thoughts
So there you have it—simple ingredients, minimal fuss, and maximum flavor wrapped up in this fabulous Chocolate Cherry Dump Cake Recipe. Whether you’re a dessert novice or a seasoned pro, this recipe delivers on sweet satisfaction every single time. Give it a try, and I promise it will become a beloved staple in your dessert lineup you’ll want to share with everyone you know.
“`
Print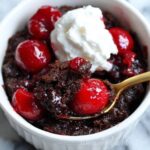
Chocolate Cherry Dump Cake Recipe
- Prep Time: 5 minutes
- Cook Time: 40 minutes
- Total Time: 45 minutes
- Yield: 6 servings
- Category: Dessert
- Method: Baking
- Cuisine: American
Description
This Chocolate Cherry Dump Cake is a quick and easy dessert perfect for busy days or last-minute gatherings. Combining sweet cherry pie filling with rich devil’s food cake mix and buttery topping, it bakes into a luscious, bubbly treat. Serve warm with whipped topping or vanilla ice cream for a comforting, crowd-pleasing dessert.
Ingredients
Fruit Layer
- 2 cans (21 ounces each) cherry pie filling
Cake Layer
- 1 box devil’s food cake mix
- 3/4 cup butter, melted
Toppings (Optional)
- Whipped topping
- Vanilla ice cream
Instructions
- Preheat Oven and Prepare Pan: Heat your oven to 350°F (175°C). Lightly spray the bottom of a 13×9-inch baking dish with cooking spray to prevent the cake from sticking.
- Layer Cherry Filling: Evenly spread the cherry pie filling over the bottom of the prepared baking dish, creating a smooth fruit base.
- Add Cake Mix: Sprinkle the dry devil’s food cake mix evenly over the cherry pie filling, ensuring it is completely covered without gaps.
- Add Butter: Pour the melted butter evenly across the surface of the dry cake mix. Tilt the pan as needed to help the butter cover as much of the top as possible. Some dry patches are fine as they will bake through.
- Bake: Place the dish in the oven and bake for 40 to 45 minutes until the edges are bubbly and the cake topping has set into a golden, firm crust.
- Cool and Serve: Allow the cake to cool for about 10 minutes. Serve warm, topped with whipped topping or a scoop of vanilla ice cream if desired to enhance the dessert’s richness.
Notes
- You can substitute cherry pie filling with other fruit pie fillings like blueberry or apple for variety.
- Butter can be swapped for margarine if dairy-free is needed, but flavor may vary slightly.
- This cake is best enjoyed warm but can be reheated for serving leftovers.
- For easier cleanup, line the baking dish with foil or parchment paper before layering ingredients.
- Using fresh cherries is not recommended for this recipe as canned pie filling provides the right consistency and sweetness.


