
“`html
There is something utterly enchanting about the simplicity and buttery richness of the Danish Butter Cookies Classic Recipe that just melts your heart with every bite. These delicate cookies are tender and crumbly, offering a perfect balance of sweetness and buttery flavor that makes them a timeless treat loved by so many. Whether you are sharing them with friends, serving them at holidays, or just indulging yourself on a cozy afternoon, this Danish Butter Cookies Classic Recipe brings a warm hug in cookie form that’s hard to resist.
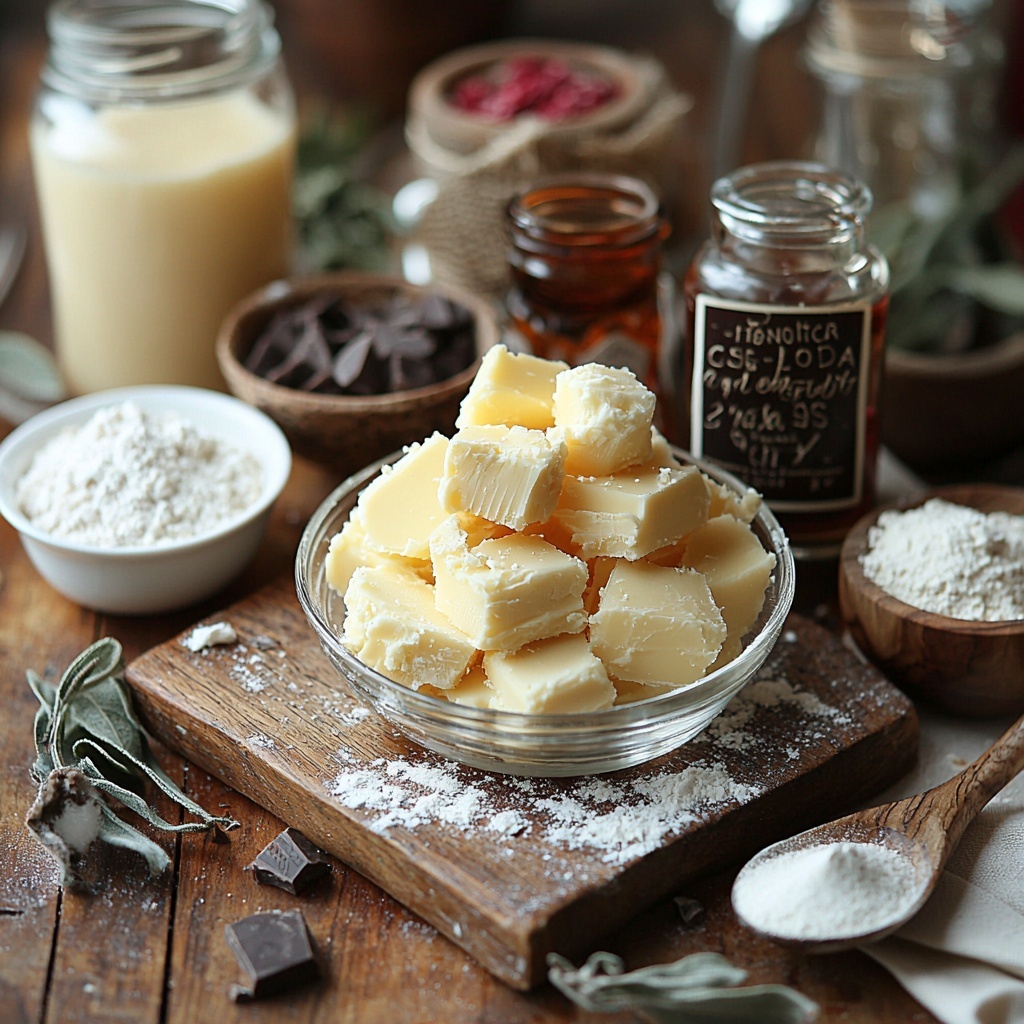
Ingredients You’ll Need
Preparing the Danish Butter Cookies Classic Recipe is wonderfully straightforward because it relies on a handful of simple, high-quality ingredients. Each one plays a crucial role in building that perfect texture, flavor, and golden hue that these cookies are known for, making your baking journey smooth and rewarding.
- 255 g unsalted butter: Softened to creamy perfection, it’s the heart of the cookie’s rich, tender crumb.
- 30 g powdered sugar: Adds a delicate sweetness and blends smoothly for a silky dough.
- 1 teaspoon vanilla extract: Infuses warmth and depth that elevates the buttery flavor.
- 160 g all-purpose flour: The base that gives structure without weighing the cookie down.
- 8 g cornstarch: Responsible for that signature melt-in-your-mouth softness.
- 1-2 teaspoons heavy cream: Adjustable moisture to help achieve the perfect dough consistency for piping.
- 170 g dark chocolate chips or almond bark (optional): For dipping, adding a luxurious contrast to the buttery base.
- 170 g white chocolate chips or almond bark (optional): Another decadent option for decorating with sweetness and color.
- Candied sprinkles (optional): Adds a cheerful pop of color and fun to dress up your cookies.
How to Make Danish Butter Cookies Classic Recipe
Step 1: Prepare Your Workspace
Start by lining a baking sheet with parchment paper; this simple step ensures your cookies won’t stick and come off perfectly every time. Having a clean, organized workspace makes the whole baking process more enjoyable and stress-free.
Step 2: Cream the Butter and Sugar
In a medium bowl, beat your softened butter for about 2 to 3 minutes until it turns pale and creamy — this is where the magic begins! Adding the powdered sugar next, continue to mix for another two minutes until the texture is light and fluffy, which will guarantee tender cookies. Finally, blend in the vanilla extract for that comforting aroma to fill your kitchen.
Step 3: Combine Dry Ingredients
Carefully add the all-purpose flour and cornstarch to your butter mixture. Mix gently just until the flour is fully incorporated and a soft dough forms. Overmixing here can toughen the cookies, so keep it tender and delicate.
Step 4: Adjust Dough Consistency
Transfer your dough to a piping bag fitted with a large open star tip. This tool will help you create the classic shapes these cookies are celebrated for. If the dough feels too stiff to pipe smoothly, simply stir in 1 to 2 teaspoons of heavy cream to loosen it up. This step is key for achieving that signature light and airy texture.
Step 5: Chill the Dough
Pipe your chosen shapes directly onto the prepared baking sheet and place them in the refrigerator for 30 minutes to chill. Meanwhile, preheat your oven to 175°C (350°F). Chilling helps the cookies hold their shape and develop that lovely crisp edge.
Step 6: Bake to Perfection
Bake the cookies for 8 to 10 minutes, keeping a close eye so the edges turn just lightly golden without browning the tops. This gentle baking preserves their classic appearance and delicate texture. Once out of the oven, transfer the cookies to a wire rack to cool completely — patience here results in the most delightful bite.
Step 7: Optional Chocolate Decoration
If you want to add a decadent twist, melt your choice of dark or white chocolate or almond bark in short 20-second bursts in the microwave, stirring in between to avoid overheating. Dip the cooled cookies halfway into the melted chocolate, then place them on parchment-lined trays. Before the chocolate sets, sprinkle with candied decorations for an extra festive touch. Allow the chocolate to firm up completely before serving.
How to Serve Danish Butter Cookies Classic Recipe
Garnishes
While the buttery richness shines brightest on its own, a drizzle or dip of dark or white chocolate instantly elevates these cookies to a stunning and indulgent treat. Adding colorful candied sprinkles not only looks charming but adds a playful crunch that contrasts beautifully with the melt-in-your-mouth texture.
Side Dishes
These classic cookies pair wonderfully with a hot cup of tea, rich coffee, or even a glass of cold milk, making them an ideal afternoon indulgence or after-dinner delight. Serving alongside fresh berries or a lightly whipped cream can add a refreshing element without overshadowing the cookie’s delicate flavor.
Creative Ways to Present
Arrange your Danish Butter Cookies Classic Recipe on a beautiful platter tied with a ribbon for gifts or festive gatherings. Try stacking them in clear jars adorned with seasonal ribbons to create a lovely homemade gift. For parties, consider combining different shapes and colors, or sandwiching two cookies with a thin spread of lemon curd or raspberry jam for a playful twist.
Make Ahead and Storage
Storing Leftovers
These cookies keep beautifully in an airtight container at room temperature for up to one week, retaining their crisp edges and tender centers. Layer them with parchment paper to prevent sticking and maintain their classic shape.
Freezing
You can also freeze unbaked piped dough by placing the shapes on a baking sheet, freezing until solid, and then transferring them to a sealed container or bag. When ready to bake, just add a couple of extra minutes to the baking time. Baked cookies freeze well, too — just wrap them tightly, and they’ll stay fresh for up to three months.
Reheating
To revive any loss of crispness, pop your stored cookies into a warm oven at 150°C (300°F) for a few minutes. Avoid microwaving as it tends to soften the cookies too much. This simple step will bring back that lovely snap every time.
FAQs
Can I substitute the butter with margarine in the Danish Butter Cookies Classic Recipe?
Butter is essential to achieve the rich flavor and tender texture unique to these cookies, so margarine isn’t recommended. However, if butter is unavailable, a high-quality margarine with no added water can be used, but expect a slight difference in taste and texture.
Why do the cookies need to be chilled before baking?
Chilling the dough helps solidify the butter, which keeps the cookies from spreading too much in the oven and helps maintain their beautiful piped shapes and delicate crumb.
Can I make the dough without a piping bag?
While piping gives the signature look, you can roll the dough into balls or use a cookie press if you don’t have piping tools. The texture will remain delicious, but the traditional shapes may not be as crisp and detailed.
What can I use if I don’t have cornstarch?
Cornstarch helps create the tender, melt-in-the-mouth texture, but if unavailable, you can try substituting with an equal amount of potato starch or reducing the flour slightly, though the texture might be a touch different.
Are the chocolates necessary to make the Danish Butter Cookies Classic Recipe?
Chocolate additions are completely optional but highly recommended if you love a little extra decadence. The cookies are delightful on their own, but dipping in chocolate adds a wonderful contrast both in flavor and presentation.
Final Thoughts
There is a special kind of joy that comes with baking the Danish Butter Cookies Classic Recipe—simple ingredients, timeless techniques, and incredible flavor all combine to create something truly magical. I wholeheartedly encourage you to try making these cookies yourself; whether for a holiday, a gift, or just a treat to savor, they never fail to bring smiles and warmth. Trust me, once you experience that buttery, crumbly goodness, these cookies will become a beloved staple in your kitchen too.
“`
Print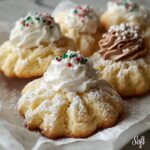
Delicious Recipe
- Prep Time: 15 minutes
- Cook Time: 10 minutes
- Total Time: 55 minutes
- Yield: 30 servings
- Category: Dessert
- Method: Baking
- Cuisine: Danish
Description
These classic Danish Butter Cookies are rich, buttery, and melt-in-your-mouth treats perfect for any occasion. Made with simple ingredients like unsalted butter, powdered sugar, and vanilla, these cookies are shaped using a piping bag and baked to a delicate golden perfection. For an extra touch, they can be dipped in melted dark or white chocolate and decorated with colorful candied sprinkles.
Ingredients
Cookie Dough
- 255 g unsalted butter, softened
- 30 g powdered sugar
- 1 teaspoon vanilla extract
- 160 g all-purpose flour
- 8 g cornstarch
- 1–2 teaspoons heavy cream, as needed
Optional Decoration
- 170 g dark chocolate chips or chocolate almond bark, melted
- 170 g white chocolate chips or white almond bark, melted
- Candied sprinkles
Instructions
- Prepare Baking Sheet: Line a baking sheet with parchment paper to prevent the cookies from sticking during baking.
- Beat Butter and Sugar: In a medium bowl, beat the softened butter for 2-3 minutes until it becomes pale and creamy. Add the powdered sugar and mix for another 2 minutes until the mixture turns light and fluffy. Stir in the vanilla extract thoroughly.
- Add Dry Ingredients: Sift in the all-purpose flour and cornstarch to the butter mixture. Mix just until the flour is incorporated and a soft dough forms, avoiding overmixing to maintain tenderness.
- Prepare Dough for Piping: Transfer the dough into a piping bag fitted with a large open star tip. Test the dough’s consistency; if it seems too stiff to pipe smoothly, add 1-2 teaspoons of heavy cream and mix until the desired texture is achieved.
- Pipe Cookies: Pipe the dough onto the prepared baking sheet in desired shapes, spacing them adequately to allow slight spreading during baking.
- Chill Dough: Place the piped cookie dough into the refrigerator for 30 minutes. This helps the cookies hold their shape during baking. Meanwhile, preheat the oven to 175°C (350°F).
- Bake Cookies: Bake the chilled cookies for 8-10 minutes until the edges turn lightly golden. Avoid browning the tops to maintain the classic appearance. Once baked, transfer cookies to a wire rack to cool completely.
- Melt Chocolate (Optional): If decorating, melt dark or white chocolate chips or almond bark in a microwave-safe bowl by heating in 20-second intervals, stirring between each until smooth. Take care not to overheat to avoid chocolate seizing.
- Decorate Cookies: Dip the cooled cookies halfway into the melted chocolate, then place them on parchment paper-lined trays. While the chocolate is still wet, sprinkle with candied sprinkles. Let the chocolate set completely before serving.
Notes
- Use softened butter at room temperature for optimal creaming and texture.
- Do not overbake; the cookies should be lightly golden at the edges but not browned on top.
- Piping the dough creates the classic ridged shape synonymous with Danish butter cookies.
- Chilling the dough before baking helps maintain shape and texture.
- If you don’t have a piping bag, you can use a plastic ziplock bag with a corner cut off.
- For a lactose-free version, substitute butter and heavy cream with dairy-free alternatives.
- The optional chocolate dip adds sweetness and aesthetic appeal but can be omitted for a simpler version.

