“`html
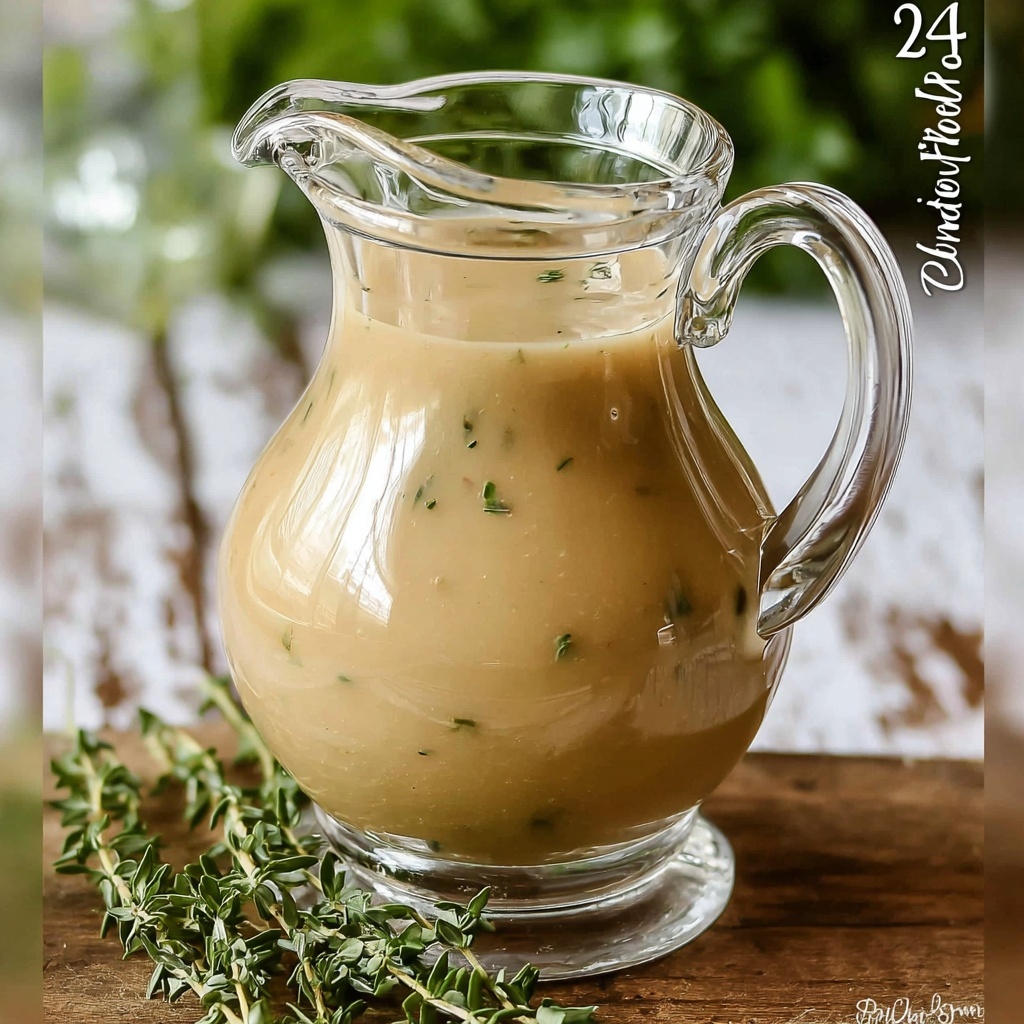
If you’ve ever wondered how to take those delicious brown pan drippings from your roast and turn them into something truly magical, you’ve landed in the right place. This Easy Homemade Gravy from Drippings Recipe is exactly what you need to elevate your meal with velvety smooth, deeply flavorful gravy that’s incredibly simple to make. It’s the perfect way to capture every bit of taste from your roast, turkey, or chicken and turn it into a sauce that will have everyone asking for seconds.

Ingredients You’ll Need
These ingredients are wonderfully straightforward, but each one plays a vital role in creating that perfect balance of richness, body, and seasoning. Together, they form a gravy that’s both comforting and elegant, showcasing the natural goodness of the drippings with no fuss.
- ½ cup fat from drippings (or unsalted butter): This is the foundation of your gravy’s richness and silky texture.
- ½ cup all-purpose flour: It thickens the gravy to that luscious, cling-to-the-spoon consistency you want.
- ½ teaspoon poultry seasoning: Adds a warm, subtle blend of herbs that enhance the savory depth.
- 3 to 4 cups drippings (add extra broth if needed): The star ingredient that brings intense meaty flavor and color.
- 1 tablespoon chopped fresh parsley (and/or fresh herbs to taste, optional): A fresh touch that brightens the finished gravy.
- Salt and black pepper (to taste): To season perfectly and highlight all those fantastic flavors.
How to Make Easy Homemade Gravy from Drippings Recipe
Step 1: Rest and Collect Your Drippings
Once your meat is cooked, transfer it to a plate and let it rest. This is the moment to scrape up all those delicious browned bits from the pan—they contain some of the best flavor you’ll get. Using the drippings to loosen those bits keeps nothing going to waste.
Step 2: Separate the Fat
Allow the drippings to settle so the fat rises to the top. If you don’t have quite enough fat, no worries—just supplement with some unsalted butter to reach ½ cup. This fat is key for cooking the flour evenly without lumps and building that smooth texture.
Step 3: Make the Roux
In a medium saucepan, combine your fat (and butter, if needed) with the flour and poultry seasoning. Cook it over medium heat for about 3 to 4 minutes while stirring constantly. This step lets the flour brown slightly and develop a toasted, nutty aroma that’s essential for a deep, flavorful gravy.
Step 4: Gradually Add Drippings and Broth
Start whisking in your drippings little by little, mixing thoroughly after each addition. It might feel thick and pasty at first, but as you keep adding liquid, it will smooth out into that perfect gravy texture. You may not need all the broth—stop when you reach your desired consistency.
Step 5: Bring to a Boil and Season
Bring the mixture to a gentle boil while whisking continually. Let it bubble for 1 to 2 minutes, which ensures the flour cooks through fully and the gravy thickens properly. Then, taste and add salt and freshly ground black pepper to suit your preferences.
Step 6: Finish with Fresh Herbs and Serve
Stir in freshly chopped parsley or any other herbs you like just before serving for a beautiful pop of color and brightness that contrasts perfectly with the deep, savory notes of the gravy.
How to Serve Easy Homemade Gravy from Drippings Recipe
Garnishes
While simple is often best, a sprinkle of fresh parsley or thyme leaves adds a lovely fresh aroma and makes your gravy visually inviting. A tiny pinch of cracked black pepper on top gives it a rustic, restaurant-quality finish that’s sure to impress.
Side Dishes
This gravy is a perfect partner for mashed potatoes, roasted vegetables, stuffing, or even a hearty meatloaf. Pour it generously over your favorites to instantly add moisture and flavor, turning a meal into a celebration of textures and tastes.
Creative Ways to Present
For a special-family-dinner touch, serve your Easy Homemade Gravy from Drippings Recipe in a beautiful gravy boat on the table, so everyone can ladle on their preferred amount. You can also swirl a little dollop on individual plates before plating, creating a lovely backdrop for your main dish.
Make Ahead and Storage
Storing Leftovers
If you have leftover gravy, don’t worry—it stores beautifully in the fridge for up to 3 days in an airtight container. Give it a good stir before reheating, as it might thicken a bit while chilled.
Freezing
You can freeze this gravy too! Portion it into freezer-safe containers and it should keep well for up to 2 months. Just thaw in the fridge overnight before reheating to preserve its silky texture and flavor.
Reheating
The best way to reheat your gravy is gently on the stovetop over low heat. Stir often, and if it gets too thick, add a splash of broth or water to loosen it. Avoid the microwave if possible, as it can cause uneven heating or clumping.
FAQs
Can I make this gravy without drippings?
While the drippings give this gravy its signature flavor, you can use broth or stock instead if needed. Just know that the depth won’t be quite the same, but adding butter for fat can help keep the richness.
What if I don’t have poultry seasoning?
No worries! You can simply use a mix of dried sage, thyme, and a little rosemary. Fresh herbs work great too, added at the end of cooking for a bright, fragrant touch.
How do I prevent lumps in my gravy?
The key is to whisk continuously while adding the liquid gradually. Cooking the roux (fat and flour mixture) until it’s slightly browned also helps avoid that raw flour taste and promotes smoothness.
Can I make this gluten-free?
Yes! Swap the all-purpose flour for a gluten-free flour blend or cornstarch. If using cornstarch, mix it with cold water first and add at the end to thicken, adjusting quantities for your desired consistency.
How long can I keep the cooked drippings before making gravy?
If you aren’t making gravy right away, you can refrigerate the drippings in an airtight container for up to 2 days. Keep the fat layer on top to help preserve the flavors until you’re ready to cook.
Final Thoughts
Making gravy from scratch doesn’t have to be intimidating, and this Easy Homemade Gravy from Drippings Recipe proves it beautifully. It’s a simple way to bring extra warmth, flavor, and love to your meal, using ingredients you likely already have at hand. Once you make this gravy, you’ll wonder how you ever settled for anything less. Go ahead—give it a try and enjoy the delicious rewards!
“`
Print
Easy Homemade Gravy from Drippings Recipe
- Prep Time: 5 minutes
- Cook Time: 15 minutes
- Total Time: 20 minutes
- Yield: 12 servings
- Category: Sauce
- Method: Stovetop
- Cuisine: American
Description
A classic homemade gravy recipe that uses drippings from cooked meat to create a rich and flavorful sauce. Perfect for enhancing the taste of roasted or grilled meats, this gravy combines savory drippings, poultry seasoning, and fresh herbs for a comforting and smooth finish.
Ingredients
Gravy Ingredients
- ½ cup fat from drippings (or unsalted butter to make up ½ cup)
- ½ cup all-purpose flour
- ½ teaspoon poultry seasoning
- 3 to 4 cups drippings (or additional broth if needed)
- 1 tablespoon chopped fresh parsley (optional)
- Salt and black pepper to taste
Instructions
- Rest the Meat and Collect Drippings: Once your meat is cooked, transfer it to a plate to rest. Use the liquid from the drippings to scrape any brown bits from the bottom and sides of the pan. Optionally strain the drippings through a fine sieve to remove solids.
- Separate Fat from Drippings: Allow the drippings to rest for a few minutes in a gravy separator or tall narrow container so the fat rises to the top. Spoon ½ cup of this fat into a medium saucepan, adding unsalted butter if needed to reach ½ cup total fat.
- Create the Roux: Stir in the flour and poultry seasoning into the fat and cook over medium heat for 3 to 4 minutes, stirring constantly until the flour begins to brown slightly and you detect a nutty aroma.
- Add Drippings and Broth: Gradually whisk in the drippings and any additional broth as needed. Whisk well after each addition. Initially the mixture will be thick but will thin as more liquid is incorporated.
- Bring to Boil: Continue whisking and bring the gravy to a boil over medium heat. Let it boil for 1 to 2 minutes until it thickens to desired consistency.
- Season and Finish: Taste the gravy and adjust seasoning with salt and black pepper. Stir in chopped fresh parsley or other herbs if desired. Serve warm alongside your meat.
Notes
- If drippings are not sufficient, supplement with low-sodium broth to reach the liquid quantity needed.
- For a gluten-free version, substitute all-purpose flour with a gluten-free flour blend or cornstarch (use half the amount and dissolve in cold liquid before adding).
- Continuous whisking during the roux and liquid incorporation prevents lumps and ensures smooth gravy.
- Use fresh herbs at the end to preserve their flavor and color.
- Can be strained again before serving for an extra smooth texture.
