
If you’re searching for a comforting, flavorful bread that brings a zesty twist to your table, this Green Chili Cheese Bread Recipe is absolutely the one to try. Packed with the mild heat of green chilis and the creamy richness of melted Monterrey or cheddar cheese, this bread forms a golden, crusty loaf with a soft, moist interior. Every bite offers a delightful balance of spice and savory goodness that perfectly complements any meal or stands on its own as a delicious snack. Whether you’re a novice baker or a seasoned pro, this recipe is straightforward and rewarding, making it a new favorite you’ll return to again and again.
Ingredients You’ll Need
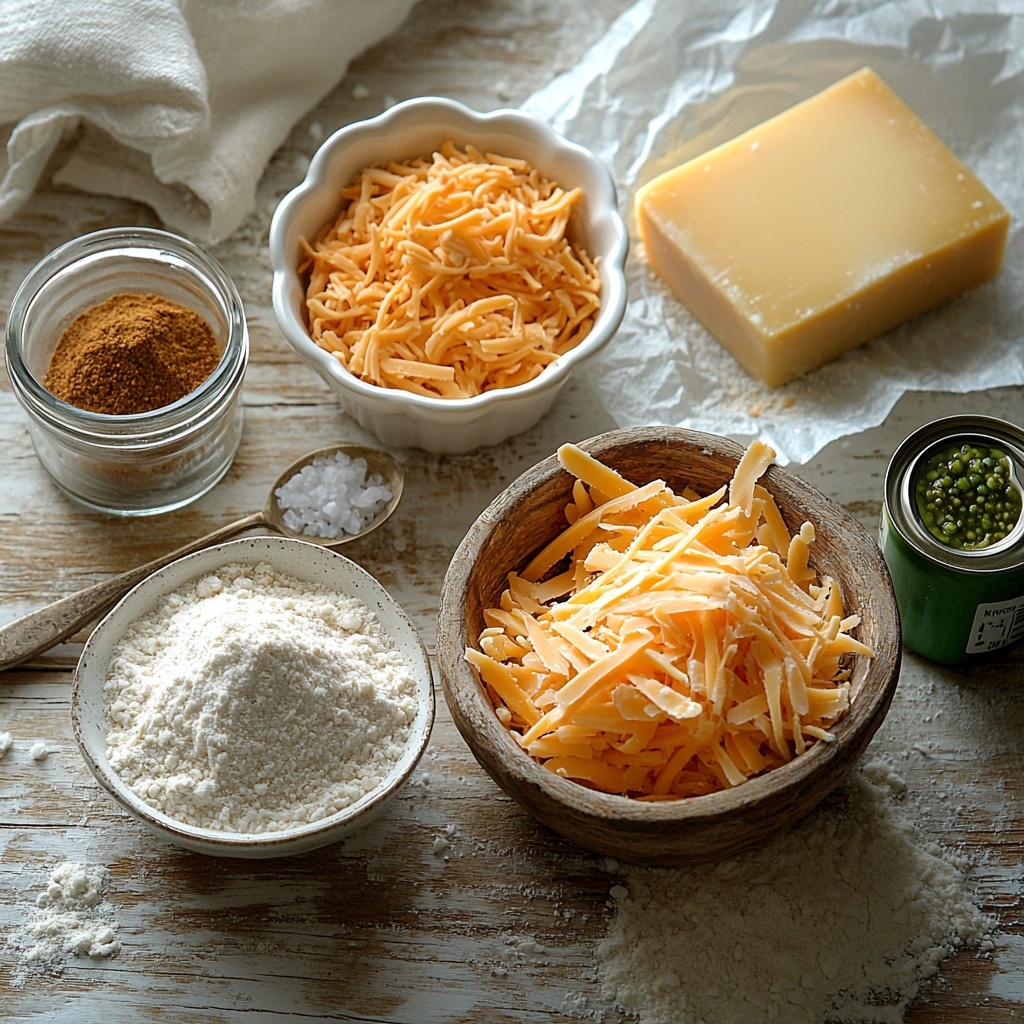
The magic behind this Green Chili Cheese Bread Recipe lies in its simple yet thoughtfully chosen ingredients. Each component plays a crucial part in building the bread’s incredible texture, flavor, and aroma, from the hearty flours to the spicy green chilis and melting cheese.
- 2 cups whole wheat flour: Adds a wholesome, nutty flavor and hearty texture to your bread.
- 2 cups all-purpose flour: Provides structure and lightness for that perfect crumb.
- 2 teaspoons salt: Enhances all the flavors while controlling yeast fermentation.
- 2 teaspoons cumin: Offers a warm, earthy spice that complements the green chili beautifully.
- ¾ teaspoon active dry yeast: The key ingredient responsible for the loaf’s rise and airy texture.
- 1 teaspoon ground black pepper: Lends a subtle kick that livens up the flavor.
- 2 cups room temperature water: Hydrates the dough and activates the yeast for fermentation.
- 1 ½ cups Monterrey cheese or cheddar: Melts into gooey pockets, adding richness and tang.
- 1 (4 ounce) can green chilis: Brings a mild heat and vibrant green color, infusing the bread with southwestern charm.
How to Make Green Chili Cheese Bread Recipe
Step 1: Read through all instructions
Before you get your hands floury, take a moment to read the recipe from start to finish. This ensures you know the timing, equipment, and steps involved, making the whole process smoother and more enjoyable.
Step 2: Mix the dry ingredients
In a medium bowl, combine the whole wheat flour, all-purpose flour, salt, cumin, yeast, and black pepper. Mixing these dry ingredients thoroughly allows the flavors to distribute evenly throughout your bread, giving every slice a perfect balance of spice and savor.
Step 3: Add wet ingredients including green chili juice
Next, pour in the water along with the green chilis and their juice. The chili juice adds extra moisture and a subtle kick, so mix everything for about a minute until it forms a sticky, shaggy dough.
Step 4: Let the dough rest
Cover the bowl with plastic wrap and let your dough sit at room temperature anywhere from 10 to 18 hours. This long fermentation period develops rich, complex flavors while the yeast works its magic to give your bread that irresistible airy texture.
Step 5: Preheat the oven and dutch oven
An important step is preheating your oven to 475°F and heating the dutch oven inside for 30 to 45 minutes. This ensures the baking vessel is scorchingly hot, which is critical for giving your bread its characteristic crisp crust.
Step 6: Shape the dough
Generously flour your work surface, then gently scoop out the dough. Shape it carefully into a ball without deflating it too much—treat it gently to keep those air bubbles alive.
Step 7: Prepare to bake
Place the shaped dough on a piece of parchment paper. This makes transferring it into the dutch oven simple and mess-free, letting you keep that lovely round shape intact.
Step 8: Bake covered
Carefully place the dough on the parchment paper into the heated dutch oven and cover it with the lid. Bake for 30 minutes to trap steam that helps the bread rise beautifully and forms a delightful crust.
Step 9: Bake uncovered to brown
Remove the lid and continue baking for another 10 to 15 minutes until the loaf turns a gorgeous golden brown. This final step adds crunch and depth to the crust, balancing out the softer interior.
Step 10: Cool before slicing
Use the parchment paper to lift the loaf out and place it on a wire rack. Allow it to cool for at least 30 minutes. Not only does this make slicing easier, but it also lets the crumb finish setting for perfect texture.
How to Serve Green Chili Cheese Bread Recipe
Garnishes
While this bread is delicious on its own, adding a pat of butter or a sprinkle of fresh chopped cilantro enhances its fresh and savory profile. For a bit more heat and color, a drizzle of spicy honey or a handful of sliced green onions does wonders.
Side Dishes
Green Chili Cheese Bread pairs beautifully with soups like tomato basil or chili con carne, making it a comforting complement that soaks up every flavorful spoonful. It also works fantastically alongside southwestern dishes, grilled meats, or fresh salads to bring a satisfying and unique twist.
Creative Ways to Present
Try slicing this bread thickly and toasting it to make mouthwatering grilled cheese sandwiches bursting with melty cheese and green chili goodness. Or cube it into croutons to add a zesty crunch to salads and soups. For entertaining, arrange slices on a board with cheeses, avocado, and salsas to create an inviting, colorful spread.
Make Ahead and Storage
Storing Leftovers
If you happen to have any leftovers, store them tightly wrapped in plastic wrap or in an airtight container at room temperature for up to two days. This keeps the bread moist while preserving its delicious flavors.
Freezing
This Green Chili Cheese Bread Recipe freezes beautifully. Wrap the cooled loaf tightly in foil and place it in a freezer bag. It will keep well for up to three months—perfect for baking ahead or saving leftovers for later indulgence.
Reheating
To enjoy the bread as if freshly baked, reheat slices in a toaster oven or regular oven at 350°F until warmed through and the crust regains its crispness. You’ll love how the cheese re-melts and the green chili aroma revives instantly.
FAQs
Can I use only one type of flour?
Yes, you can use all all-purpose flour if you prefer, though using whole wheat adds more nutty flavor and a heartier texture that complements the green chilis amazingly well.
What cheese works best for this recipe?
Monterrey Jack and cheddar are ideal because they melt smoothly and have a mild, creamy taste that balances the spice from the chilis. Feel free to experiment with your favorite cheeses!
How spicy is this bread?
This bread offers a gentle warmth rather than intense heat, making it accessible to most palates. If you want it milder, reduce the amount of green chilis; for more heat, add a pinch of cayenne or use hotter chilis.
Can I make this bread without a dutch oven?
You can bake it on a preheated baking stone or heavy baking sheet covered loosely with an inverted roasting pan to trap steam, but a dutch oven provides the best crust and rise.
Is this recipe suitable for beginners?
Absolutely! The steps are straightforward, and the overnight fermentation means most of the work happens while you relax. It’s a forgiving recipe that yields impressive results even for first-time bread bakers.
Final Thoughts
There’s something so special about homemade bread, especially when it’s bursting with the comforting, vibrant flavors of green chili and melted cheese. This Green Chili Cheese Bread Recipe is not just a dish; it’s a little celebration of warmth, texture, and zest that you can share with family and friends. Once you try it, I’m confident it will become a beloved staple in your kitchen—perfect for cozy nights, gatherings, or whenever you need a tasty, satisfying bite. So go ahead, gather your ingredients, and enjoy every step of making this delightful bread that promises to brighten your table!
Print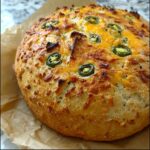
Green Chili Cheese Bread Recipe
- Prep Time: 15 minutes
- Cook Time: 45 minutes
- Total Time: 11 hours (including resting time)
- Yield: 1 loaf (about 8-10 servings)
- Category: Bread
- Method: Baking
- Cuisine: American
- Diet: Vegetarian
Description
Green Chili Cheese Bread is a flavorful homemade loaf combining the warmth of cumin and black pepper with the rich taste of Monterrey cheese and spicy green chilis. This bread recipe uses a simple no-knead method with a long fermentation, resulting in a crusty exterior and soft, cheesy interior. Perfect for sandwiches or as a savory side.
Ingredients
Dry Ingredients
- 2 cups whole wheat flour
- 2 cups all-purpose flour
- 2 teaspoons salt
- 2 teaspoons cumin
- ¾ teaspoon active dry yeast
- 1 teaspoon ground black pepper
Wet Ingredients
- 2 cups room temperature water
- 1 ½ cups Monterrey cheese or cheddar, shredded
- 1 (4 ounce) can green chilis, including juice
Instructions
- Preparation: Read the instructions thoroughly before beginning to ensure a smooth baking process.
- Mix Dry Ingredients: In a medium-sized bowl, combine the whole wheat flour, all-purpose flour, salt, cumin, active dry yeast, and ground black pepper. Mix well to distribute the ingredients evenly.
- Add Wet Ingredients: Pour in the room temperature water along with the can of green chilis including their juice. Mix everything together vigorously for about one minute until a thick, sticky dough forms. Stir in the shredded Monterrey cheese ensuring it is well incorporated.
- Rest the Dough: Cover the bowl tightly with saran wrap and let the dough rest at room temperature for 10 to 18 hours. This long fermentation develops flavor and texture.
- Preheat Oven and Dutch Oven: About 45 minutes before baking, preheat your oven to 475°F (246°C). Place your Dutch oven inside the oven to heat for at least 30 to 45 minutes to ensure it is thoroughly hot for baking the bread.
- Shape the Dough: Generously flour your work surface. Gently remove the dough from the bowl and shape it carefully into a round loaf. Avoid deflating it too much to keep the air pockets intact.
- Prepare for Baking: Place the shaped dough ball onto a piece of parchment paper to make transferring easier.
- Bake Covered: Using the parchment paper, carefully transfer the loaf into the hot Dutch oven. Cover with the lid and place it back in the oven. Bake covered for 30 minutes, which helps steam the bread and create a crisp crust.
- Bake Uncovered: Remove the lid and continue baking the bread for an additional 10 to 15 minutes. This step browns the crust to a beautiful golden color and adds extra crunch.
- Remove and Cool: Carefully lift the parchment paper to transfer the bread from the Dutch oven to a wire cooling rack. Allow the bread to cool for at least 30 minutes before slicing to ensure the interior sets properly.
Notes
- Allowing the dough to rest for 10-18 hours develops a deeper flavor and better texture due to slow fermentation.
- Using a Dutch oven traps steam to create a crusty exterior similar to artisan bread.
- Be careful when handling the hot Dutch oven to prevent burns.
- You can substitute cheddar cheese if Monterrey cheese is unavailable.
- Letting the bread cool fully before slicing helps prevent a gummy interior.


