Description
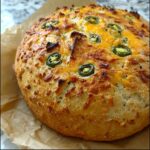
Green Chili Cheese Bread is a flavorful homemade loaf combining the warmth of cumin and black pepper with the rich taste of Monterrey cheese and spicy green chilis. This bread recipe uses a simple no-knead method with a long fermentation, resulting in a crusty exterior and soft, cheesy interior. Perfect for sandwiches or as a savory side.
Ingredients
Scale
Dry Ingredients
- 2 cups whole wheat flour
- 2 cups all-purpose flour
- 2 teaspoons salt
- 2 teaspoons cumin
- ¾ teaspoon active dry yeast
- 1 teaspoon ground black pepper
Wet Ingredients
- 2 cups room temperature water
- 1 ½ cups Monterrey cheese or cheddar, shredded
- 1 (4 ounce) can green chilis, including juice
Instructions
- Preparation: Read the instructions thoroughly before beginning to ensure a smooth baking process.
- Mix Dry Ingredients: In a medium-sized bowl, combine the whole wheat flour, all-purpose flour, salt, cumin, active dry yeast, and ground black pepper. Mix well to distribute the ingredients evenly.
- Add Wet Ingredients: Pour in the room temperature water along with the can of green chilis including their juice. Mix everything together vigorously for about one minute until a thick, sticky dough forms. Stir in the shredded Monterrey cheese ensuring it is well incorporated.
- Rest the Dough: Cover the bowl tightly with saran wrap and let the dough rest at room temperature for 10 to 18 hours. This long fermentation develops flavor and texture.
- Preheat Oven and Dutch Oven: About 45 minutes before baking, preheat your oven to 475°F (246°C). Place your Dutch oven inside the oven to heat for at least 30 to 45 minutes to ensure it is thoroughly hot for baking the bread.
- Shape the Dough: Generously flour your work surface. Gently remove the dough from the bowl and shape it carefully into a round loaf. Avoid deflating it too much to keep the air pockets intact.
- Prepare for Baking: Place the shaped dough ball onto a piece of parchment paper to make transferring easier.
- Bake Covered: Using the parchment paper, carefully transfer the loaf into the hot Dutch oven. Cover with the lid and place it back in the oven. Bake covered for 30 minutes, which helps steam the bread and create a crisp crust.
- Bake Uncovered: Remove the lid and continue baking the bread for an additional 10 to 15 minutes. This step browns the crust to a beautiful golden color and adds extra crunch.
- Remove and Cool: Carefully lift the parchment paper to transfer the bread from the Dutch oven to a wire cooling rack. Allow the bread to cool for at least 30 minutes before slicing to ensure the interior sets properly.
Notes
- Allowing the dough to rest for 10-18 hours develops a deeper flavor and better texture due to slow fermentation.
- Using a Dutch oven traps steam to create a crusty exterior similar to artisan bread.
- Be careful when handling the hot Dutch oven to prevent burns.
- You can substitute cheddar cheese if Monterrey cheese is unavailable.
- Letting the bread cool fully before slicing helps prevent a gummy interior.