“`html
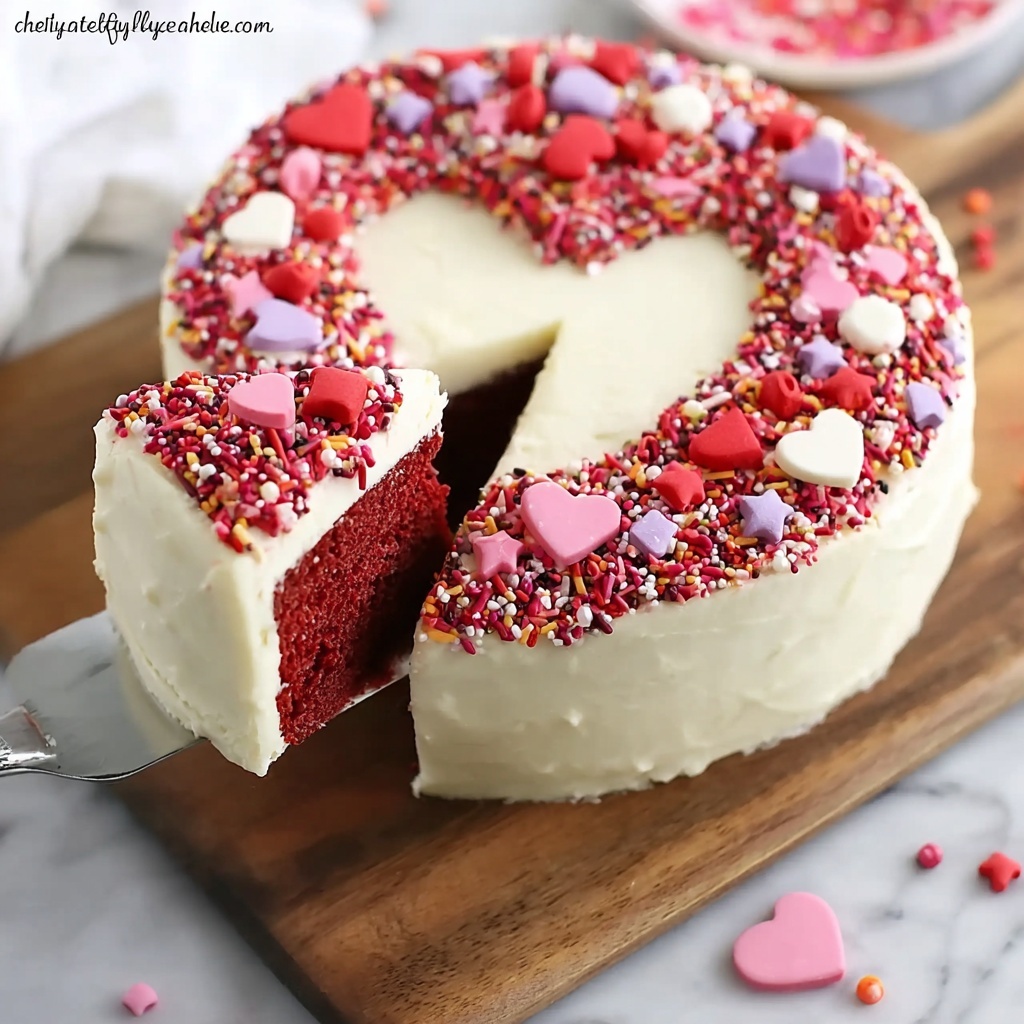
There is something undeniably magical about a Heart-Shaped Cocoa Cake with Cream Cheese Frosting Recipe. This dessert combines the rich, deep flavors of cocoa with the creamy tang of luscious cream cheese frosting, all beautifully shaped into a heart that makes it perfect for celebrations or just because. It’s a showstopper that feels both classic and comforting, delivering moist cake layers with a velvety smooth frosting that simply melts in your mouth. Whether you’re making it for a loved one or treating yourself, this recipe brings warmth and sweetness in every bite.
Ingredients You’ll Need
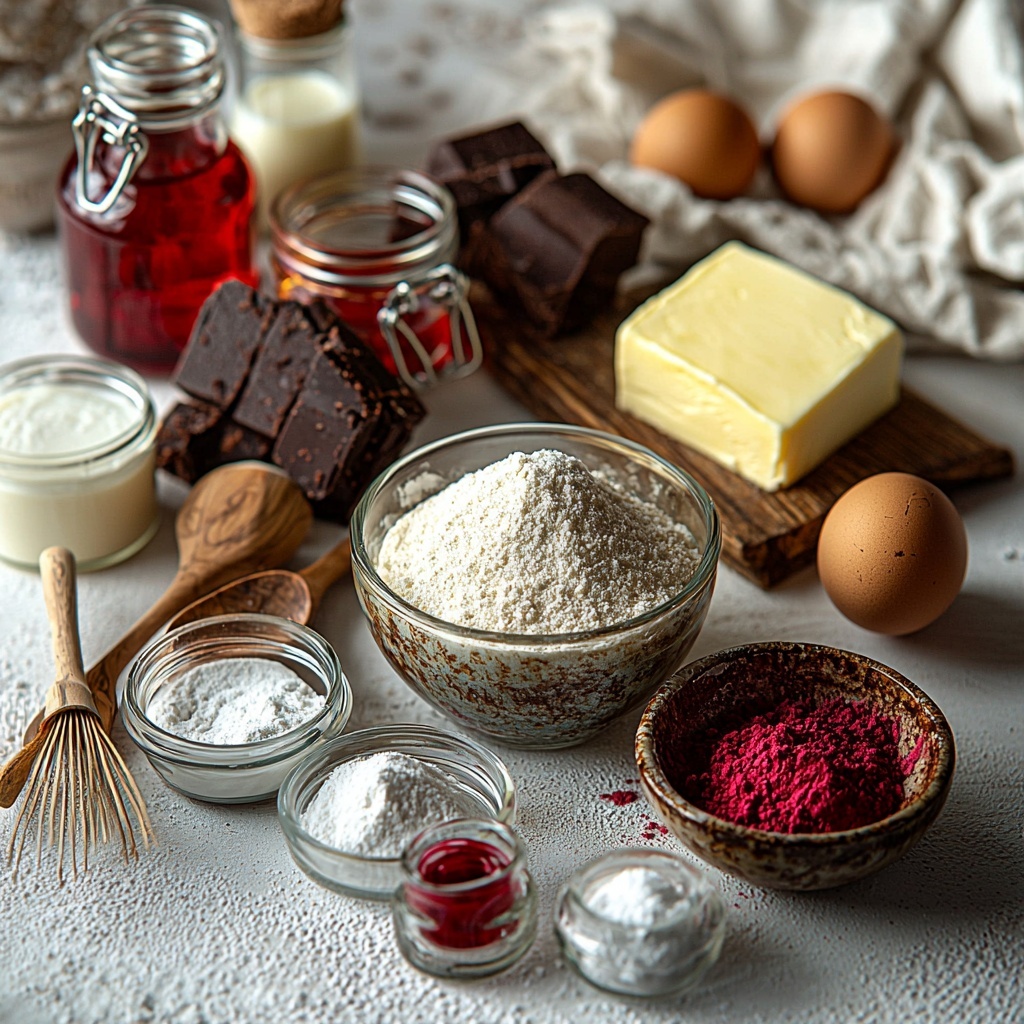
Getting ready to bake this Heart-Shaped Cocoa Cake with Cream Cheese Frosting Recipe is a joy because the ingredients are straightforward yet essential. Each one plays a special role, from the cocoa powder adding that rich chocolate depth to the buttermilk that keeps the cake tender and moist. The cream cheese frosting is a dreamy contrast that ties everything deliciously together.
- 2 ½ Cups all-purpose flour: Provides the sturdy base for a tender cake crumb.
- ¼ cup cocoa powder: Adds the rich, chocolatey flavor that defines the cake.
- 1 ½ teaspoons baking soda: Helps your cake rise beautifully and become fluffy.
- 1 teaspoon baking powder: Gives an extra lift so the texture stays light.
- 1 ½ cups granulated sugar: Sweetens just right, balancing the cocoa’s boldness.
- ½ teaspoon salt: Enhances all flavors and cuts through sweetness.
- 1 ½ cups buttermilk, room temperature: Keeps the cake moist and adds a subtle tang.
- 1 cup vegetable oil: Ensures moistness without heaviness or dryness.
- 2 large eggs, room temperature: Bind ingredients and provide structure.
- 1 teaspoon white vinegar: Reacts with baking soda for a tender crumb.
- 2 teaspoons vanilla extract: Adds warmth and rounds out the flavor.
- 2 tablespoons liquid red food coloring: Gives the cake its romantic, vibrant hue.
- 1 pound cream cheese, room temperature: Base for the smooth, creamy frosting.
- 8 ounces unsalted butter, room temperature: Makes the frosting rich and spreadable.
- 1 teaspoon vanilla extract: Infuses the frosting with a sweet aroma.
- 1 ½ cups powdered sugar: Sweetens and thickens the frosting perfectly.
How to Make Heart-Shaped Cocoa Cake with Cream Cheese Frosting Recipe
Step 1: Prepare Your Pans
Start by preheating your oven to 350°F and preparing your pans – one 8-inch round and one 8-inch square. Spray each pan thoroughly with pan spray, line them with parchment paper, and spray the parchment as well. This step ensures your beautifully baked cakes will release easily and maintain the perfect shape for assembling a heart.
Step 2: Mix the Dry Ingredients
In a medium bowl, sift together the flour, cocoa powder, baking soda, and baking powder to avoid clumps and create an airy texture. Then add the sugar and salt, whisking everything together well so that the flavors are evenly distributed throughout the batter.
Step 3: Combine the Wet Ingredients
In a large bowl, whisk together buttermilk, vegetable oil, eggs, white vinegar, vanilla extract, and that vibrant red food coloring. Mixing these wet ingredients until smooth ensures your batter will be silky and consistent, ready to marry beautifully with the dry ingredients.
Step 4: Make the Batter
Gradually add the dry flour mixture to the wet ingredients, whisking gently but thoroughly until everything is just combined. Be careful not to overmix, as this keeps the cake light and tender rather than dense and tough.
Step 5: Bake the Cake
Divide your smooth batter evenly between the two prepared pans. Slide them into the oven and bake for 30 to 35 minutes. You’ll know it’s done when a toothpick inserted in the center comes out clean or when pressing gently causes the cakes to spring back.
Step 6: Cool the Cakes
Once baked to perfection, allow the cakes to cool in their pans for about 10-15 minutes. Then carefully remove them and transfer to a wire rack to cool completely. Cooling is crucial as this keeps your frosting from melting when it’s time to decorate.
Step 7: Make the Cream Cheese Frosting
Beat the cream cheese and unsalted butter together in a large bowl or stand mixer until smooth and creamy. This blend forms the luscious base of your frosting.
Step 8: Add Flavor to Frosting
Mix in the vanilla extract, being sure to scrape down the sides of your bowl so everything combines evenly for a beautiful, flavorful frosting.
Step 9: Finish the Frosting
Gradually add powdered sugar on low speed to incorporate it smoothly, then increase the speed and beat until the frosting is fluffy and perfect for spreading.
Step 10: Assemble the Heart-Shaped Cocoa Cake with Cream Cheese Frosting Recipe
Once the cakes are fully cooled, carefully cut the round cake in half to form two half circles. Place the square cake on your serving plate and arrange the two half circles on adjacent sides, creating the unmistakable heart shape with ease.
Step 11: Apply a Crumb Coat
Spread a thin layer of frosting over the entire cake to trap any loose crumbs. Smooth it out gently and chill for a short while if you prefer before adding the final frosting layer to keep your cake looking clean and polished.
Step 12: Final Frosting Layer and Decoration
Spread the remaining frosting evenly over the cake’s surface. Now is the moment to get creative by decorating with sprinkles, edible glitter, or fresh berries to make it truly special.
Step 13: Chill Before Serving
Refrigerate the finished cake for at least 30 minutes to let the frosting set perfectly. This step ensures clean slices and a delightful presentation when it’s time to dig in!
How to Serve Heart-Shaped Cocoa Cake with Cream Cheese Frosting Recipe
Garnishes
A simple dusting of cocoa powder or a few fresh raspberries on top of the cream cheese frosting adds a lovely visual pop and bursts of tartness that cut through the richness, complementing the Heart-Shaped Cocoa Cake with Cream Cheese Frosting Recipe wonderfully.
Side Dishes
This cake pairs beautifully with a scoop of vanilla bean ice cream or some whipped cream on the side, creating a rich and creamy balance that enhances the chocolatey cocoa flavors without overpowering them.
Creative Ways to Present
Present your heart-shaped wonder on a decorative board or a colorful cake stand for extra charm. Add edible flowers or pipe frosting borders to elevate the look for special occasions like anniversaries or Valentine’s Day celebrations.
Make Ahead and Storage
Storing Leftovers
Keep any leftover Heart-Shaped Cocoa Cake with Cream Cheese Frosting Recipe tightly covered in the refrigerator. This will maintain the frosting’s freshness and the cake’s moisture for up to 4 days — perfect for enjoying a little sweetness over time.
Freezing
If you’d like to freeze the cake, it’s best to do so without the frosting. Wrap the cake layers tightly in plastic wrap and aluminum foil before freezing. When you’re ready to enjoy, thaw in the refrigerator overnight and then frost as usual for the freshest results.
Reheating
Since this cake is best served chilled, reheating is not recommended. Instead, bring refrigerated slices to room temperature for about 20 minutes before serving to unlock the full flavor and tender texture.
FAQs
Can I substitute regular milk for buttermilk in this recipe?
Yes, you can make a buttermilk substitute by adding 1 tablespoon of white vinegar or lemon juice to 1 ½ cups of milk and letting it sit for 5-10 minutes. This mimics buttermilk’s acidity, helping with the cake’s moisture and tenderness.
Is the red food coloring necessary?
The food coloring is optional but it brings a lovely, vibrant hue that adds a romantic, festive touch to this Heart-Shaped Cocoa Cake with Cream Cheese Frosting Recipe. You can omit it if you prefer a more traditional cocoa color.
How do I avoid cracked frosting?
Make sure your cake is completely cool before frosting, and apply an initial crumb coat to seal crumbs. Chilling the cake briefly before the final layer helps the frosting set smoothly and prevents cracking.
Can I make this cake vegan or dairy-free?
This specific recipe relies on dairy ingredients like cream cheese and buttermilk, so adapting it would require several substitutions such as using vegan cream cheese and a dairy-free milk alternative with vinegar. The texture and flavor will be different but still delicious with the right tweaks.
Why do I need to chill the cake before serving?
Chilling sets the cream cheese frosting, making it firmer and easier to slice with clean cuts. It also helps the flavors meld together for a more satisfying taste experience.
Final Thoughts
Making this Heart-Shaped Cocoa Cake with Cream Cheese Frosting Recipe is a joyful baking adventure that rewards you with a stunning cake perfect for celebrating love, friendship, or simply your passion for baking. The rich cocoa flavor paired with silky cream cheese frosting is irresistible, and the heart shape adds an extra layer of heartfelt charm. Don’t hesitate to try this recipe soon — it’s sure to become a beloved staple in your kitchen!
“`
Print
Heart-Shaped Cocoa Cake with Cream Cheese Frosting Recipe
- Prep Time: 30 minutes
- Cook Time: 35 minutes
- Total Time: 1 hour 5 minutes
- Yield: 12 servings
- Category: Dessert
- Method: Baking
- Cuisine: American
Description
This Heart Shaped Cocoa Cake with Cream Cheese Frosting is a visually stunning dessert perfect for special occasions. Featuring a moist and rich cocoa-flavored cake combined with a smooth, tangy cream cheese frosting, this recipe guides you step-by-step to create a heart-shaped cake that impresses both in taste and presentation. Utilizing simple ingredients and straightforward baking techniques, it delivers a luscious treat that’s as delightful to bake as it is to enjoy.
Ingredients
Cake Ingredients
- 2 ½ Cups all-purpose flour
- ¼ cup cocoa powder
- 1 ½ teaspoons baking soda
- 1 teaspoon baking powder
- 1 ½ cups granulated sugar
- ½ teaspoon salt
- 1 ½ cups buttermilk, room temperature
- 1 cup vegetable oil
- 2 large eggs, room temperature
- 1 teaspoon white vinegar
- 2 teaspoons vanilla extract
- 2 tablespoons liquid red food coloring
Frosting Ingredients
- 1 pound cream cheese, room temperature
- 8 ounces unsalted butter, room temperature
- 1 teaspoon vanilla extract
- 1 ½ cups powdered sugar
Instructions
- Prepare Pans: Preheat your oven to 350°F (175°C). Spray one 8-inch round pan and one 8-inch square pan with pan spray, then line each with parchment paper. Additionally, spray the parchment paper to prevent sticking and set aside for batter.
- Mix Dry Ingredients: In a medium bowl, sift together the all-purpose flour, cocoa powder, baking soda, and baking powder. Add the granulated sugar and salt, whisk everything together to ensure even distribution, then set this mixture aside.
- Combine Wet Ingredients: In a large bowl, whisk together the buttermilk, vegetable oil, eggs, white vinegar, vanilla extract, and red food coloring until the mixture is smooth and homogenous.
- Make Batter: Gradually incorporate the dry ingredient mixture into the wet ingredients, whisking gently until the batter is smooth and fully combined. Be careful not to overmix to maintain a tender crumb.
- Bake: Evenly divide the batter between the prepared pans. Place them in the oven and bake for 30 to 35 minutes. The cakes are done when a toothpick inserted in the center comes out clean or the cake springs back when gently pressed.
- Cool Cakes: Allow the cakes to cool in their pans for 10 to 15 minutes. Then, carefully remove them from the pans and transfer to a wire cooling rack to cool completely before frosting.
- Make Frosting: In a large mixing bowl or stand mixer, beat together the cream cheese and unsalted butter until the mixture is creamy and smooth.
- Add Flavor: Mix in the vanilla extract, scraping down the sides of the bowl as needed to ensure even blending.
- Finish Frosting: Gradually add the powdered sugar while mixing at low speed to avoid powder clouds. Once incorporated, increase the mixer speed and beat the frosting until light and fluffy.
- Assemble Cake: Once the cakes have completely cooled, cut the round cake horizontally in half to create two half circles. Place the square cake on your serving plate, then arrange the two half circles on adjacent sides of the square to form a heart shape.
- Apply Crumb Coat: Spread a thin layer of frosting over the entire assembled cake to trap any loose crumbs. Smooth the layer evenly, then chill the cake briefly if desired to set the crumb coat.
- Final Frosting Layer: Spread the remaining frosting evenly over the cake, covering all surfaces smoothly. Decorate the cake with sprinkles or any decoration of your choice.
- Chill Before Serving: Refrigerate the decorated cake for at least 30 minutes to allow the frosting to set properly, making slicing easier and presentation neater.
Notes
- Room temperature ingredients like eggs, buttermilk, cream cheese, and butter help the batter and frosting blend smoothly without curdling.
- If liquid red food coloring is unavailable, gel or paste food coloring can be used for more vibrant color with less liquid added.
- Be careful not to overmix the batter to keep the cake light and tender; mix until just combined.
- Make sure cakes are completely cool before frosting to prevent the frosting from melting or sliding off.
- For a stronger cream cheese flavor, allow the cream cheese to reach full room temperature before mixing.
- This cake is best enjoyed within 2-3 days; keep refrigerated and covered.
- Decorate with fresh strawberries or chocolate shavings for an extra special touch.


