
There is something truly enchanting about the Magic Candy Recipe that brings a dash of whimsy and a burst of sweetness to any moment. This delightful homemade treat is not only incredibly simple to make but also offers a perfect balance of crunch, flavor, and vibrant colors that can brighten up your day or any celebration. Whether you choose classic vanilla or a refreshing peppermint twist, creating this candy from scratch feels like a special little kitchen adventure you’ll want to savor again and again.
Ingredients You’ll Need
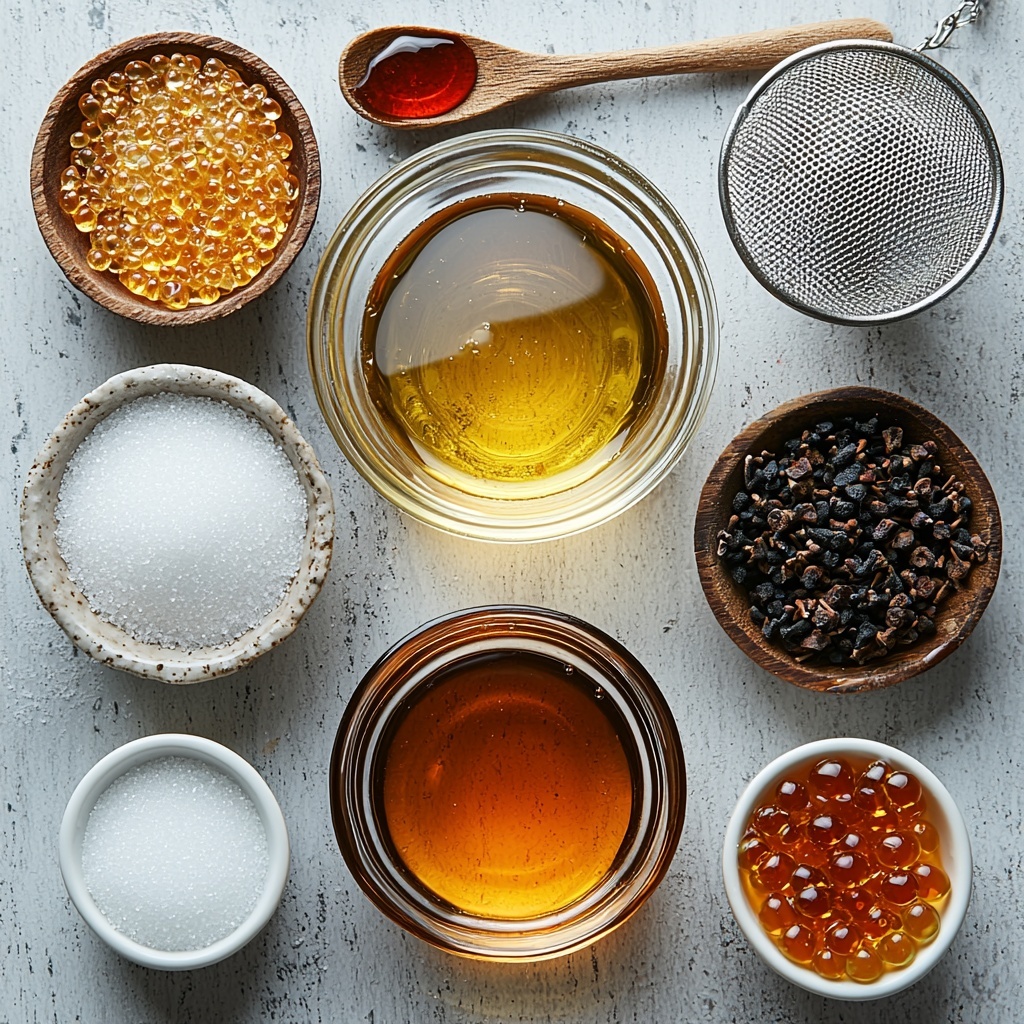
Gathering the ingredients for this Magic Candy Recipe is a breeze, yet each one plays a crucial role in delivering the perfect texture, flavor, and appearance. From the granulated sugar that forms the candy’s foundation to the flavorful extract that adds an unforgettable aroma, every element counts.
- Granulated sugar: The backbone of the candy, providing sweetness and structure.
- Light corn syrup: Prevents crystallization and keeps the candy smooth and glossy.
- Water: Helps dissolve the sugar evenly and controls the cooking temperature.
- Flavoring extract (vanilla, peppermint, etc.): Adds a personalized flavor kick that makes the candy uniquely yours.
- Food coloring (optional): Brings a pop of color to your candy, making it eye-catching and festive.
- Powdered sugar: Used for dusting to prevent the pieces from sticking together.
How to Make Magic Candy Recipe
Step 1: Combine Your Base Ingredients
Start by placing granulated sugar, light corn syrup, and water in a medium saucepan. This trio is the foundational mix that, with just a little heat and patience, transforms into magical candy. Stir them together gently to get everything evenly distributed before you begin heating.
Step 2: Dissolve the Sugar
Cook the mixture over medium heat, stirring constantly. This step is essential because it ensures the sugar dissolves completely, preventing any grainy texture in your final candy. You’ll notice the liquid becoming clear and smooth—that’s your cue to prepare for the next stage.
Step 3: Achieve the Hard-Crack Stage
Now, cook the syrup without stirring until it reaches the hard-crack stage between 300-310°F (149-154°C). Using a candy thermometer here is key. This stage guarantees the candy will harden with that satisfying brittle crunch everyone loves.
Step 4: Add Flavor and Color
Remove the saucepan from heat promptly and stir in your chosen flavoring extract and food coloring if you like. This is where your Magic Candy Recipe truly comes alive, as you get to personalize the candy with delightful flavors and hues that match your mood or the occasion.
Step 5: Pour the Mixture
Pour the hot candy mixture onto a lightly greased baking sheet or silicone mat. Make sure to spread it evenly but work quickly because the mixture hardens fast. The smooth surface helps the candy cool uniformly without sticking.
Step 6: Let It Harden
Allow the candy to cool completely until it becomes hard. This chilling period is an exciting wait—knowing that your delicious Magic Candy Recipe is nearly ready to enjoy.
Step 7: Break Into Pieces
Once hardened, gently break the candy into small, bite-sized pieces. This hands-on step is fun and lets you decide just how big or small you want each candy to be.
Step 8: Dust to Finish
Finally, dust the pieces lightly with powdered sugar. This simple touch keeps the candies from sticking together and adds a delicate finish to your homemade treat.
How to Serve Magic Candy Recipe
Garnishes
While the Magic Candy Recipe shines on its own, dusting the pieces with a little extra powdered sugar or sprinkling crushed nuts on top before the candy fully hardens can add texture and enhance visual appeal. Brightly colored candy can also be paired with edible glitter or delicate sugar roses for festive occasions.
Side Dishes
Serve your Magic Candy alongside a hot cup of tea or coffee for a cozy afternoon treat. It also pairs wonderfully with ice cream or custard desserts, where the candy’s crisp texture contrasts beautifully with creamy softness.
Creative Ways to Present
Package your Magic Candy Recipe pieces in clear jars tied with ribbons as charming gifts. For parties, arrange the candy on colorful platters, or skewer bites for a fun and portable candy treat that guests can enjoy easily.
Make Ahead and Storage
Storing Leftovers
Your homemade Magic Candy Recipe keeps best when stored in an airtight container at room temperature. This prevents moisture from softening the candy and keeps it crisp and fresh for several weeks.
Freezing
While freezing isn’t usually recommended for this candy because it can introduce moisture and cause stickiness, if you must freeze it, wrap each piece well in parchment paper and seal tightly in a freezer bag to protect from condensation.
Reheating
Reheating isn’t an option for this hard candy, but if you want to make another batch, just follow the recipe again for fresh, crispy Magic Candy that everyone will rave about.
FAQs
Can I use different flavor extracts for the Magic Candy Recipe?
Absolutely! One of the joys of this recipe is its versatility. Vanilla, peppermint, almond, or even fruit extracts work wonderfully and allow you to tailor the candy to your personal preferences.
What is the hard-crack stage, and why is it important?
The hard-crack stage means the sugar mixture reaches a temperature where it will harden into a brittle candy once cooled, which is essential for that classic crunch in Magic Candy Recipe.
Can I omit the food coloring?
Yes, the food coloring is optional and mainly for visual appeal. Your candy will still taste amazing without it!
What should I do if my candy turns out sticky?
Sticky candy usually means it absorbed moisture. Make sure to store your Magic Candy Recipe properly in an airtight container and dust with powdered sugar to keep it dry and separate.
Is it safe to pour hot sugar mixture directly onto a baking sheet?
Yes, but be very cautious. Always use a lightly greased baking sheet or silicone mat and handle the hot mixture carefully to avoid burns.
Final Thoughts
Making the Magic Candy Recipe is like capturing a little bit of kitchen magic that turns simple ingredients into a joyful, crunchy delight. It’s a fantastic project to share with friends and family, and the colorful variations mean you can tailor it for any occasion. Trust me, once you try this recipe, the sweet satisfaction will keep you coming back for more!
Print
Magic Candy Recipe
- Prep Time: 5 minutes
- Cook Time: 15 minutes
- Total Time: 20 minutes
- Yield: About 20 pieces
- Category: Candy
- Method: Stovetop
- Cuisine: American
Description
This Magic Candy recipe guides you through making delightful homemade hard candies with simple ingredients like sugar, corn syrup, and water. Flavored with your choice of extract and optionally colored, these candies harden into perfect bite-sized treats dusted with powdered sugar to prevent sticking. Ideal for gifting or snacking, this classic candy recipe is straightforward and fun to make.
Ingredients
Ingredients
- 1 cup granulated sugar
- 1/2 cup light corn syrup
- 1/4 cup water
- 1/4 teaspoon flavoring extract (vanilla, peppermint, etc.)
- Food coloring (optional)
- Powdered sugar, for dusting
Instructions
- Combine Ingredients: In a medium saucepan, combine granulated sugar, corn syrup, and water to prepare the candy base.
- Dissolve Sugar: Cook over medium heat while stirring constantly until the sugar completely dissolves to ensure a smooth candy texture.
- Cook to Hard-Crack Stage: Continue cooking the mixture without stirring, monitoring with a candy thermometer until it reaches 300-310°F (149-154°C), also known as the hard-crack stage, essential for hard candy consistency.
- Add Flavor and Color: Remove the saucepan from heat and quickly stir in your choice of flavoring extract and food coloring if desired to infuse taste and appeal.
- Pour Mixture: Pour the hot candy mixture onto a lightly greased baking sheet or silicone mat, spreading it out evenly.
- Cool and Harden: Allow the candy to cool completely at room temperature until it has fully hardened into a brittle sheet.
- Break into Pieces: Once hardened, break the candy into small bite-sized pieces for serving.
- Dust with Powdered Sugar: Lightly dust the candy pieces with powdered sugar to prevent them from sticking together.
Notes
- Use a candy thermometer for precise temperature control to achieve perfect texture.
- If candy sticks to your hands when breaking, dust your hands or the candy with powdered sugar.
- Store candies in an airtight container to keep them from becoming sticky or absorbing moisture.
- You can customize flavoring extracts and colors to suit holidays or personal preferences.

