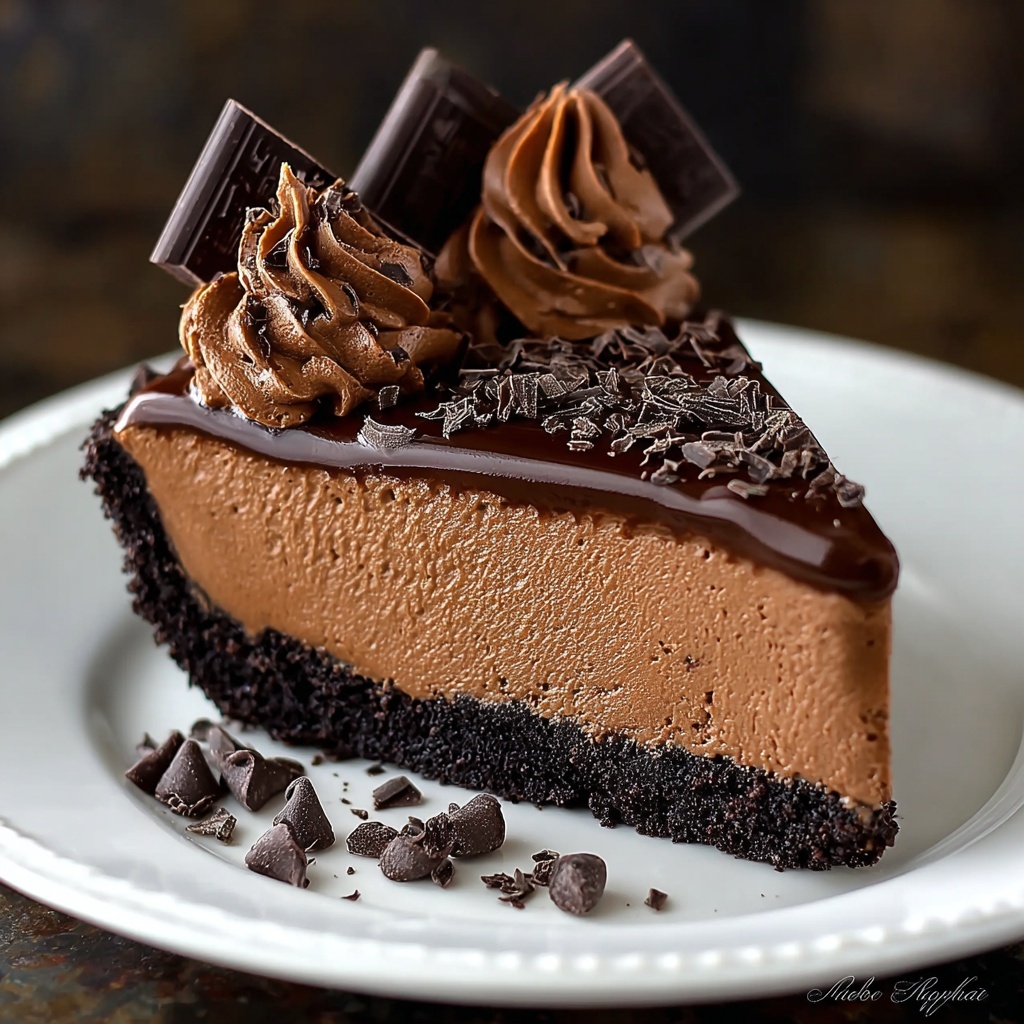
If you are a chocolate and coffee lover looking for a show-stopping dessert that’s surprisingly easy to make, this No-Bake Espresso Chocolate Cheesecake Recipe is exactly what you need in your life. It perfectly marries the rich bitterness of espresso with the deep, velvety smoothness of bittersweet chocolate, all resting on a crunchy Oreo crust infused with a hint of coffee flavor. The best part is that you don’t need to turn on your oven—this cheesecake sets beautifully in the fridge, delivering an indulgent, creamy texture with layers of chocolate and espresso that will have everyone asking for seconds.
Ingredients You’ll Need
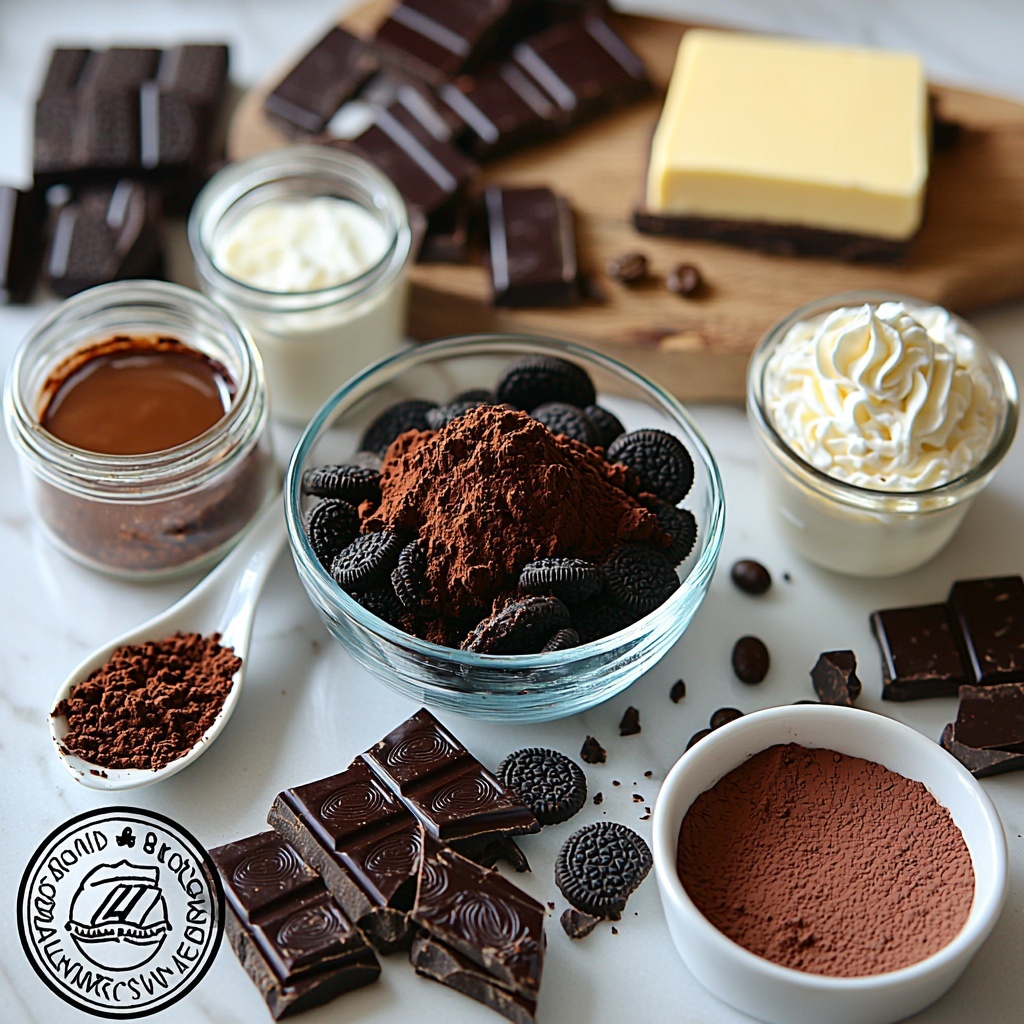
Every ingredient in this recipe plays a crucial role in building those layers of chocolatey, coffee-infused magic. From the crunchy Oreo base to the luscious cream cheese filling and silky ganache topping, this list keeps it simple yet essential for maximum flavor and texture.
- Oreo cookies (1 package, crushed into fine crumbs): Provides a sweet and crunchy crust that holds the cheesecake together with subtle chocolate notes.
- Unsalted butter (8 tablespoons, melted): Binds the Oreo crumbs to form a firm and buttery base.
- Espresso powder (½ teaspoon for crust): Enhances the chocolate flavor with a subtle coffee kick right from the crust.
- Bittersweet chocolate (14 ounces, coarsely chopped): Adds rich, deep chocolate flavor to the creamy filling.
- Espresso powder (1½ teaspoons for filling): Infuses the cheesecake with an aromatic espresso punch that balances the sweetness.
- Full-fat cream cheese (1½ pounds, at room temperature): The creamy base that makes this cheesecake luxuriously smooth.
- Granulated sugar (1 cup): Sweetens the filling perfectly without overpowering the chocolate and coffee.
- Light brown sugar (¼ cup, packed): Adds a hint of molasses flavor for depth and subtle caramel notes.
- Dutch-process cocoa powder (1 tablespoon): Boosts the chocolatey richness with smooth, mellow flavor.
- Vanilla extract (1½ teaspoons): Balances and rounds out the chocolate and espresso flavors.
- Heavy cream (1 cup at room temperature): Whipped and folded in to give the cheesecake a light, airy texture.
- Semi-sweet chocolate (1⅓ cups, finely chopped): The base for a luscious ganache topping that adds shine and extra chocolate goodness.
- Heavy cream (1¼ cups): Heated to melt the semi-sweet chocolate and form the ganache.
- Unsalted butter (¼ cup, cut into cubes at room temperature): Added to ganache for a smooth, glossy finish with richness.
- Espresso powder (1 teaspoon for ganache): Mixes into the ganache to echo the espresso flavor throughout the dessert.
- Espresso beans (optional, for garnish): Adds a fun, crunchy coffee-flavored accent on top.
- Chocolate shavings (optional, for garnish): Gives an elegant and textured finish to your cheesecake presentation.
How to Make No-Bake Espresso Chocolate Cheesecake Recipe
Step 1: Prepare the Crust
Start by combining your crushed Oreo cookies, melted butter, and ½ teaspoon of espresso powder in a mixing bowl. Stir everything together until all the crumbs are evenly moistened, which ensures your crust binds well. Press this mixture firmly into the bottom of a 9-inch springform pan, creating an even and compact base. This crust sets the stage for all the indulgent layers to come, so give it a good press. Set it aside while you work on the filling.
Step 2: Melt the Bittersweet Chocolate
Next, melt the 14 ounces of bittersweet chocolate. Whether you choose a double boiler or microwave, make sure to heat gently—if microwaving, use 30-second intervals while stirring in between to avoid burning. Allow the chocolate to cool slightly but stay fluid, as rushing this step can cause the filling to seize or become grainy.
Step 3: Beat the Cream Cheese
In a large mixing bowl, add your room temperature cream cheese alongside granulated sugar, light brown sugar, Dutch-process cocoa powder, and 1½ teaspoons of espresso powder. Using an electric mixer, beat the ingredients until creamy and smooth, giving you a perfectly sweet and coffee-kissed base for the cheesecake filling. Don’t forget to scrape down the sides to avoid any lumps lurking around.
Step 4: Incorporate the Melted Chocolate
Gradually add the slightly cooled bittersweet chocolate into the cream cheese mixture. This step is where everything starts to come together into a luxurious, velvety filling. Mix on medium speed until completely smooth. Follow with the addition of vanilla extract, beating until combined to round out the flavor with a touch of warmth.
Step 5: Whip the Heavy Cream
In a separate bowl, whip 1 cup of heavy cream until soft peaks form. This means when you lift the whisk, the cream should hold a peak that gently tips over. Folding this whipped cream into your chocolate-espresso filling is the secret to a light, airy cheesecake texture that melts on your tongue. Take care to fold gently so you keep all that lovely volume.
Step 6: Pour and Set
Pour your luscious filling over the chilled crust in the springform pan. Use a spatula to smooth the top for a beautiful finish. Refrigerate for at least 4 hours, but the magic really happens if you let it set overnight—this allows the flavors to meld and the texture to firm perfectly.
Step 7: Prepare the Ganache
While the cheesecake chills, make the rich ganache topping by combining finely chopped semi-sweet chocolate and 1 teaspoon of espresso powder in a bowl. Heat the heavy cream and butter in a saucepan until just boiling, then pour the hot cream mixture over the chocolate. Let it sit for a few minutes to soften the chocolate before stirring until glossy and smooth. This ganache adds an irresistible chocolate sheen and an additional espresso hit that ties the whole dessert together.
Step 8: Top the Cheesecake
Once your cheesecake has fully set, pour the ganache evenly over the top. Spread gently with a spatula to cover the surface. Return the cheesecake to the refrigerator for about an hour to let the ganache firm up beautifully.
Step 9: Serve and Garnish
When it’s time to impress your guests, carefully remove the springform sides. Add optional espresso beans and chocolate shavings for a decorative and tasty touch. Slice the cheesecake with a hot knife for clean cuts and enjoy a perfect bite of this dreamy No-Bake Espresso Chocolate Cheesecake Recipe.
How to Serve No-Bake Espresso Chocolate Cheesecake Recipe
Garnishes
Though the ganache topping is stunning on its own, garnishing with whole espresso beans adds a crunchy coffee kick and visual flair that highlights the espresso theme. Chocolate shavings bring texture and a bit of rustic charm, while a dusting of cocoa powder can evoke the look of a frothy mocha at a glance. Feel free to get creative with your garnishes to suit your style.
Side Dishes
This cheesecake pairs wonderfully with fresh berries like raspberries or cherries, whose tartness balances the richness of the chocolate and espresso. A dollop of lightly sweetened whipped cream also complements the dessert without overpowering the complex flavors. For an adult-friendly serving, a small glass of Irish cream liqueur or espresso alongside your slice will elevate the experience even further.
Creative Ways to Present
Consider serving the cheesecake in individual clear glasses or jars to showcase the elegant layers of crust, filling, and ganache. Adding edible gold leaf or a sprinkle of finely ground espresso powder on top can turn this into a dessert fit for a special celebration. You can even layer crushed Oreos between the filling and ganache for added texture surprises. The No-Bake Espresso Chocolate Cheesecake Recipe is versatile enough to let your creativity shine!
Make Ahead and Storage
Storing Leftovers
Leftover cheesecake should be tightly wrapped in plastic wrap or stored in an airtight container and kept in the refrigerator. It will stay fresh and delicious for up to 4 days, making it an excellent make-ahead dessert for gatherings or special occasions. Always slice with a warm knife for clean cuts and smoother serving after refrigeration.
Freezing
This cheesecake freezes beautifully. Wrap the entire cake or individual slices tightly in plastic wrap and then in aluminum foil to prevent freezer burn. Freeze for up to 1 month. To thaw, transfer it to the refrigerator overnight to preserve texture and flavor. Avoid microwaving frozen cheesecake, as it can ruin the creamy consistency.
Reheating
Since this is a no-bake chilled dessert, reheating is not recommended. Instead, allow frozen cheesecake slices to thaw gently in the refrigerator to enjoy the best creamy texture and flavor. Serve chilled or at cool room temperature for maximum enjoyment.
FAQs
Can I use regular coffee instead of espresso powder?
While regular coffee can add flavor, espresso powder delivers a more concentrated and pure coffee essence that really enhances the chocolate. If you substitute, use strong brewed coffee, but the flavor might be less intense and the texture of the crust might be affected slightly.
Is it necessary to use both bittersweet and semi-sweet chocolates?
Using both types balances out the sweetness and bitterness perfectly. Bittersweet chocolate offers depth in the filling, while semi-sweet chocolate in the ganache adds a shiny, smooth finish without being overly sweet. However, you can adjust based on your taste preference.
Can I make this cheesecake vegan or dairy-free?
This recipe relies heavily on cream cheese, butter, and cream for its creamy texture, so substitutions would require significant recipe changes. Vegan cream cheese and non-dairy cream could be experimented with, but the results may differ in texture and richness.
How long should I chill the cheesecake before serving?
At minimum, chill for 4 hours, but overnight chilling is ideal. This resting time allows the cheesecake to firm up and the flavors to meld for the best taste and texture.
Can I prepare this cheesecake ahead of time for a party?
Absolutely! In fact, this No-Bake Espresso Chocolate Cheesecake Recipe is perfect for preparing a day or two ahead. Just make sure to keep it refrigerated and add garnishes right before serving for the freshest presentation.
Final Thoughts
Creating this No-Bake Espresso Chocolate Cheesecake Recipe is an absolute joy, especially when you get to share each decadent bite with friends and family. The blend of bold espresso and rich chocolate creates a dessert that’s truly memorable yet effortless to assemble. So go ahead, give it a try—you might just find your new favorite dessert that’s equally impressive and easy to make!
Print
No-Bake Espresso Chocolate Cheesecake Recipe
- Prep Time: 45 minutes
- Cook Time: 0 minutes
- Total Time: 4 hours 45 minutes
- Yield: 8 servings
- Category: Dessert
- Method: No-Cook
- Cuisine: American
Description
This No-Bake Espresso Chocolate Cheesecake combines rich bittersweet and semi-sweet chocolates with a subtle espresso kick, layered on a crunchy Oreo crust. Perfectly creamy and indulgent, this dessert requires no oven baking and is set in the refrigerator, making it an elegant and effortless treat for chocolate and coffee lovers alike.
Ingredients
Crust
- 1 package Oreo cookies, crushed into fine crumbs
- 8 tablespoons unsalted butter, melted
- 1/2 teaspoon espresso powder (for the crust)
Filling
- 14 ounces bittersweet chocolate, coarsely chopped
- 1 1/2 teaspoons espresso powder (for the filling)
- 1 1/2 pounds full-fat cream cheese, at room temperature
- 1 cup granulated sugar
- 1/4 cup light brown sugar, packed
- 1 tablespoon Dutch-process cocoa powder
- 1 1/2 teaspoons vanilla extract
- 1 cup heavy cream, at room temperature
Ganache
- 1 1/3 cups semi-sweet chocolate, finely chopped
- 1 1/4 cups heavy cream
- 1/4 cup unsalted butter, at room temperature, cut into cubes
- 1 teaspoon espresso powder (for ganache)
Garnish (Optional)
- Espresso beans
- Chocolate shavings
Instructions
- Prepare the Crust: In a mixing bowl, combine the crushed Oreo cookies, melted butter, and ½ teaspoon of espresso powder. Stir until the crumbs are evenly moistened. Press this mixture firmly into the bottom of a 9-inch springform pan to create an even layer. Set aside while you prepare the filling.
- Melt the Bittersweet Chocolate: Using either a double boiler or a microwave, gently melt the 14 ounces of bittersweet chocolate. If using a microwave, heat in 30-second intervals, stirring in between until smooth. Allow to cool slightly once melted.
- Beat the Cream Cheese: In a large mixing bowl, add the room temperature cream cheese, granulated sugar, light brown sugar, Dutch-process cocoa powder, and 1 ½ teaspoons of espresso powder. Using an electric mixer, beat the mixture until smooth and creamy, scraping down the sides as needed.
- Incorporate the Melted Chocolate: Once the chocolate has cooled slightly, gradually add it to the cream cheese mixture. Mix until fully incorporated and smooth. Add the vanilla extract and beat until combined.
- Whip the Heavy Cream: In a separate bowl, pour in 1 cup of heavy cream. Beat with an electric mixer until soft peaks form. Gently fold the whipped cream into the chocolate cream cheese mixture, being careful not to deflate the whipped cream.
- Pour and Set: Pour the filling over the prepared crust in the springform pan. Smooth the top with a spatula and refrigerate for at least 4 hours, or overnight for best results.
- Prepare the Ganache: In a clean bowl, combine the finely chopped semi-sweet chocolate and 1 teaspoon of espresso powder. In a small saucepan, heat 1 1/4 cups of heavy cream and 1/4 cup of unsalted butter over medium heat until just boiling. Pour this hot mixture over the chopped chocolate and let it sit for a few minutes. Stir until the ganache is smooth and glossy.
- Top the Cheesecake: Once the cheesecake has set, pour the ganache over the top, spreading it evenly. Return the cheesecake to the refrigerator for an additional hour to allow the ganache to set.
- Serve and Garnish: When ready to serve, carefully remove the sides of the springform pan. Garnish with espresso beans and chocolate shavings, if desired. Slice and enjoy your No-Bake Espresso Chocolate Cheesecake!
Notes
- Ensure the cream cheese and heavy cream are at room temperature to facilitate smoother mixing and better texture.
- You can adjust the espresso powder amount to taste, depending on how strong you want the coffee flavor.
- For a firmer crust, chill the crust layer in the refrigerator for 15 minutes before adding the filling.
- Use high-quality chocolate for the best flavor and texture.
- This cheesecake needs at least 4 hours to set properly; overnight refrigeration yields the best results.
- The ganache can be made a day ahead and stored in the refrigerator; rewarm gently before spreading if it thickens too much.
- Optional garnishes add an elegant touch but can be omitted if desired.


