“`html
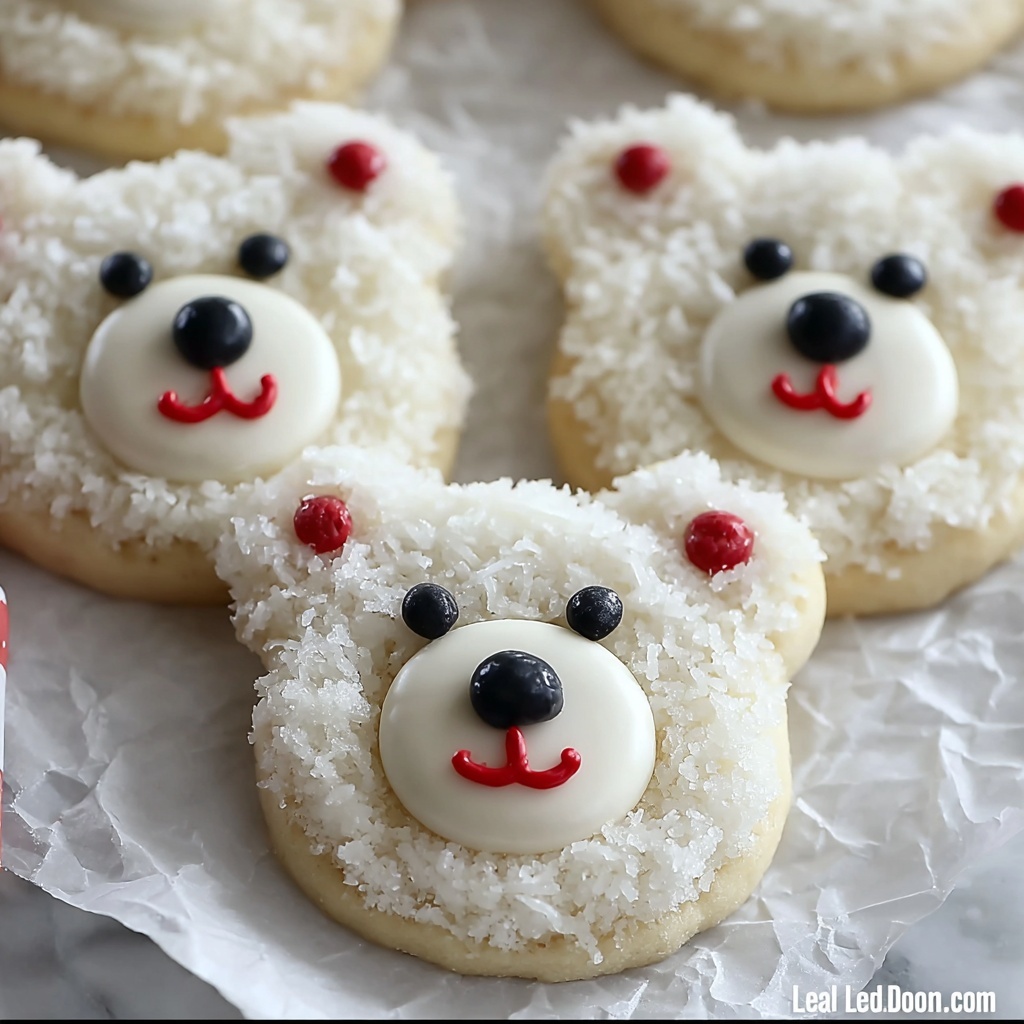
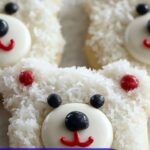
If you’re looking for a delightful, charming treat to brighten any occasion, you have to try this Polar Bear Cookies Recipe. These adorable, fluffy cookies crowned with sweet buttercream frosting and cute little bear features aren’t just a feast for the eyes—they’re packed with buttery, creamy goodness that melts in your mouth. Perfect for cookie swaps, holiday celebrations, or just an afternoon pick-me-up, this recipe combines classic flavors with whimsical fun, making baking feel like a joyful adventure every step of the way.

Ingredients You’ll Need
The magic behind these Polar Bear Cookies lies in a handful of well-balanced, everyday ingredients that come together to create a soft, tender cookie with a dreamy, smooth frosting. Each component plays its part, from the creamy butter and tangy cream cheese to the delicate almond extract and perfectly sweetened powdered sugar, giving you a cookie that’s both comforting and playful.
- 3/4 cup (170g) unsalted butter, room temperature: Provides richness and a tender crumb.
- 1/2 cup (113g) cream cheese, room temperature: Adds moisture and a slight tang that keeps the cookies soft.
- 1 cup (200g) granulated sugar: Sweetens the dough and helps achieve that lovely golden color.
- 1 large egg, room temperature: Binds the ingredients and adds structure.
- 1 teaspoon vanilla extract: Brings warmth and depth to the flavor.
- 1/2 teaspoon almond extract (optional): Offers a subtle nutty note that complements the vanilla perfectly.
- 3 cups (375g) all-purpose flour: The base that creates the cookie’s shape and texture.
- 2 teaspoons cornstarch: Lightens the dough, giving it a delicate softness.
- 1/2 teaspoon baking powder: Helps the cookies rise slightly without losing their sturdiness.
- 1/2 teaspoon salt: Balances the sweetness and enhances all flavors.
- 1/2 cup (113g) unsalted butter, room temperature (for frosting): Creamy base for the luscious buttercream.
- 2 cups (250g) powdered sugar: Sweetens and thickens the frosting perfectly.
- 1 teaspoon vanilla extract: Gives the frosting a lovely aromatic touch.
- 2 tablespoons heavy cream or milk: Adjusts the frosting consistency for that perfect spreadable texture.
- Pinch of salt: Balances the sweetness in the frosting.
- White sanding sugar or granulated sugar: Adds a little sparkle and crunch on frosting.
- Large chocolate chips (for noses): Makes the bears irresistibly cute with their chocolate noses.
- Black round sprinkles (for eyes): Bring those adorable bear eyes to life.
- Red or pink round sprinkles (for inner ears): Add a sweet pop of color and personality.
How to Make Polar Bear Cookies Recipe
Step 1: Prepare the Cookie Dough
Start by creaming together the butter, cream cheese, and granulated sugar until the mixture is light and fluffy. This process is key to achieving that tender, melt-in-your-mouth texture you’re after. Next, beat in the egg, vanilla extract, and almond extract if you’re using it, mixing everything until just combined. This gentle mixing keeps the dough soft and pliable.
Step 2: Combine the Dry Ingredients
In a separate bowl, whisk the all-purpose flour, cornstarch, baking powder, and salt. These dry elements add structure and lift to the cookies, making them sturdy enough to hold their shape but still wonderfully soft. Gradually add this mixture to the wet ingredients and stir just until everything comes together into a smooth dough.
Step 3: Chill the Dough
Divide the dough in half, flatten each half into discs, wrap in plastic wrap, and chill for at least 2 hours in the fridge. This resting period is crucial because it firms up the dough, making it easier to roll out and cut. If you’re in a hurry, you can freeze the dough discs for 30 minutes instead — both methods work perfectly to develop the flavor and texture.
Step 4: Roll and Cut the Cookies
Preheat your oven to 350°F (175°C) and line baking sheets with parchment paper. Roll out the chilled dough on a floured surface to about 1/3 inch thickness — just right for a tender bite with a bit of sturdiness. Use a 2 1/2-inch round cookie cutter to create the main “bear face” shapes. For the ears, cut smaller circles using a 3/4-inch cutter, and trim a flat edge on each to make attaching easier.
Step 5: Assemble the Bears
Attach the ear pieces to the top of each cookie face by pressing gently but firmly, ensuring they don’t fall off during baking. Once shaped, chill the cookies again in the fridge for 15 minutes — this helps them keep their cute shape in the oven.
Step 6: Bake the Cookies
Bake the cookies for 10-13 minutes, or until the edges are set but not browned. You want them slightly pale for that soft texture and perfect Polar Bear look. Cool the cookies on the baking sheet for about 15 minutes, then transfer them to a wire rack to cool completely before decorating.
Step 7: Prepare the Buttercream Frosting
Beat the butter until creamy and then gradually add powdered sugar, mixing on low speed to avoid a sugar cloud. Add vanilla, heavy cream (or milk), and a pinch of salt, then beat on medium-high until the frosting turns fluffy and spreadable. This frosting is dreamy-soft and just sweet enough for the perfect bear face finish.
Step 8: Decorate Your Polar Bear Cookies Recipe
Spread a thin layer of buttercream on each cooled cookie. For a sparkle effect, dip the frosted side lightly into white sanding sugar. Pipe an oval of frosting at the bottom center of the cookie for the muzzle, and top it with a large chocolate chip to create the nose. Use black round sprinkles above the muzzle for eyes, and add red or pink sprinkles inside the ears to complete the irresistible bear look. You’ll end up with cookies that are almost too cute to eat (but you’ll want to eat them right away!).
How to Serve Polar Bear Cookies Recipe
Garnishes
Polar Bear Cookies are delightful on their own, but you can amp up the presentation with a few garnish ideas. A light dusting of powdered sugar around the cookies creates a “snowy” effect that perfectly suits the bear theme. Fresh mint leaves nearby or small dollops of whipped cream can add visual contrast and appeal.
Side Dishes
These cookies pair beautifully with a warm drink. Serve them alongside a cup of hot cocoa, chai tea, or even a frothy latte to balance the sweetness. For parties or gatherings, a bowl of mixed berries on the side offers juicy bursts of freshness that complement the rich flavors.
Creative Ways to Present
Try arranging the cookies on a platter in a circle to mimic a family of polar bears — it makes a whimsical centerpiece. For kids’ parties, place them on a “polar ice cap” made of crushed ice or cotton candy for a playful setting. You can also package them individually in clear cello bags tied with a festive ribbon for sweet gifts that are as charming as they are delicious.
Make Ahead and Storage
Storing Leftovers
Leftover Polar Bear Cookies keep wonderfully in an airtight container at room temperature for 3-4 days. This timeframe ensures they stay soft and fresh without losing their flavor or frosting texture. Make sure they are completely cooled and the frosting has set before storing to avoid sticking.
Freezing
If you want to bake ahead, freeze the unbaked dough discs wrapped tightly in plastic wrap for up to 1 month. When ready to bake, thaw overnight in the fridge. For already baked and decorated cookies, store them in an airtight container with parchment paper between layers, then freeze for up to 1 month. Thaw at room temperature before serving for the best texture.
Reheating
Generally, these cookies are best enjoyed at room temperature, but if you prefer a warm cookie, pop one in the microwave for about 10 seconds. Be cautious not to overheat as the frosting can melt. This slight warmth enhances the buttercream’s softness and the cookie’s tender crumb beautifully.
FAQs
Can I skip the almond extract?
Absolutely! The almond extract is optional and adds a subtle nutty background note, but your Polar Bear Cookies will still be delicious and full of flavor without it.
What if I don’t have a cookie cutter the exact size?
No worries! You can use any round cookie cutter close to 2 1/2 inches or even a drinking glass rim for the bear faces. For ears, smaller circles from a piping tip or bottle cap work perfectly fine too.
Can I make these cookies gluten-free?
Yes, you can substitute the all-purpose flour with a gluten-free flour blend that measures cup-for-cup like regular flour. Just be sure it contains xanthan gum for structure, and watch the dough’s consistency during mixing.
How do I keep the ears attached during baking?
Pressing the ears lightly onto the cookie faces before chilling helps them stick, and chilling the assembled cookies in the fridge for 15 minutes before baking further solidifies the shape so ears won’t fall off in the oven.
What’s the best way to pipe the frosting muzzle?
Use a small piping bag with a plain round tip or simply a sandwich bag with the corner snipped. Pipe a small oval shape at the bottom center of the cookie face for the muzzle, then press the chocolate chip nose on top while the frosting is still soft.
Final Thoughts
Baking these Polar Bear Cookies Recipe is such a joy and truly brings out your inner kid with every adorable, frosting-topped bear face you create. The perfect balance of buttery, tender cookies with smooth, sweet frosting makes them a crowd-pleaser every single time. So grab your ingredients, roll up your sleeves, and get ready to share some smiles with these irresistible, cozy treats!
“`
Print
Polar Bear Cookies Recipe
- Prep Time: 20 minutes
- Cook Time: 13 minutes
- Total Time: 1 hour 20 minutes
- Yield: 30 servings
- Category: Dessert
- Method: Baking
- Cuisine: American
- Diet: Vegetarian
Description
Polar Bear Cookies are charming, fun-to-make sugar cookies featuring a soft cream cheese enriched dough and decorated with creamy buttercream and colorful sprinkles to resemble adorable polar bear faces. Perfect for winter gatherings or any festive occasion, these cookies combine a tender texture with delightful visual appeal.
Ingredients
For the Cookie Dough
- 3/4 cup (170g) unsalted butter, room temperature
- 1/2 cup (113g) cream cheese, room temperature
- 1 cup (200g) granulated sugar
- 1 large egg, room temperature
- 1 teaspoon vanilla extract
- 1/2 teaspoon almond extract (optional)
- 3 cups (375g) all-purpose flour
- 2 teaspoons cornstarch
- 1/2 teaspoon baking powder
- 1/2 teaspoon salt
For the Buttercream Frosting
- 1/2 cup (113g) unsalted butter, room temperature
- 2 cups (250g) powdered sugar
- 1 teaspoon vanilla extract
- 2 tablespoons heavy cream or milk
- Pinch of salt
For Decoration
- White sanding sugar or granulated sugar
- Large chocolate chips (for noses)
- Black round sprinkles (for eyes)
- Red or pink round sprinkles (for inner ears)
Instructions
- Prepare the Cookie Dough: Cream together unsalted butter, cream cheese, and granulated sugar until the mixture is light and fluffy, creating a smooth base for the dough.
- Add Flavorings and Egg: Incorporate the egg, vanilla extract, and optional almond extract, mixing thoroughly until everything is well combined.
- Mix Dry Ingredients: In a separate bowl, whisk together all-purpose flour, cornstarch, baking powder, and salt to ensure even distribution of leavening and seasoning.
- Combine Wet and Dry Ingredients: Gradually add the dry ingredients to the wet mixture, stirring until just combined to form a soft cookie dough.
- Chill the Dough: Divide the dough into portions, flatten each into a disc, wrap tightly in plastic wrap, and chill in the refrigerator for at least 2 hours or freeze for 30 minutes for easier handling.
- Preheat and Prepare Baking Sheets: Set your oven to 350°F (175°C) and line baking sheets with parchment paper to prevent sticking.
- Roll Out Dough: On a floured surface, roll the chilled dough to about 1/3 inch thick, preparing for cutting.
- Cut Bear Faces: Use a 2 1/2-inch round cookie cutter to cut out the main bear face shapes from the dough.
- Cut Bear Ears: Using a 3/4-inch round cutter, cut smaller circles for the ears and trim a flat edge to help them attach properly.
- Attach Ears to Faces: Position the ears on the top of each bear face cookie and gently press to adhere.
- Chill Before Baking: Place the assembled cookies back in the refrigerator for 15 minutes to help them maintain shape while baking.
- Bake Cookies: Bake in the preheated oven for 10-13 minutes until the edges are set but not browned to preserve their soft texture.
- Cool Cookies: Allow the cookies to cool on the baking sheet for 15 minutes before transferring them to a wire rack to cool completely.
- Prepare Buttercream Frosting: Beat unsalted butter until creamy, then gradually add powdered sugar on low speed until combined smoothly.
- Finish Frosting: Mix in vanilla extract, heavy cream or milk, and a pinch of salt. Beat on medium-high speed until the frosting is light and fluffy.
- Frost Cookies: Spread a thin layer of the buttercream frosting onto each cooled cookie evenly.
- Add Sugar Coating: Dip the frosted side of each cookie into white sanding sugar for a smooth, sparkling finish.
- Decorate Bear Faces: Pipe an oval of frosting near the bottom of the cookie face as a muzzle, place a large chocolate chip for the nose on top of it, add black round sprinkles above for the eyes, and use red or pink sprinkles to create inner ears for charming detail.
Notes
- Chilling the dough is essential to prevent spreading and to keep the cookies’ shape intact during baking.
- If almond extract is not desired or available, omit it without significantly affecting flavor.
- Use parchment paper or silicone baking mats to ensure easy release and even baking.
- For a dairy-free alternative, substitute butter and cream cheese with plant-based versions and use a suitable non-dairy milk for frosting.
- Decorative sprinkles can be customized based on availability and occasion.
