Description
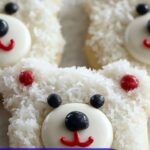
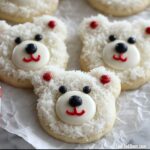
Polar Bear Cookies are charming, fun-to-make sugar cookies featuring a soft cream cheese enriched dough and decorated with creamy buttercream and colorful sprinkles to resemble adorable polar bear faces. Perfect for winter gatherings or any festive occasion, these cookies combine a tender texture with delightful visual appeal.
Ingredients
Scale
For the Cookie Dough
- 3/4 cup (170g) unsalted butter, room temperature
- 1/2 cup (113g) cream cheese, room temperature
- 1 cup (200g) granulated sugar
- 1 large egg, room temperature
- 1 teaspoon vanilla extract
- 1/2 teaspoon almond extract (optional)
- 3 cups (375g) all-purpose flour
- 2 teaspoons cornstarch
- 1/2 teaspoon baking powder
- 1/2 teaspoon salt
For the Buttercream Frosting
- 1/2 cup (113g) unsalted butter, room temperature
- 2 cups (250g) powdered sugar
- 1 teaspoon vanilla extract
- 2 tablespoons heavy cream or milk
- Pinch of salt
For Decoration
- White sanding sugar or granulated sugar
- Large chocolate chips (for noses)
- Black round sprinkles (for eyes)
- Red or pink round sprinkles (for inner ears)
Instructions
- Prepare the Cookie Dough: Cream together unsalted butter, cream cheese, and granulated sugar until the mixture is light and fluffy, creating a smooth base for the dough.
- Add Flavorings and Egg: Incorporate the egg, vanilla extract, and optional almond extract, mixing thoroughly until everything is well combined.
- Mix Dry Ingredients: In a separate bowl, whisk together all-purpose flour, cornstarch, baking powder, and salt to ensure even distribution of leavening and seasoning.
- Combine Wet and Dry Ingredients: Gradually add the dry ingredients to the wet mixture, stirring until just combined to form a soft cookie dough.
- Chill the Dough: Divide the dough into portions, flatten each into a disc, wrap tightly in plastic wrap, and chill in the refrigerator for at least 2 hours or freeze for 30 minutes for easier handling.
- Preheat and Prepare Baking Sheets: Set your oven to 350°F (175°C) and line baking sheets with parchment paper to prevent sticking.
- Roll Out Dough: On a floured surface, roll the chilled dough to about 1/3 inch thick, preparing for cutting.
- Cut Bear Faces: Use a 2 1/2-inch round cookie cutter to cut out the main bear face shapes from the dough.
- Cut Bear Ears: Using a 3/4-inch round cutter, cut smaller circles for the ears and trim a flat edge to help them attach properly.
- Attach Ears to Faces: Position the ears on the top of each bear face cookie and gently press to adhere.
- Chill Before Baking: Place the assembled cookies back in the refrigerator for 15 minutes to help them maintain shape while baking.
- Bake Cookies: Bake in the preheated oven for 10-13 minutes until the edges are set but not browned to preserve their soft texture.
- Cool Cookies: Allow the cookies to cool on the baking sheet for 15 minutes before transferring them to a wire rack to cool completely.
- Prepare Buttercream Frosting: Beat unsalted butter until creamy, then gradually add powdered sugar on low speed until combined smoothly.
- Finish Frosting: Mix in vanilla extract, heavy cream or milk, and a pinch of salt. Beat on medium-high speed until the frosting is light and fluffy.
- Frost Cookies: Spread a thin layer of the buttercream frosting onto each cooled cookie evenly.
- Add Sugar Coating: Dip the frosted side of each cookie into white sanding sugar for a smooth, sparkling finish.
- Decorate Bear Faces: Pipe an oval of frosting near the bottom of the cookie face as a muzzle, place a large chocolate chip for the nose on top of it, add black round sprinkles above for the eyes, and use red or pink sprinkles to create inner ears for charming detail.
Notes
- Chilling the dough is essential to prevent spreading and to keep the cookies’ shape intact during baking.
- If almond extract is not desired or available, omit it without significantly affecting flavor.
- Use parchment paper or silicone baking mats to ensure easy release and even baking.
- For a dairy-free alternative, substitute butter and cream cheese with plant-based versions and use a suitable non-dairy milk for frosting.
- Decorative sprinkles can be customized based on availability and occasion.