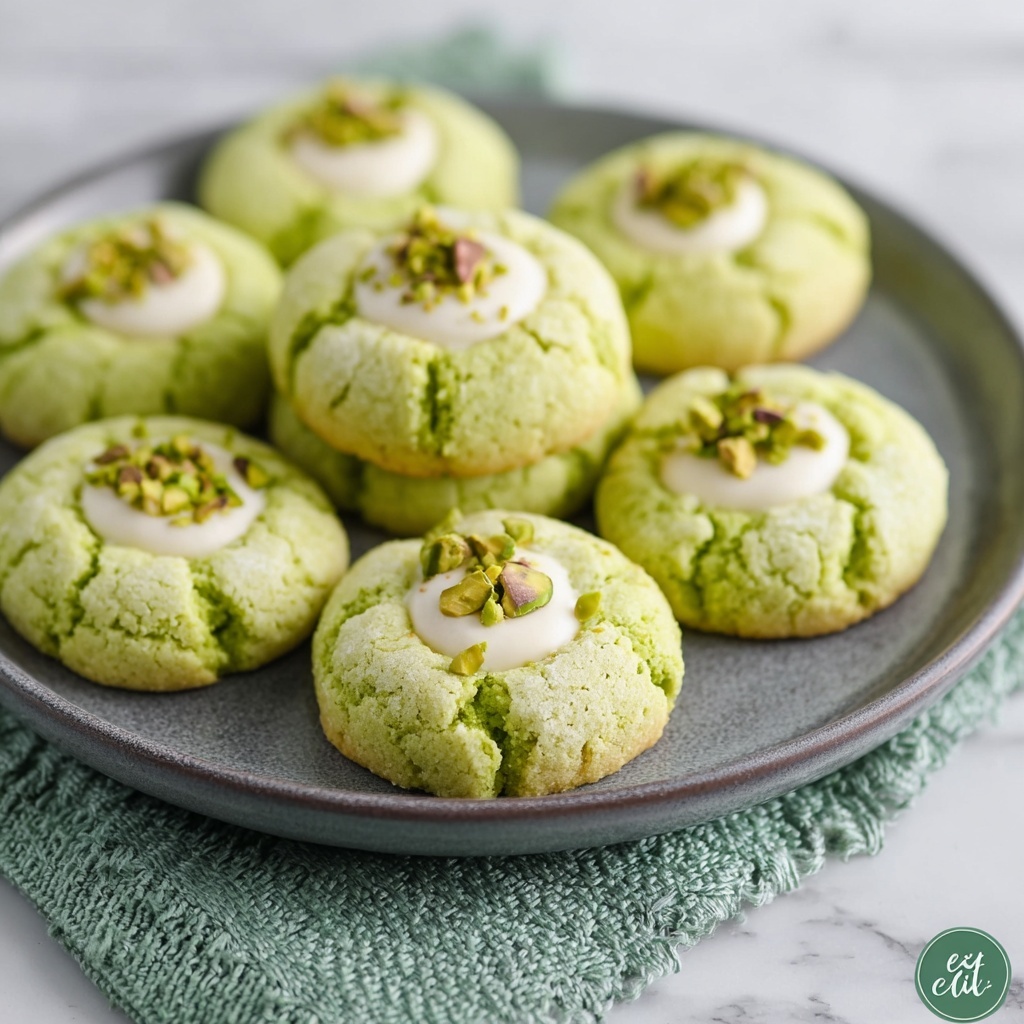
If you’re craving a cookie that’s bursting with flavor and bursting with charm, this White Chocolate-Orange-Pistachio Thumbprint Cookies Recipe is exactly what you need. These delightful cookies bring together the creamy sweetness of white chocolate, the bright, fresh zing of orange zest, and the lovely crunch of pistachios in each bite. Perfectly soft with a little nutty crunch and a luscious, melty center, these cookies feel like a cozy hug on a chilly day or an elegant treat when sharing with friends and family. Trust me, once you try this recipe, it’ll become one of your all-time favorites to bake and savor.
Ingredients You’ll Need
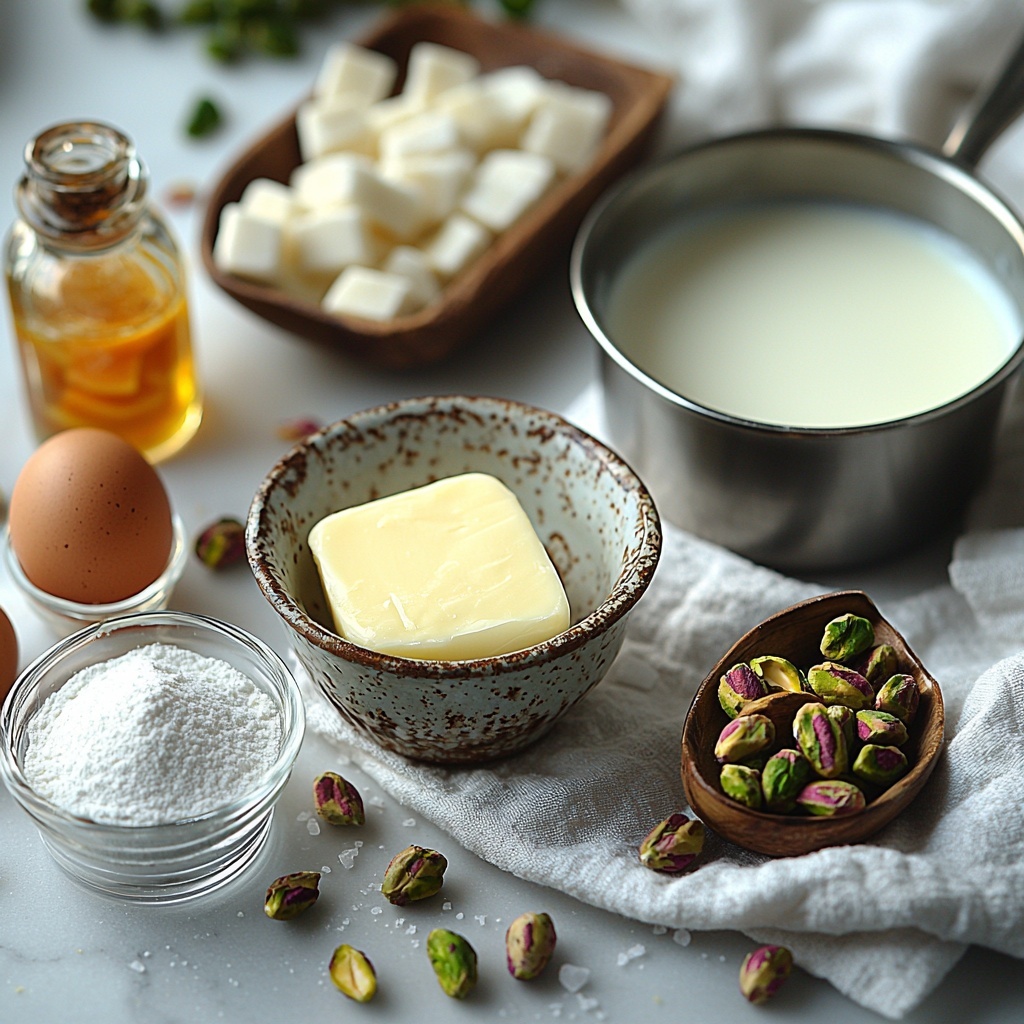
This recipe uses a handful of simple ingredients that each play a crucial role in turning ordinary cookie dough into something truly special. From the buttery base to the fresh zest and crunchy nuts, these ingredients create an irresistible balance of flavors and textures.
- 1 cup unsalted butter softened: The rich foundation that gives the cookies a tender, melt-in-your-mouth texture.
- 2/3 cup granulated sugar: Adds just the right amount of sweetness without overpowering.
- 1 large egg separated: The yolk enriches the dough while the white helps pistachios stick to the outside.
- 1 teaspoon vanilla extract: Enhances the overall flavor with a warm, aromatic note.
- 1 tablespoon fresh orange zest: Brings in a bright, citrusy zing that wakes up your taste buds.
- 2 cups all-purpose flour: Forms the sturdy structure of the cookie to hold all the goodies together.
- 1/4 teaspoon salt: Balances sweetness and highlights the orange and pistachio flavors.
- 1/2 cup finely chopped pistachios shelled: Adds a beautiful color contrast and that signature nutty crunch.
- 4 ounces white chocolate chopped: The luscious filling that melts in your mouth, perfectly complementing the orange zest.
- 2 tablespoons heavy cream: Used to smooth out the melted white chocolate filling for that glossy finish.
How to Make White Chocolate-Orange-Pistachio Thumbprint Cookies Recipe
Step 1: Prepare Your Workspace and Preheat the Oven
Start by heating your oven to 350 degrees Fahrenheit and lining two baking sheets with parchment paper. This ensures your cookies bake evenly and don’t stick, giving you perfectly shaped thumbprint cookies every time.
Step 2: Cream Butter and Sugar
In a large bowl, cream your softened butter and granulated sugar together until the mixture becomes light, fluffy, and pale. This step is key for creating a soft, tender cookie with just the right amount of sweetness and texture.
Step 3: Add Egg Yolk, Vanilla, and Orange Zest
Beat in the egg yolk (hold the egg white for later), vanilla extract, and that vibrant fresh orange zest. This blend is where the cookie gets its inviting aroma and cheerful citrus punch, so don’t skip the fresh zest for the best flavor.
Step 4: Mix Flour and Salt into Dough
Gradually incorporate the all-purpose flour and salt until your dough comes together into a soft, workable ball. The flour gives your cookies their structure, while the pinch of salt balances all the sweet, buttery flavors.
Step 5: Form Dough Balls and Coat in Pistachios
Roll the dough into 1-inch balls. Lightly whisk the reserved egg white in a small bowl—this will act as glue—then dip each ball in egg white and roll in finely chopped pistachios. This nutty coating adds a wonderfully crunchy texture and a pop of color.
Step 6: Create Thumbprints and Bake
Arrange your pistachio-coated dough balls on the baking sheets, then gently press a thumb or the back of a spoon into the center of each cookie to make a small well. Bake for 12 to 14 minutes until the edges are just turning golden, giving you a soft cookie body and a sturdy center to hold the filling.
Step 7: Prepare the White Chocolate Filling
While the cookies are cooling briefly, gently heat the chopped white chocolate and heavy cream together. Stir until smooth and glossy, creating a luscious filling that perfectly complements the tangy orange and nutty pistachios.
Step 8: Fill the Thumbprints and Let Set
Carefully spoon the melted white chocolate into each thumbprint well. Allow the cookies to cool completely so the filling sets into a delightful, creamy center that doesn’t spill over while adding that gorgeous white chocolate spark.
How to Serve White Chocolate-Orange-Pistachio Thumbprint Cookies Recipe
Garnishes
If you want to take these cookies from lovely to absolutely stunning, sprinkle a few whole pistachios or a light dusting of powdered sugar over the cooled cookies. Edible orange zest curls or candied orange peel add a fresh, decorative touch that makes presentation pop.
Side Dishes
These cookies shine alongside a cup of hot tea, fresh coffee, or even a glass of cold milk. For a special brunch or dessert platter, offer alongside fresh orange slices or a small bowl of pistachios to echo the flavors inside the cookies.
Creative Ways to Present
Arrange them on a rustic wooden board with fresh flowers for gifting, or package in clear cellophane bags tied with orange ribbon for festive parties. Serving these cookies nestled in colorful napkins on a dessert tray always draws compliments and a second helping request.
Make Ahead and Storage
Storing Leftovers
To keep these cookies fresh and delicious, store them in an airtight container at room temperature for up to three days. The white chocolate filling holds up nicely, and the pistachios retain their crunch, so they taste freshly baked even after a couple of days.
Freezing
If you want to enjoy these delightful cookies later, freeze them before adding the white chocolate filling. Wrap the dough balls well in plastic wrap and then place in a freezer bag. When ready to bake, thaw, form the thumbprints, bake, cool, and add the filling as usual.
Reheating
When you’re ready for a treat, warm a cookie gently in the microwave for about 10 seconds to soften the white chocolate center slightly. This makes the filling decadently melty again while warming the soft cookie dough without drying it out.
FAQs
Can I substitute almonds or pecans for pistachios?
Absolutely! While pistachios offer a unique flavor and color, you can swap in almonds, pecans, or even walnuts depending on your preference or what you have on hand. Just chop them finely for the best coating.
Is it necessary to separate the egg for this recipe?
Separating the egg is important here because the yolk enriches the cookie dough, making it tender and flavorful, while the egg white acts as a sticky surface so the pistachios adhere better on the outside.
Can I use store-bought white chocolate chips instead of chopped bars?
Yes, white chocolate chips work fine! Just be sure to melt them gently with the heavy cream to avoid burning, and stir until smooth before spooning into the thumbprints.
How long will these cookies keep their freshness?
Stored in an airtight container at room temperature, these cookies stay fresh for up to three days. Beyond that, the texture of the pistachios and the smoothness of the filling may begin to degrade.
Are these cookies suitable for vegetarians?
Yes! This White Chocolate-Orange-Pistachio Thumbprint Cookies Recipe is entirely vegetarian-friendly, making it a fantastic choice for a wide range of dietary preferences.
Final Thoughts
There’s something truly special about the combination of white chocolate, citrusy orange zest, and crunchy pistachios in this White Chocolate-Orange-Pistachio Thumbprint Cookies Recipe. These cookies are as joyful to make as they are to eat, perfect for cozy afternoons, festive gatherings, or whenever you want to treat yourself. I can’t wait for you to try them and enjoy every delicious, melt-in-your-mouth bite!
Print
White Chocolate-Orange-Pistachio Thumbprint Cookies Recipe
- Prep Time: 20 minutes
- Cook Time: 14 minutes
- Total Time: 34 minutes
- Yield: 24 cookies
- Category: Dessert
- Method: Baking
- Cuisine: American
- Diet: Vegetarian
Description
Delight in these White Chocolate-Orange-Pistachio Thumbprint Cookies, a perfect blend of zesty orange, crunchy pistachios, and creamy white chocolate nestled in buttery soft cookies. Ideal for holiday celebrations or any time you crave a sweet, nutty treat.
Ingredients
Cookie Dough Ingredients
- 1 cup unsalted butter, softened
- 2/3 cup granulated sugar
- 1 large egg, separated
- 1 teaspoon vanilla extract
- 1 tablespoon fresh orange zest
- 2 cups all-purpose flour
- 1/4 teaspoon salt
- 1/2 cup finely chopped pistachios, shelled
Filling Ingredients
- 4 ounces white chocolate, chopped
- 2 tablespoons heavy cream
Instructions
- Preheat oven and prepare baking sheets: Set your oven to 350°F (175°C) and line two baking sheets with parchment paper to prevent sticking and ensure even baking.
- Cream butter and sugar: In a large bowl, beat the softened butter and granulated sugar together until the mixture becomes light and fluffy, creating a smooth base for your cookies.
- Add egg yolk, vanilla, and zest: Incorporate the egg yolk, vanilla extract, and fresh orange zest into the creamed butter mixture, mixing well to combine aromatic flavors evenly.
- Mix flour and salt: Gradually add the all-purpose flour and salt to the wet mixture, stirring until a soft and workable dough forms without overmixing.
- Shape and coat cookies: Roll the dough into 1-inch balls. Lightly beat the egg white in a small bowl, dip each dough ball into the egg white, then roll them in the finely chopped pistachios to evenly coat each cookie ball.
- Form indentations: Place the coated dough balls onto the prepared baking sheets. Use your thumb or the back of a spoon to gently press an indentation into the center of each cookie ball, creating a perfect thumbprint.
- Bake: Bake the cookies in the preheated oven for 12 to 14 minutes, or until the edges turn lightly golden. Remove from the oven and let them cool slightly on the baking sheets.
- Prepare white chocolate filling: While cookies cool, gently heat the chopped white chocolate and heavy cream together, stirring continuously until the mixture is smooth and glossy.
- Fill cookies: Spoon the melted white chocolate mixture into the thumbprint centers of each cookie while still warm, filling the indentations generously.
- Cool and set: Allow the cookies to cool completely at room temperature so the white chocolate filling firms up into a delicious, creamy center.
Notes
- If the cookie centers puff up during baking, gently press them down again while still warm to maintain the indentation for filling.
- Store these cookies in an airtight container at room temperature for up to three days to keep them fresh.
- For an extra burst of citrus flavor, you can add a teaspoon of orange juice to the dough.
- Make sure the white chocolate mixture is smooth to avoid lumps in the filling.


