
“`html
If you are a fan of rich, creamy, and delightfully nutty desserts, then the Peanut Butter Cookie Pie: 5 Steps to Pure Bliss Recipe is about to become your new obsession. This luscious pie combines the comforting warmth of peanut butter with a crispy cookie crust, creating an irresistible harmony of textures and flavors that’s perfect for sharing—or savoring all by yourself. With just a handful of simple ingredients and straightforward steps, you’ll be amazed at how effortlessly you can bring pure bliss to your dessert table.
Ingredients You’ll Need
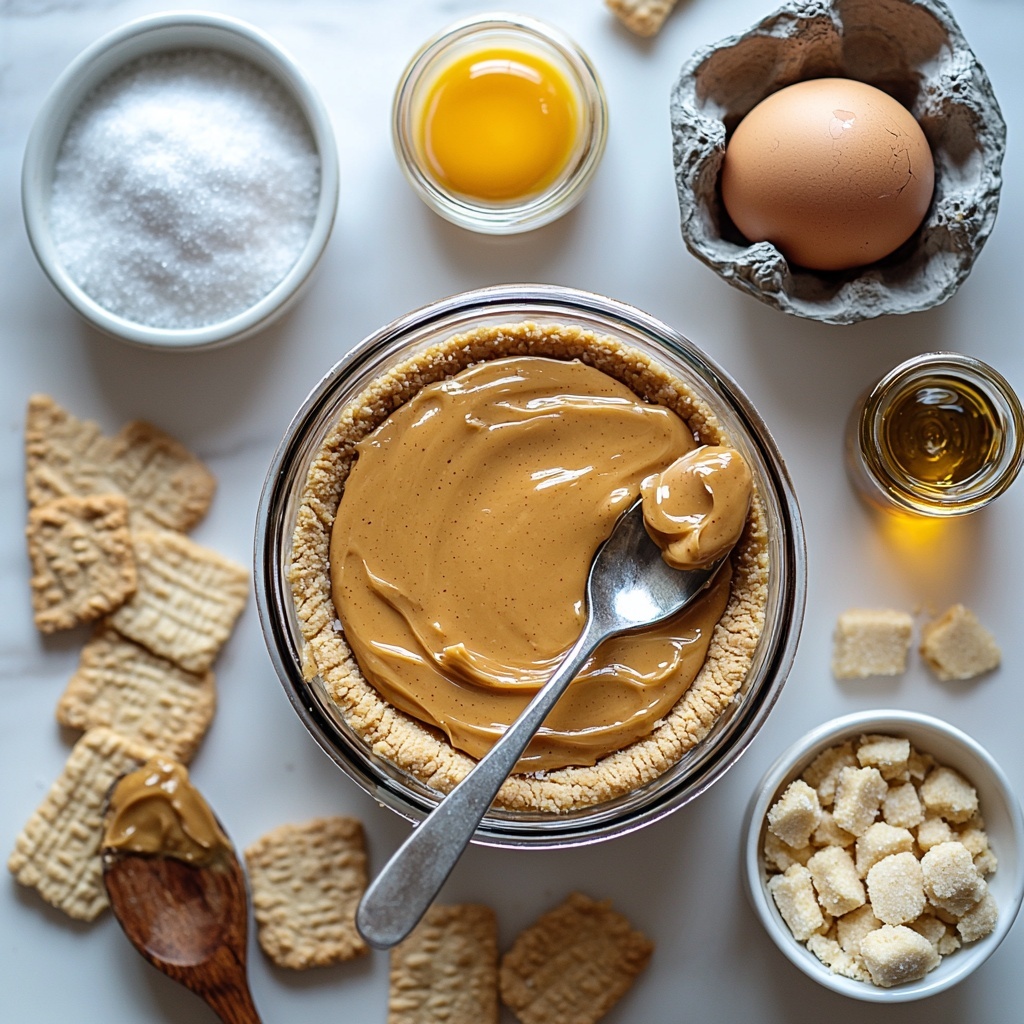
The magic of this Peanut Butter Cookie Pie comes from its simple yet essential ingredients that each play a starring role in both taste and texture. These basics come together to form a creamy filling balanced by a buttery, crunchy crust that’s out of this world.
- 1 cup peanut butter: The heart and soul of the pie, bringing creamy, nutty richness that defines the flavor.
- 1 cup sugar: Perfectly sweetens the filling, balancing the natural saltiness of the peanut butter.
- 1 egg: Acts as the binder, giving the pie its smooth and set texture after baking.
- 1 teaspoon vanilla extract: Adds a warm, aromatic depth to elevate the overall taste.
- 1 cup crushed cookies: Forms the crunchy base, adding contrast and a bit of extra sweetness.
- 1/2 cup butter, melted: Binds the cookie crumbs together while adding richness and a tender crumb to the crust.
How to Make Peanut Butter Cookie Pie: 5 Steps to Pure Bliss Recipe
Step 1: Preheat Your Oven
Start by setting your oven to 350°F (175°C). This ensures it’s at the perfect temperature to bake your pie evenly, allowing the filling to set just right while the crust crisps up beautifully.
Step 2: Mix the Peanut Butter Filling
In a mixing bowl, combine the peanut butter, sugar, egg, and vanilla extract until smooth and creamy. This mixture forms the rich and silky center of your pie, so take a moment to really blend it well for the best texture.
Step 3: Prepare the Cookie Crust
In a separate bowl, stir together the crushed cookies and melted butter. The butter brings everything together, turning the crumbs into a firm, flavorful crust that will hold your pie filling perfectly.
Step 4: Press the Crust into the Pan
Firmly press the cookie mixture into the bottom of your pie pan, creating an even layer. This step is key for a sturdy base that offers delightful crunch with every bite matching the creamy filling.
Step 5: Pour and Bake
Pour the peanut butter filling over the cookie crust and spread it out evenly. Bake for 25 to 30 minutes, or until the pie is set and slightly golden around the edges. Once out of the oven, let it cool completely before slicing and serving.
How to Serve Peanut Butter Cookie Pie: 5 Steps to Pure Bliss Recipe
Garnishes
Enhance your Peanut Butter Cookie Pie with a handful of chopped peanuts for extra crunch or a drizzle of melted chocolate to add a touch of decadence. A dollop of whipped cream or a scoop of vanilla ice cream also complements the richness wonderfully.
Side Dishes
This pie pairs well with fresh berries or a tangy fruit compote that cuts through the richness and brightens every mouthful. A hot cup of coffee or creamy milk is also the perfect beverage to enjoy alongside this velvety dessert.
Creative Ways to Present
For parties, serve the pie in individual mini tart pans or as small squares topped with a sprinkle of sea salt. You can even layer the peanut butter mixture and cookie crumbs in a trifle bowl for a visually stunning twist on the classic.
Make Ahead and Storage
Storing Leftovers
Your Peanut Butter Cookie Pie will keep beautifully covered in the refrigerator for 3 to 4 days. This resting time actually lets the flavors meld even more, making each slice taste just as phenomenal as the first.
Freezing
If you want to enjoy it later, wrap the pie tightly or cover individual slices in plastic wrap and foil, then freeze for up to 1 month. Thaw overnight in the fridge for a perfect texture.
Reheating
Reheat slices gently in the microwave for about 15-20 seconds to bring back that freshly baked warmth without compromising texture, or enjoy it chilled for a firmer bite.
FAQs
Can I use crunchy peanut butter instead of smooth?
Absolutely! Crunchy peanut butter adds a delightful texture to the filling, making each bite even more interesting. Just keep in mind it may slightly alter the smoothness but will boost flavor.
What type of cookies work best for the crust?
Simple sandwich cookies, graham crackers, or even digestive biscuits all work wonderfully. Choose cookies with a mild flavor so they complement, not overpower, the peanut butter filling.
Is it necessary to bake the pie?
Baking helps the filling set firmly and develops a lovely depth of flavor. Without baking, the pie might be too soft and won’t slice as cleanly, so it’s highly recommended.
Can I make this pie gluten-free?
Yes! Just swap out the crushed cookies for gluten-free alternatives, and make sure your peanut butter and other ingredients don’t contain gluten. The rest of the process remains the same.
How do I prevent the crust from getting soggy?
Be sure to press the cookie and butter mixture firmly and bake immediately after assembling. This pre-baking of the crust helps it stay crisp under the filling.
Final Thoughts
If you’re searching for a dessert that feels like a warm, peanut buttery hug, the Peanut Butter Cookie Pie: 5 Steps to Pure Bliss Recipe is your answer. Its simplicity, combined with such stunning flavor and texture contrasts, makes it a surefire crowd-pleaser. Trust me, once you make it, you’ll keep coming back to this cozy, delicious pie again and again. So go ahead—grab those ingredients and whip up some bliss in your kitchen today!
“`
Print
Peanut Butter Cookie Pie: 5 Steps to Pure Bliss Recipe
- Prep Time: 15 minutes
- Cook Time: 30 minutes
- Total Time: 45 minutes
- Yield: 8 servings
- Category: Dessert
- Method: Baking
- Cuisine: American
Description
This Peanut Butter Cookie Pie is a delightful dessert combining a crunchy cookie crust with a creamy, rich peanut butter filling. Perfect for peanut butter lovers, this easy-to-make pie offers a luscious balance of sweetness and texture, baked to golden perfection in under an hour.
Ingredients
Peanut Butter Filling
- 1 cup peanut butter
- 1 cup sugar
- 1 egg
- 1 teaspoon vanilla extract
Cookie Crust
- 1 cup crushed cookies
- 1/2 cup butter, melted
Instructions
- Preheat oven: Preheat your oven to 350°F (175°C) to ensure even baking of the pie.
- Mix peanut butter filling: In a medium bowl, combine 1 cup of peanut butter, 1 cup of sugar, 1 egg, and 1 teaspoon of vanilla extract. Stir thoroughly until the mixture is smooth and well blended.
- Prepare cookie crust: In another bowl, mix together 1 cup of crushed cookies and 1/2 cup of melted butter until the crumbs are evenly coated and hold together when pressed.
- Form the crust: Press the cookie mixture firmly into the bottom of a pie pan, creating an even layer that will serve as the crust.
- Assemble pie: Pour the peanut butter filling over the cookie crust ensuring an even spread across the surface.
- Bake: Place the pie in the preheated oven and bake for 25-30 minutes, or until the filling is set and edges are lightly golden.
- Cool and serve: Remove the pie from the oven and allow it to cool completely before slicing and serving to enhance the texture and flavor.
Notes
- Make sure to use fully cooled melted butter to avoid making the crust soggy.
- For a gluten-free version, use gluten-free cookies for the crust.
- Do not overbake to keep the filling creamy and soft.
- The pie can be refrigerated for up to 3 days to maintain freshness.
- Serve with a dollop of whipped cream or a drizzle of chocolate sauce for extra indulgence.


