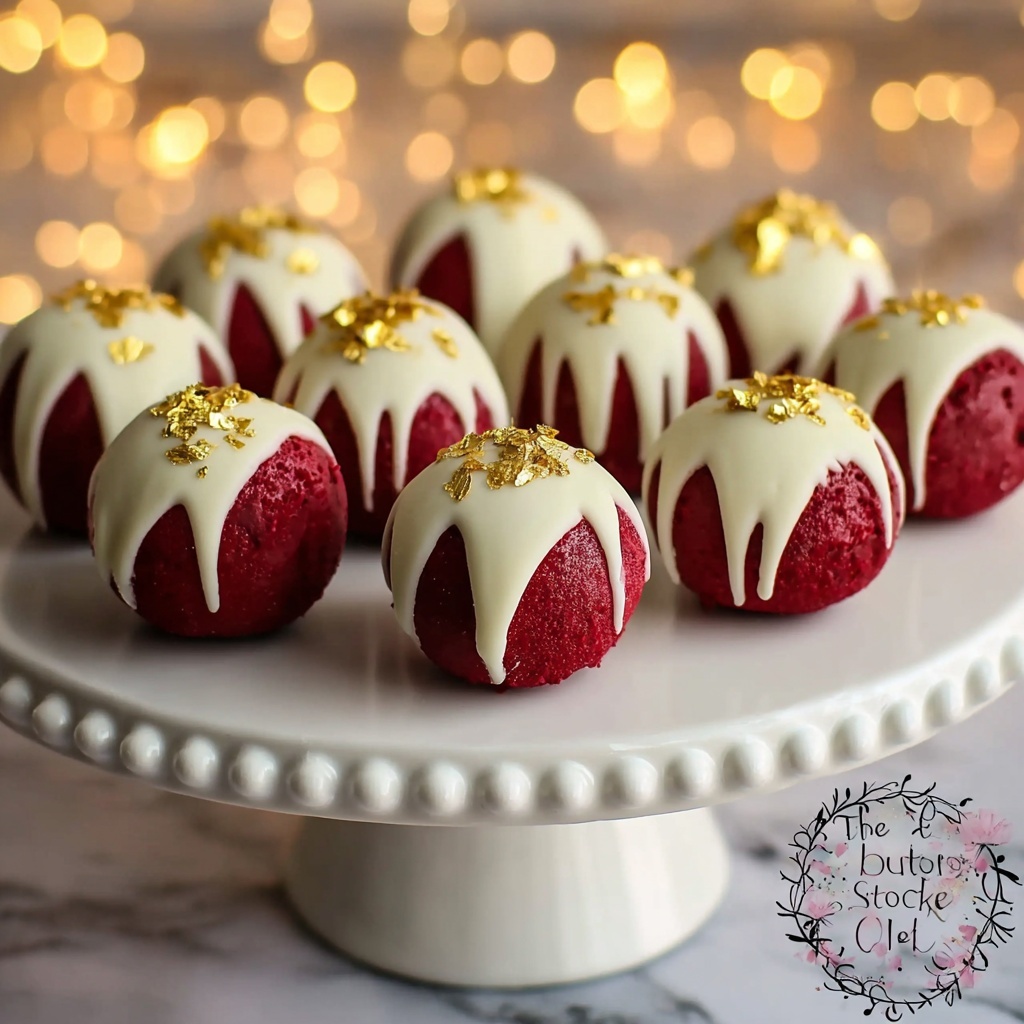
If you have a sweet tooth and are craving a bite-sized treat that bursts with rich flavor and velvety texture, you’re going to adore this Red Velvet Cake Balls Recipe. These little gems capture all the classic charm of red velvet cake but in a fun, poppable form that’s perfect for parties, gifts, or a cozy night in. With a luscious cream cheese center wrapped in tender cake and coated in smooth white chocolate, each bite feels like a little celebration. Get ready to fall in love with every bite!
Ingredients You’ll Need
The magic of this Red Velvet Cake Balls Recipe comes from using simple, everyday ingredients that work together beautifully. Each one plays a crucial role in delivering the perfect balance of color, richness, and sweetness in these delightful cake balls.
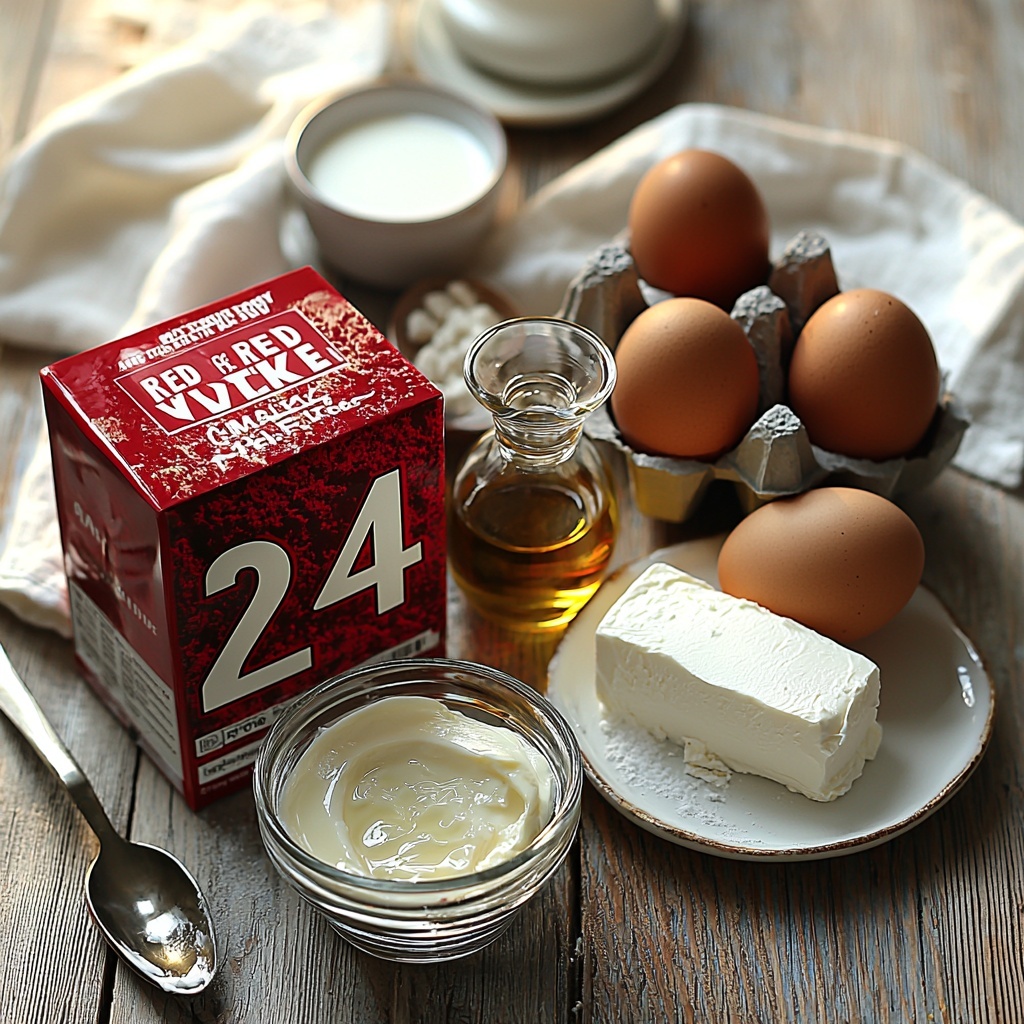
- 1 box red velvet cake mix: The base of our cake balls, providing that iconic red color and subtle cocoa flavor.
- 1 cup buttermilk: Adds tang and moisture that keeps the cake tender and flavorful.
- 1/2 cup vegetable oil: Ensures the cake stays moist and soft, helping with the perfect crumb.
- 3 large eggs: Bind everything together and contribute to the cake’s structure.
- 1 teaspoon vanilla extract: Boosts the overall flavor, adding warmth and depth.
- 8 oz cream cheese, softened: Gives that luscious, creamy taste which complements the red velvet perfectly.
- 1 teaspoon vanilla extract: Mixed into the cream cheese for extra aromatic richness.
- 1 cup powdered sugar: Sweetens and firms up the cream cheese mixture for easy shaping.
- 12 oz white chocolate, melted: The final coating that adds sweetness and a smooth, glossy finish.
How to Make Red Velvet Cake Balls Recipe
Step 1: Bake Your Red Velvet Cake
Start by preheating your oven to 350°F (175°C). Prepare the cake mix just as the box instructs, but remember to add the buttermilk, vegetable oil, eggs, and vanilla extract. These ingredients make the cake moist and flavorful, enhancing that classic red velvet charm. Bake the cake as directed, then let it cool completely. Patience here is key—cool cake is easier to crumble and won’t make your mixture too sticky.
Step 2: Create the Cream Cheese Filling
While the cake cools, get your cream cheese filling ready. In a separate bowl, mix the softened cream cheese, vanilla extract, and powdered sugar until the mixture is silky smooth and lump-free. This creamy delight will bind your cake crumbs together and add the signature tangy sweetness for the perfect contrast.
Step 3: Combine and Form the Cake Balls
Once your cake is cooled, crumble it finely into a large bowl. Pour in the cream cheese mixture and gently combine until everything holds together nicely but isn’t overly wet. Now for the fun part—shape the mixture into small, uniform balls and place them on a baking sheet. Try to make them about one-inch in diameter for bite-sized perfection.
Step 4: Chill Before Coating
Place your cake balls in the refrigerator and chill for at least one hour. This helps them firm up and makes coating them in chocolate a breeze. Trust me, this step makes all the difference!
Step 5: Dip in White Chocolate
After chilling, dip each cake ball into the melted white chocolate, ensuring they are fully coated. Lay them on parchment paper to set. The sweet, creamy white chocolate shell provides a lovely contrast in both texture and flavor to the rich, moist cake inside. Let these rest until the coating hardens completely before diving in.
How to Serve Red Velvet Cake Balls Recipe
Garnishes
Want to add a little extra flair? Sprinkle your chocolate-dipped cake balls with festive toppings like red sugar crystals, crushed peppermint, or mini white chocolate chips. These garnishes not only add color but also invite some delightful subtle crunches that make every bite more exciting.
Side Dishes
Red Velvet Cake Balls are sweet enough to stand on their own but pair wonderfully with light accompaniments like a cold glass of milk, a cup of coffee, or even a fresh fruit salad to balance the richness. They also make an excellent surprise treat alongside a scoop of vanilla ice cream for an indulgent twist.
Creative Ways to Present
These bite-sized beauties are perfect for party platters! Arrange them on tiered trays, stick them on decorative skewers for cake pops, or package them in pretty boxes with tissue paper to gift loved ones. Their vibrant color and shiny white chocolate shell make an eye-catching addition wherever they are showcased.
Make Ahead and Storage
Storing Leftovers
If you happen to have leftovers from your Red Velvet Cake Balls Recipe, store them in an airtight container in the refrigerator. They will stay fresh and delicious for up to 3-4 days, giving you plenty of chances to enjoy them without losing that wonderful texture.
Freezing
Want to make a batch ahead of time? No problem! Freeze uncoated or chocolate-coated cake balls in a single layer on a baking sheet, then transfer them to a freezer-safe container. They’ll keep beautifully for up to one month. Just thaw in the fridge before serving to maintain their perfect consistency.
Reheating
Since these cake balls are best enjoyed chilled or at room temperature, reheating isn’t usually necessary. However, if you prefer them slightly warmer, let them sit out for about 15-20 minutes before eating. Avoid microwaving as this can cause the white chocolate coating to melt unevenly.
FAQs
Can I use homemade red velvet cake instead of a box mix for this recipe?
Absolutely! Homemade red velvet cake works wonderfully and allows you to customize your flavor and ingredients. Just make sure you crumble the cake once cooled and follow the same mixing and chilling steps.
Is it possible to use a different coating instead of white chocolate?
Yes! While white chocolate adds a lovely sweetness and color contrast, you can definitely experiment with milk chocolate, dark chocolate, or even colored candy melts depending on your preference or occasion.
How big should I make the cake balls?
About one-inch diameter works perfectly for bite-sized indulgence. Making them uniform helps with even chilling and coating, plus they’re easier to enjoy in just a couple of bites.
Can I skip the chilling step?
Chilling is crucial because it firms up the cake balls, making them easier to dip and preventing the chocolate from melting too quickly. Skipping this step may make coating messy and tricky.
How long do Red Velvet Cake Balls last once coated?
Once coated and stored properly in the refrigerator, these treats stay fresh for 3-4 days. Beyond that, the texture may start to change, so it’s best to enjoy them within this timeframe.
Final Thoughts
There’s something truly special about Red Velvet Cake Balls Recipe that turns a beloved classic cake into a fun, shareable delight. Whether you’re making them for a party, a gift, or just because, these cake balls never fail to impress and bring smiles. Give this recipe a try—you’ll have a hard time resisting the temptation to make them over and over again!
Print
Red Velvet Cake Balls Recipe
- Prep Time: 20 minutes
- Cook Time: 30 minutes
- Total Time: 1 hour 20 minutes
- Yield: 24 servings
- Category: Dessert
- Method: Baking
- Cuisine: American
Description
These Red Velvet Cake Balls are a delightful treat combining moist red velvet cake with a creamy cream cheese filling, all coated in a smooth white chocolate shell. Perfect for parties and special occasions, these bite-sized desserts offer a rich and flavorful indulgence that’s easy to make and irresistible to eat.
Ingredients
Cake
- 1 box red velvet cake mix
- 1 cup buttermilk
- 1/2 cup vegetable oil
- 3 large eggs
- 1 teaspoon vanilla extract
Cream Cheese Mixture
- 8 oz cream cheese, softened
- 1 teaspoon vanilla extract
- 1 cup powdered sugar
Coating
- 12 oz white chocolate, melted
Instructions
- Preheat Oven: Preheat your oven to 350°F (175°C) to prepare for baking the red velvet cake.
- Mix Cake Batter: Prepare the cake mix according to package directions, combining the buttermilk, vegetable oil, eggs, and vanilla extract to make a smooth batter.
- Bake Cake: Bake the cake as instructed on the package, then allow it to cool completely to ensure it crumbles properly.
- Crumble Cake: Once cooled, break the cake into crumbs inside a large mixing bowl, ready to be combined with the cream cheese mixture.
- Prepare Cream Cheese Mixture: In a separate bowl, beat the softened cream cheese, vanilla extract, and powdered sugar together until smooth and creamy.
- Combine Mixtures: Add the cream cheese mixture to the crumbled cake and mix thoroughly until well combined and able to hold shape.
- Form Balls: Shape the mixture into small, bite-sized balls and arrange them on a baking sheet lined with parchment paper.
- Chill: Refrigerate the cake balls for at least 1 hour to firm up, making them easier to coat with chocolate.
- Coat in Chocolate: Dip each chilled cake ball into the melted white chocolate ensuring full coverage, then place them back on parchment paper to set.
- Set Chocolate: Allow the white chocolate coating to harden completely before serving to enjoy the perfect texture contrast.
Notes
- Ensure the cream cheese is fully softened for easier mixing and smooth texture.
- Use parchment paper to prevent sticking when setting the chocolate-coated cake balls.
- Customize the coating by using milk or dark chocolate instead of white chocolate if preferred.
- Store cake balls in an airtight container in the refrigerator to maintain freshness for up to 5 days.
- For firmer cake balls, chill longer before dipping in chocolate.
